
Things don’t always go as planned, in needle-work and art as well as in life. I can’t absolutely assert that resilience and resourcefulness in fixing fiber art problems translates to resilience and resourcefulness in fixing life problems, but I can confidently state that fixing fiber art problems makes you better and more creative at fixing fiber art problems. I have had a lot of fiber arts problems lately.
A few years ago I knitted a machine-knit striped sweater for my sister Nancy using a spectrum of my plant-dyed yarn. She lives in Florida, and it’s too warm there for her to wear it much. The good news is that the colors haven’t faded. The bad news is that somewhere between Baltimore and Florida, some voracious bugs got some good meals at the expense of our lovely sweater. Nancy returned the sweater to me at Thanksgiving, and it had a bunch of holes especially on the back. That wasn’t good, but I’ve been wanting to learn visible mending, and here was a golden opportunity.

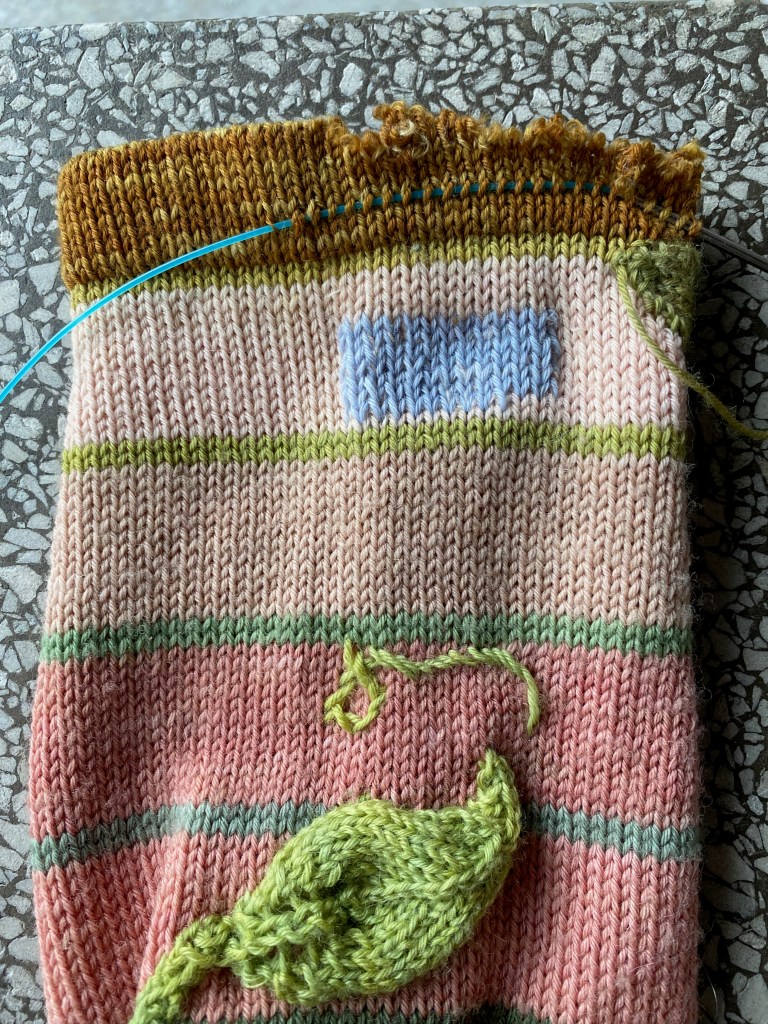
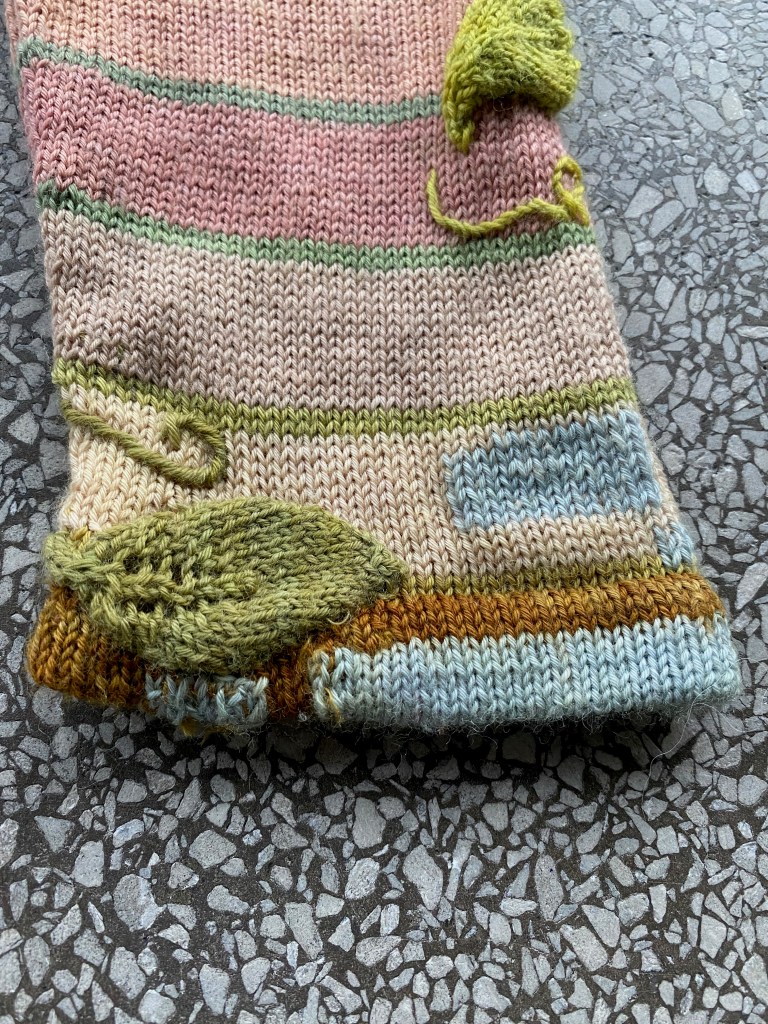
My very favorite kind of visible mending is a technique that looks like wizardry to me, that conjures up knitted stitch shapes out of empty holes with nothing onto which a duplicate stitch can be anchored. Flora Collingworth-Norris is a leader in this specialty of needle arts, and she has a blog, a book, and a well-known presence on Instagram. She also does Zoom workshops, a medium that doesn’t appeal to me, but I really do want her book. At this stage I don’t have sophisticated skills, but I ran across a visible mending project on Ravelry that patched holes with knitted leaf shapes, and I do know how to do that. I hand-knitted leaves, starting with an i-cord stem on three stitches, then building the width from yarnovers on either side of the center stitch until I liked the size, and shaping the point of the leaf with centered double decreases until there were no stitches left. At either end I left about 24″ inches of yarn that I used to sew the leaf over the hole, darn the hole securely shut, and embroider decorative tendrils with running stitch over the surface of the sweater. Eventually I got an everlasting project off of my knitting machine (much more about that below) and knitted leaves on the machine, which was about twice as fast. I darned and covered 17 holes this way. I’m going to knit a bunch of extra leaves that my sister can sew on herself in case more holes develop, although I’m doing everything I can to prevent future holes and will return the repaired sweater to her in a sealed bag with sachets to deter bugs.
Much as I enjoyed this process, I don’t want to have to keep doing it. So I pored over the fabric very closely, over and over again, searching for frayed bits in the yarn that I patched with duplicate stitch in a contrast color. The toughest dilemma was what to do with the fraying and holes at the edge of one of the cuffs and at the neck. Someday I hope to know how to magic nonexistent stitches out of thin air the way the mending masters do, but for now, I know how to knit and how to stick a one-eyed needle into the fabric on one side and pull it out a little distance away on the other side, so I used what I know. The fray on the neckline was confined to one destroyed stitch and several disintegrating stitches on either side, but there was enough there for me to duplicate-stitch a decorative long rectangle over several rows below the fray and on either side of the no-longer-existing stitch, which distracted from the awkward, unanchored stitch I made by leaving enough yarn in the gap to use as the corners of a stitch when I came back to that stitch with the needle and yarn on the next row. Perfection? Well, no, but it’s good enough.

The cuff of the right sleeve was so badly chewed up that my rudimentary duplicate stitch skills were completely useless. I had to think of an approach that used what I know how to do.

I have seen videos in which yarn is inserted into an intact stitch on the side of the hole, stretched across the hole with extra length to form stitches to build new fabric, and then the yarn reenters the fabric in the stitch where the length of yarn originated and pops out again in the stitch just above. It looks so fun and easy in the videos, like anyone can do it. I can’t. I need personal tutelage. Instead, I stuck a thin circular needle into the row of intact stitches below the fray, stitch by stitch, and knitted upward, picking up the nearest side loop of the original knitting and knitting it together with the edge stitch of the new knitting. I inserted another circular needle into the corresponding stitches on the back side so that I could kitchener-stitch the new fabric closed when I had knitted all but one of the rows of the cuff length. The final row was the kitchener stitch join. The edge stitches, where I joined the new knitting to the old knitting on the sides, look a bit wonky, but the rest is smooth and looks intentional.
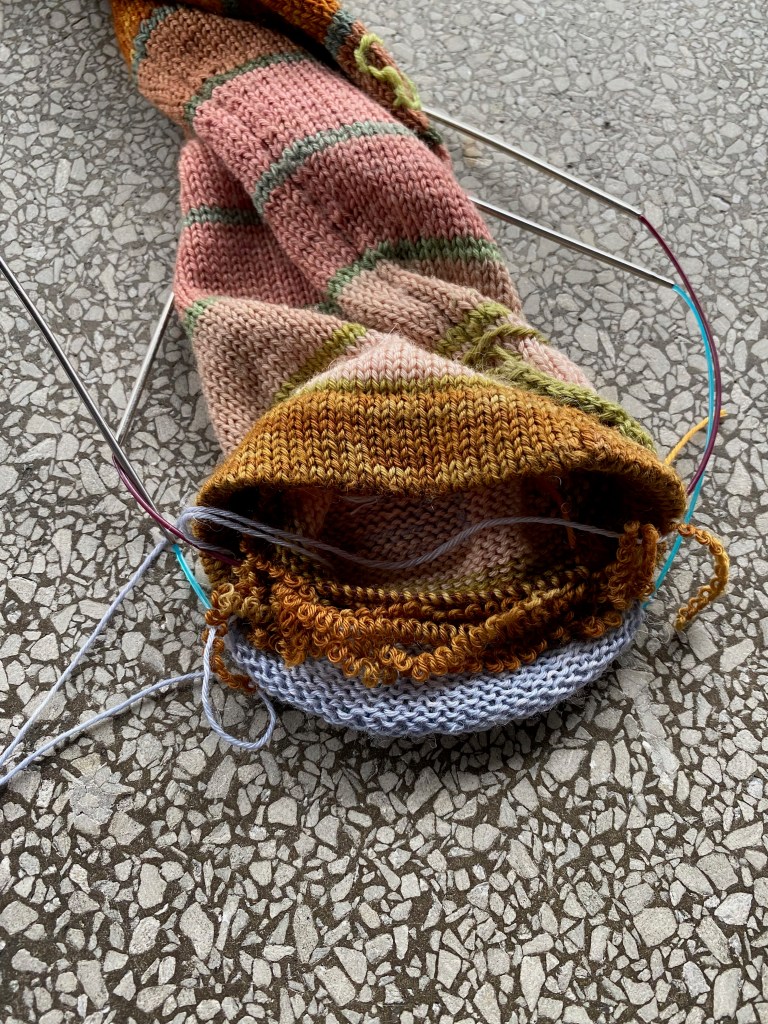


There was another hole in the edge of the cuff, several stitches wide. That was too many destroyed stitches for duplicate stitching at my current skill level, but it wasn’t enough destruction to reknit that chunk the way I did above. I decided to try something else, which actually turned out kind of a mess. I duplicate-stitched the intact stitches around the hole, then tried to create a woven fabric in the breach by darning a warp and weft across the hole. That was above my skill level and the result looked very crude, so I tried to beautify it by using the darning as a grid onto which I could fasten something that was supposed to look like duplicate stitch. It still is kind of a mess, but at least I have bound up those raveled stitches so tightly that they have nowhere to go.
My skills with a one-eyed needle are quite rudimentary and untutored, but I used the little I know to achieve a pleasing aesthetic effect. At least, it pleases me. I let the size and position of the holes guide how and where I directed my repairs and allowed the factors that I couldn’t predetermine be my partner in design. This was true randomness. I really enjoy the interplay between accident and intention, and making it work aesthetically adds an element of challenge, surprise, and risk that adds to the fun of just making a thing.


One of the swatches I made for the January Swatchathon used yarn that I hadn’t stored properly and it got pretty badly eaten by bugs. It had to be wound in pieces, and even still there are weak places in the yarn. But pairing this particular shade of pinky-mauve with a saffron yellow serves the design I’m thinking of, stranding yellow circles in random sizes and shapes against the pink in a low-contrast pairing. My idea as of now is to use the weak places in the pink yarn as a design element that directs the placement of embroidered yellow bullions and adds a textural emphasis to the stranded low-contrast circles. I might have to abandon this idea if there are too many weak spots in the 300-stitch rows that I plan for the actual garment, but I’m going to give it a try before I switch to a Plan B.

And then there are times when you want to emphasize something that went wrong, as an aesthetic element that plays with deconstructing a structured visual effect and putting it back together again by highlighting unexpected parts of the patterning, and it’s just a bloody mess. Literally. I have been using my knitting machine steadily for six years, but I have been intimidated by its electronic features. It has been a mental block that I’m rather ashamed of. Finally I gathered my courage and used one of the pre-programmed patterns in the machine to knit a sweater with an all-over pattern that looks like floor tiles, on almost all of the needles.
It was a steep and rocky learning curve, not just to learn the proper sequence of the steps to program the machine so that it becomes muscle memory, but also to learn the sequence of steps to divide the work at the neckline, shape it, and resume the pattern on the second side at the right place. I swatched and swatched until I learned exactly how to get it right. Then I started knitting the sweater across 190 needles, and I discovered that the machine behaved differently than the way I was used to. It needed much more weight to keep the stitches on the needles, and I was getting huge loops on the sides, especially the left side. The edges were a loopy mess with many disruptions to the pattern where the stitches on the edges fell off the needles and unraveled several rows below. I probably could have hand-knitted each row faster, until I figured out how to control the tension and make sure that the yarn wasn’t hanging slack at the beginning of the row when I first started moving the carriage. At least the division of the work for the shoulder and neck shaping went without a hitch.

Finally the back piece was done and I could take it off the machine. I washed and blocked it so that I could measure it to see if I was going to need to adjust my design with side panels in order to get the size I wanted. The size was fine… but what were those vertical white lines at regular intervals, 16 needles apart? It turns out my machine has some kind of problem in the needle selection mechanism, possibly a solenoid (a word I had never heard before). There’s a whole diagnostic protocol to identify exactly where the problem is, but not much information about what to do to fix it, other than buy and install new parts. That was probably practical advice when the manual was written 50 years ago, but Brother stopped making knitting machines back in the 1990’s. I turned off and unplugged the machine for a week while I dealt with my trauma. When I knitted the front, the bottom third was mostly all right, and the mispatterning was less severe on the upper part than it was on the back. The sleeves, knitted on a maximum of 106 needles, had almost no mispatterning, again after turning off and unplugging the machine when each piece was completed. That probably means something, but I have no idea what.

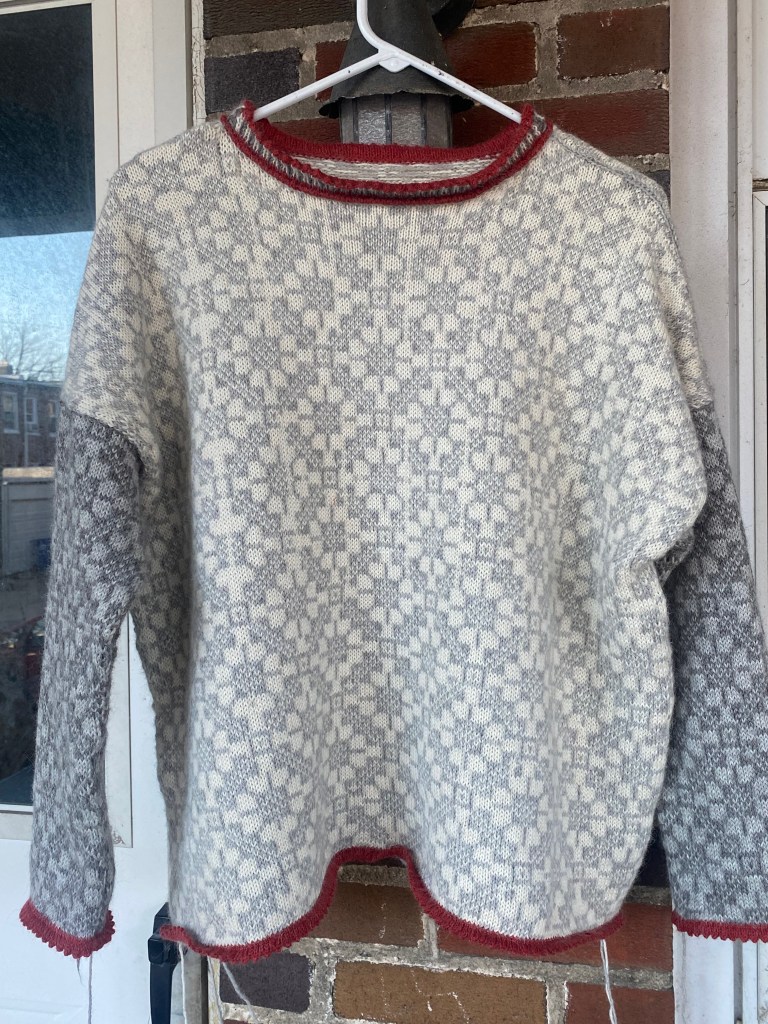
The standard machine knitter’s solution to mispatterning is the one-eyed solution, using duplicate stitch to conceal the offending bits. But what if, instead of concealing it with gray yarn, I emphasized it with the red yarn I used for the contrast color? It would be like the tracks of my tears, in the color of congealed blood, which expressed my feelings about everything this project had put me through. So I started embroidering. And it looked distracting and disorganized.

I texted a picture to Melissa. She didn’t mince words. “Looks like ketchup stains.” Well, all right then, the standard solution it would be. Sometimes discretion is the better part of valor.
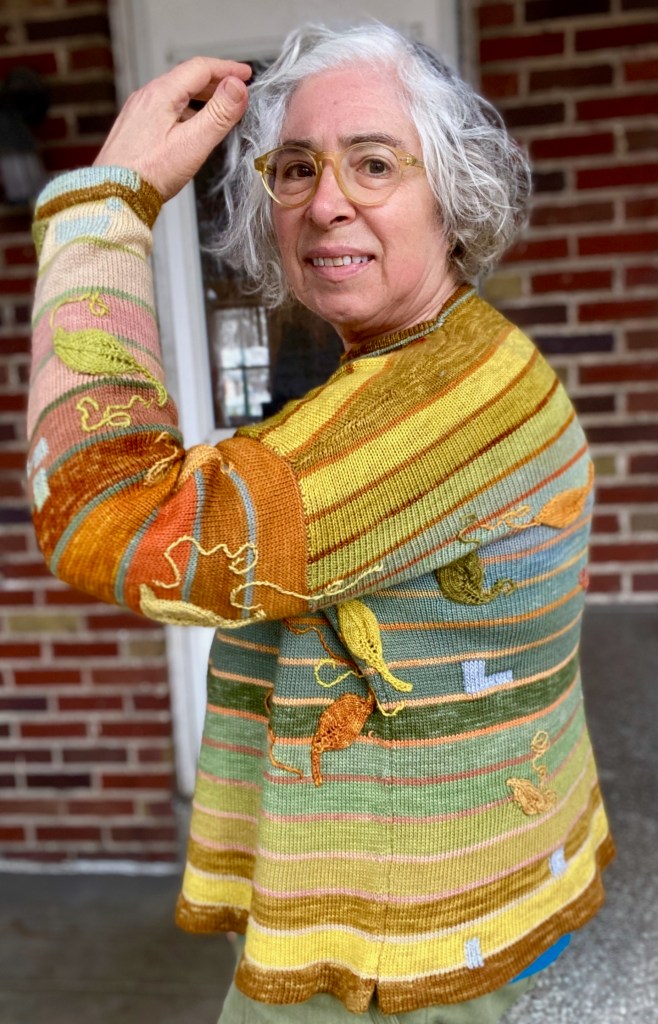
After my adventures with my sister’s sweater, I have gotten to be a dab hand with the duplicate stitch. You might see places I missed, but you probably won’t all the places I fixed.


I love your posts and the way your brain works! Well done!
LikeLiked by 1 person
Thank you!!!
LikeLike
The photo at the end really made me smile. I could here snippets of conversation between the two sweaters, comparing adventures and misadventures of their creation and repair. For some reason, it makes me think of the “I’m A Little Cookie” song.
I hadn’t noticed at first the color change in the sleeves of the fair isle sweater – nice. And reading that you used natural colors explains completely how fantastically harmonized they are. They just melt together so that you see some color difference, and some patterning, but neither reaches out and grabs you, more like a gentle hug of a presentation. So lovely.
And, of course, I’m all over the intentional mending.
LikeLiked by 1 person
I was about to say I loved the whimsy of the conversation between the two sweaters, but maybe it’s literal! Who knows what they say to each of when we leave the room? Thank you for the kind words!
LikeLike
Grr! Auto correct! Hear, NOT here. 😩
LikeLiked by 1 person
I knew what you meant.
LikeLike
What a great idea to knit, or I guess I could crochet, leaves to appliqu´é over the holes. I love the effect of the extra layer of texture on the sweater.
LikeLiked by 1 person
Thank you!
LikeLike
I liked the wabi sabi of the mispatterning, actually.
LikeLiked by 1 person
Love your work ethos – makes me think perhaps I would get my actual knitting mojo back if I concentrated on one machine.
LikeLiked by 1 person
Thank you! I guess I’m monogamous with my KH 965i because it’s all I have room for!
LikeLike