
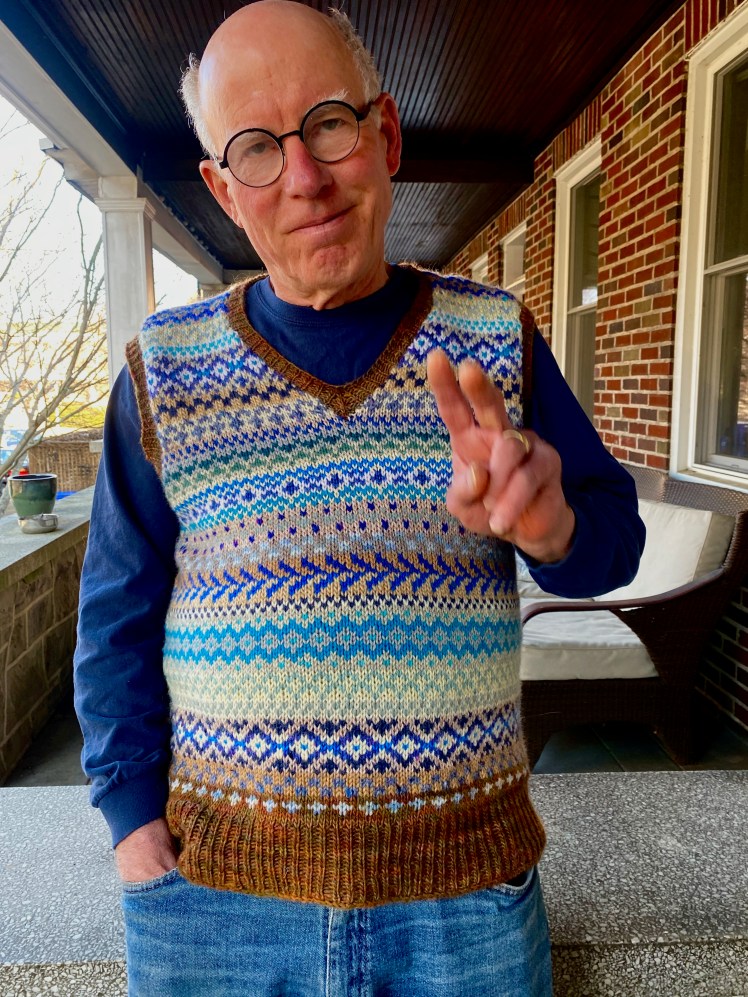
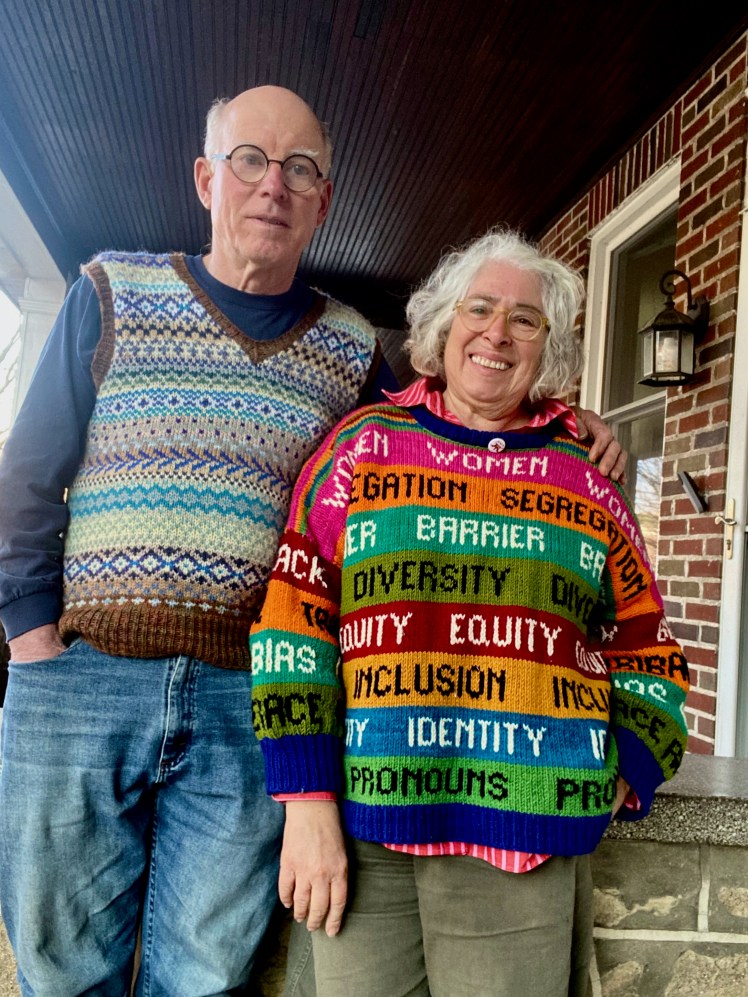
My husband shamed me. Not intentionally, he never would do that, he just needed an extra layer to keep warm in our unusually cold January, and he put his hands on a moth-eaten vest I had knitted him 35 or so years ago and wore it nonstop for a month. I felt deeply ashamed that he didn’t have anything better than that when I have so many sweaters I can’t remember them all, let alone wear them all. How could I let this dear and good man, who anticipates all my needs and wants and quietly fulfills them without a word from me, be cold when I have the skills and means to prevent that? Fortuitously a Fair Isle sweater pattern with 8-stitch repeats, perfect for the Needle Beetle, came across my Ravelry friends activity feed while I was berating myself for neglecting him, and I bought the Ottavia Sweater pattern for the charts.
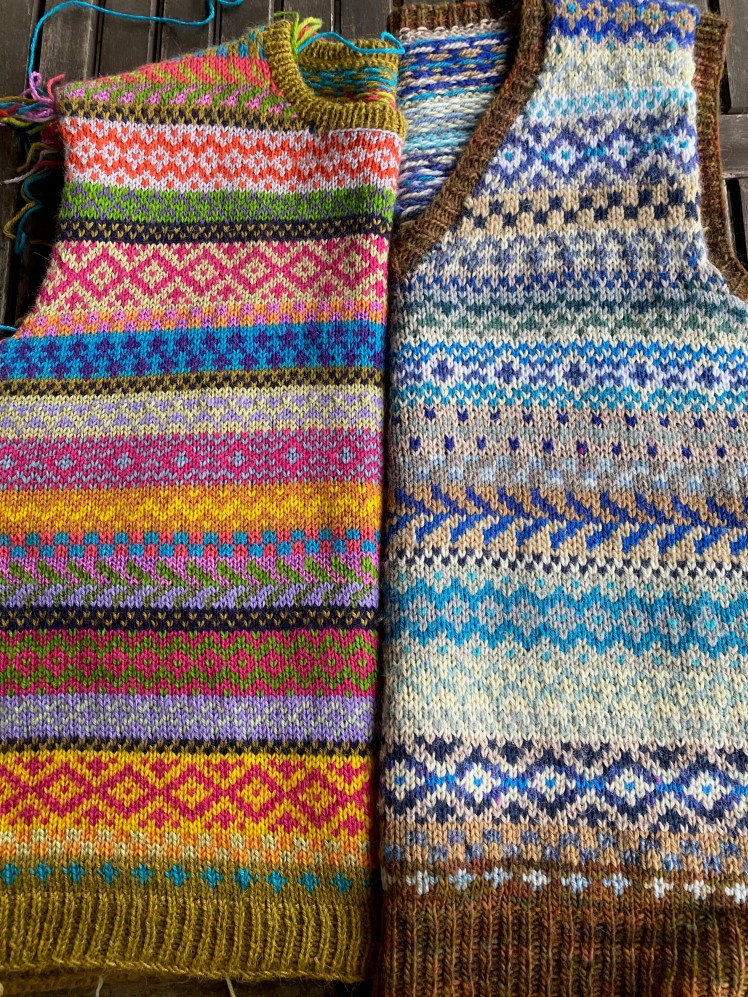
The moth-eaten vest he was wearing was one of my nicest works of Kaffe Fassett-inspired color work from my First Knitting Era, concentric triangles, three colors per row in blues and blue-adjacent hues, which is a colorway that I particularly like on my pink-complected, blue-eyed husband.
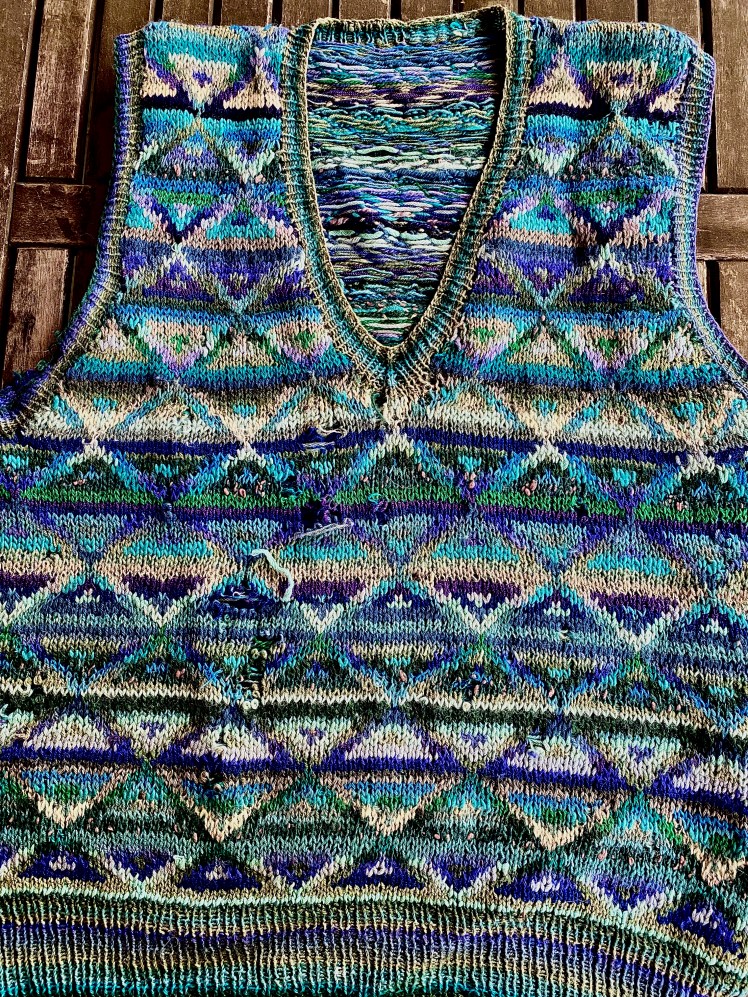
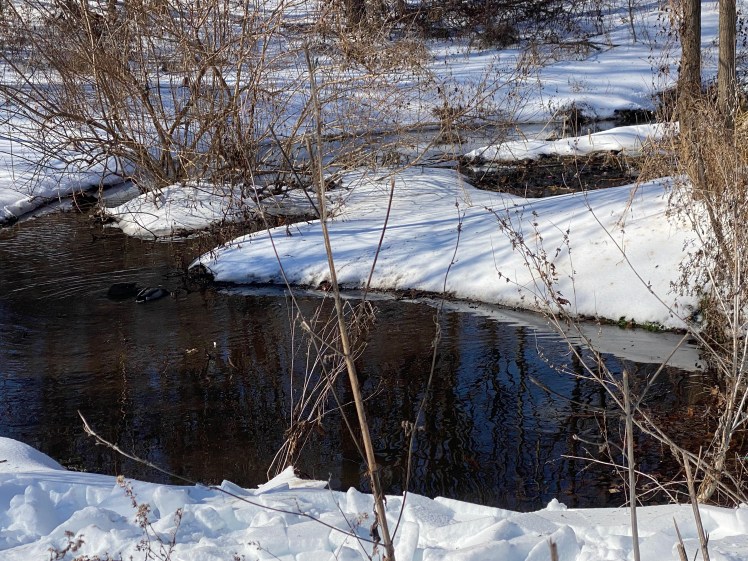
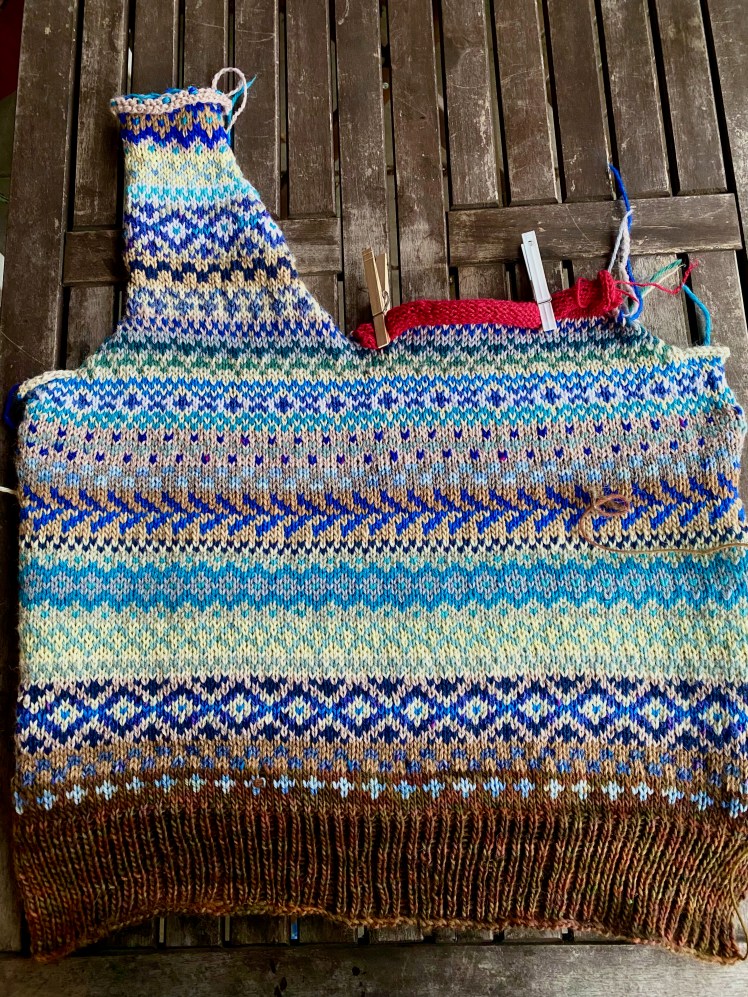
The plan for the new vest was to contrast a similar set of blues, blue-greens, and blue-purples against light natural colors, mostly from deep, ancient stash, including a ribbing knitted from a darker mid-brown mottled with murky green that I bought at Maryland Sheep and Wool back in the early ’90’s, maybe late ’80’s. We were in the midst of a deep freeze at the time and it was icy and scary to take our usual walk by the stream at the end of our street, but when we did get down there, I realized that my color choices had been influenced by the winter landscape.
The old vest fit him a bit more tightly now than it did back in the days before the moth holes developed, so I added a generous amount of ease to the seam-to-seam width of the new vest. I calculated my numbers accordingly, cast on and knitted the rows for the ribbing, and did the knit-purl rib by unraveling every other stitch and latching it up from the bottom. This is time-consuming, but the LK150 doesn’t have a ribber, not that I would have used it, because I’m a little phobic about ribbers, to be honest. Then I commenced the patterning.
In my previous use of the Needle Beetle, I had an 8-stitch chart that indicated the rows with even numbers on the right side of the row and odd numbers on the left side of the same row, to correspond to the reading on the row counter, since each row is done in two passes, one for each color. This numbering kept me accurately oriented so I always knew where I was in the patterning. But this time the training wheels were off. The chart for the Ottavia pattern was on a single page showing several hundred rows of tiny black and white squares, with each pattern segment separated by a single plain row. This messed up the row counter readings because the single rows usually needed to be done on the side of the knitting where the required color was not, which disrupted the sequence of carriage moves that achieved a two-pass row of stranded knitting. I ended up just ignoring my row counter, whereas previously I couldn’t have done the stranding operation without it. Progress was slow because I got lost and disoriented a lot, but I am nothing if not tenacious, and eventually I trained myself to think consciously about which color was in my carriage at the start of the row, on the right side, and whether it was represented by a black or white square in the chart. And sometimes I just didn’t have the mental wherewithal for that level of spacial thinking, at which point it was time to hang it up for the day after undoing my rows of mispatterning.
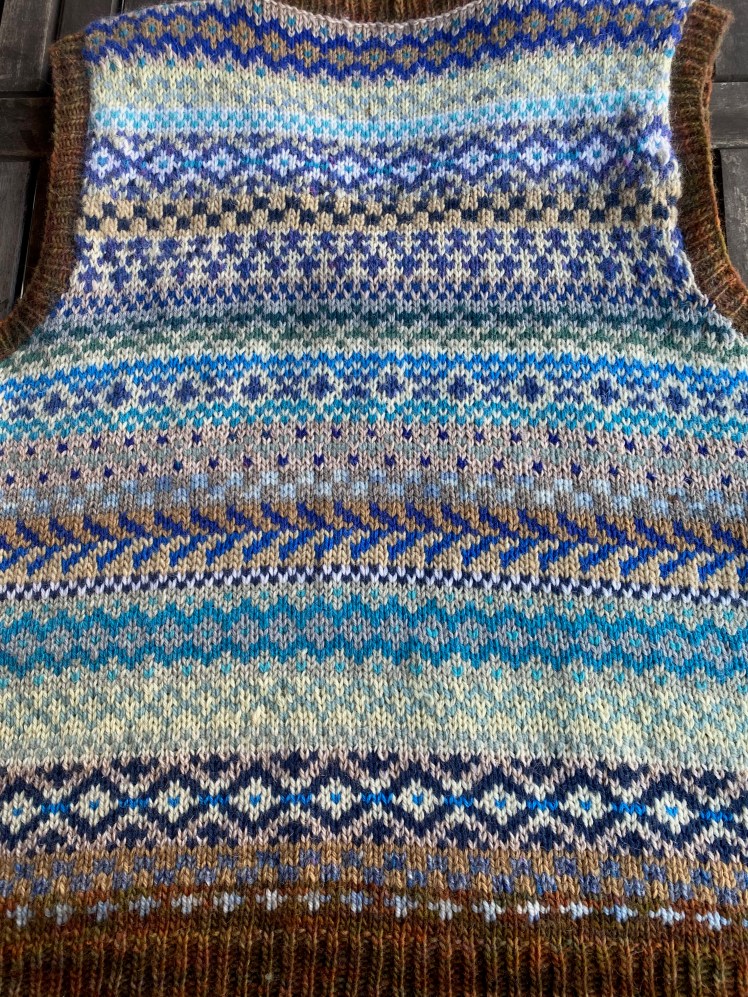
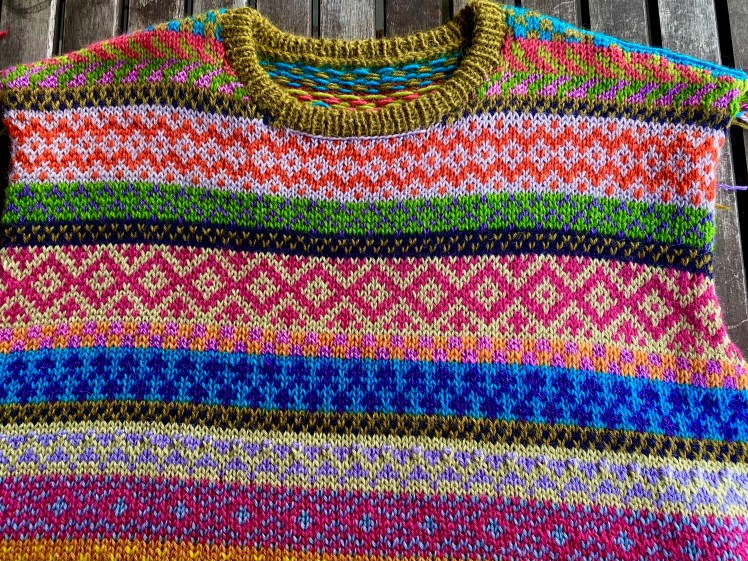
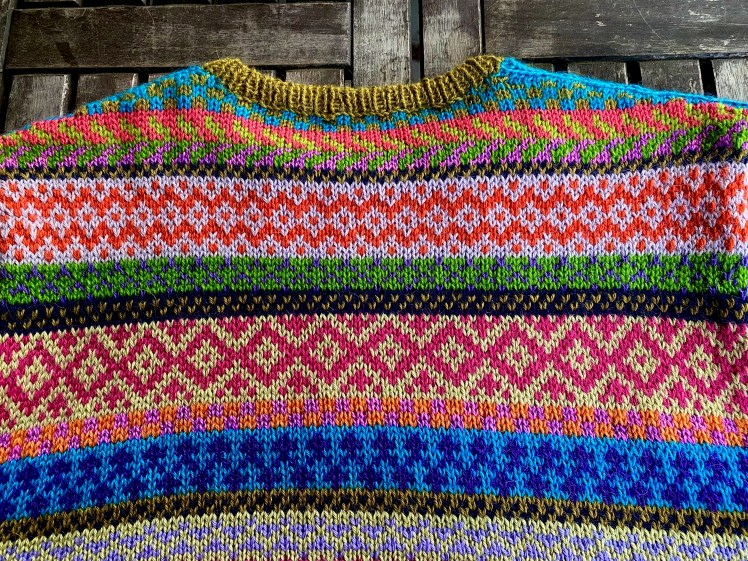
Progress was also slow because I changed colors several times in every pattern sequence that was longer than four rows. To minimize ends, I spit-joined my yarns together, which required a lot of starts and stops in the knitting. The color choices took some time too. I gave serious thought to my gradients and to where I wanted the areas of high contrast and where I wanted the areas of low contrast, for maximum effect so as to navigate spontaneity between the Shoals of Scylla and Charybdis; that is, avoiding chaos on one side and excessive regularity on the other. I don’t agonize over my color decisions, but there were a lot of color decisions, and each one was deliberate. My background colors were the color range of snow and vegetation in a frigid winter and my contrast colors were the colors of sky, water, and shadows in the snow. We were having a deep freeze that wouldn’t thaw, very unusually for Baltimore in an age of climate change. It was a real winter, like the winters of my New England childhood and post-adolescence. I love real winters.
When I got to the armhole shaping, I chose numbers that were compatible with the 8-stitch pattern repeats to make it as easy as possible for me to do the patterning so that it was symmetrical on either side of the shaping, by binding off 8 at the base of the armpit and decreasing the edge stitches every row for the next 8 rows, 16 stitches right and left. That was when I noticed something that dropped the pit of my stomach through the floor. I had miscounted my needles and I was 10 short. I backed away slowly from my machine so as not to do any more harm. How was I going to get out of this pickle???
When my powers of calm and rational thought returned, I counted and recounted the number of needles in use until I knew for sure that I had 111 stitches of knitting, rather than the 121 stitches I had planned to knit. This meant that the generous ease I had built into the garment was gone, but thank goodness I had built it in, because, now that those stitches weren’t there, that left a garment with a traditional fit, not a bad thing for a garment that a British prince might have worn in the 1930’s for a game of golf. So, deep breath, it would still be a usable garment. But what about my plan to match the patterning at the side seams? Fortunately there was a solution that wasn’t as perfect as my original idea would have been, but it would be adequate.
I had planned 121 stitches because 120 is divisible by 8, which the Needle Beetle requires, plus one extra stitch for seaming. The next number down from 120 that is evenly divisible by 8 is 112, and I had 111. It was too late to sneak increase an additional stitch at the side seam for the front piece, since I was already at the armpits and I wasn’t going to frog, but I could make the back piece 112 stitches wide. My seaming wouldn’t have the even match between front and back that I had planned, but it would be close, and I was going to move on with my life.
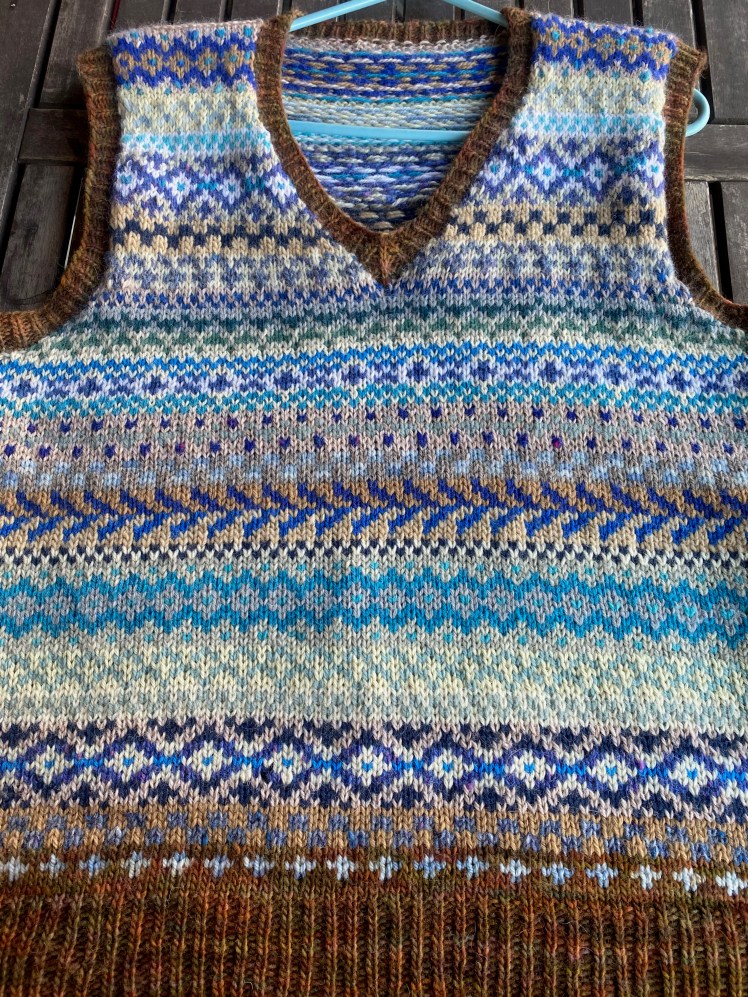
As soon as I finished shaping the armholes, I had to figure out how to make the V-neck symmetrical. Once again, I was decreasing 16 stitches per side because it’s divisible by 8, one stitch every other row for 32 rows. I started with the right side of the V, because the needle-beetling starts on the right and it’s simplest to start with the side that isn’t in the process of being shaped.
There were no memorable disasters on that first side, but I was a little worried about how to do the second side so that it was symmetrical, since that was the side that started with shaping, on the right where the patterning originated. But it was a lot easier than I was expecting, because the start of the V began at the beginning of the pattern sequence, and when I set the needles for the Needle Beetle, I pulled out the needles that I had decreased to get back to the start of the 8-stitch patterning when I set up the needles for each row, then pushed them back in when the needles were in place and ready to knit.
It was a huge relief to finish the machine knitting after the thrills and chills of navigating the complications and recovering from near-fatal mistakes. I looked forward to not doing this again. Then I sewed it up, hand-knitted the ribbing at the neck and armholes, and marveled at its perfection when my husband put it on, despite all the mistakes.
It has been a couple of months since I finished it, and I’m still congratulating myself on how good my color choices were. But… what if… I did the same patterning in colors that were the diametric opposite of the soothing, harmonious natural colors of a wooded trail next to a pond on a sunny day in a snowy and frigid winter? I had a whole big bag of bright, intense colors of alpaca yarn from Peru, souvenir yarn that my sister brought me from visits there and my own souvenirs from a trip we made there in December and January. I had hot pink, apple green, aqua, orange, purple, and lots of other colors. What if I skipped the subtle gradients and just went for high impact?
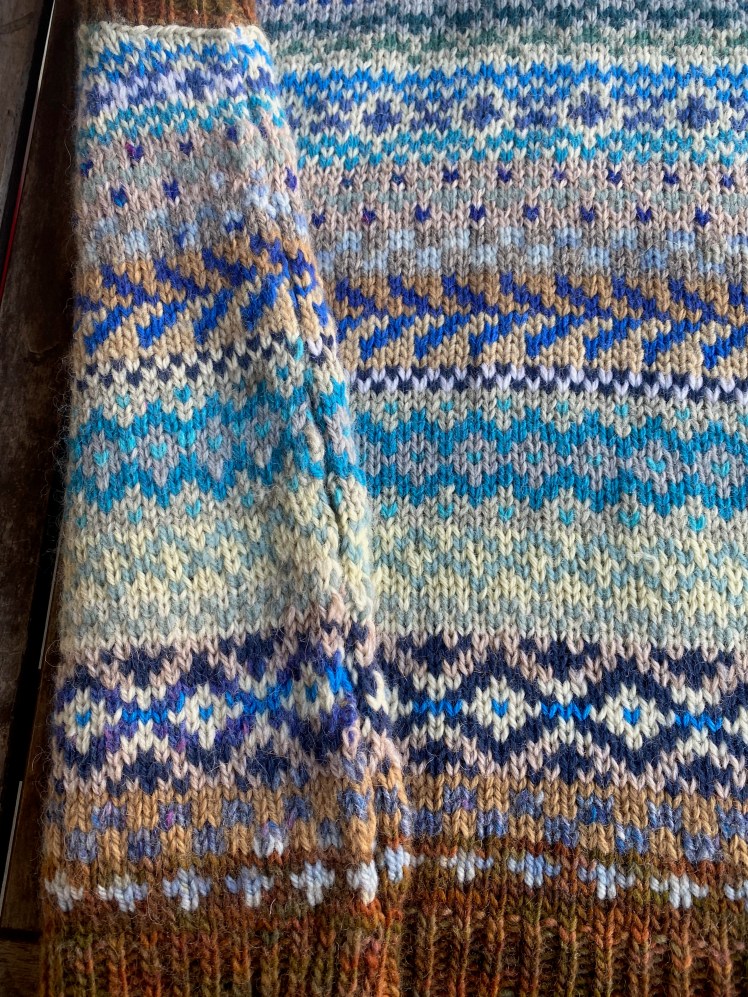
I worked on something else while the construction details of this new version marinated in my brain. I wanted it to be a sleeved pullover with a roomy, comfortable fit, and not too long. My default pullover style is dropped shoulders with a straight armhole edge and sloped shoulder shaping to prevent bunching at the armpits. But I was discouraged from that because the needle positioning of two-pass stranding makes the usual short row method impossible, and I didn’t want a conspicuous wedge of short-rowed plain knitting sitting at the top of a lot of busy, colorful stranded patterning. That easy way out looked like defeat to me. I remembered that my This Is NOT Fine sweater, which is my favorite thing to wear, has no shoulder shaping but does have a set-in sleeve that was easy to make and was easy to sew in, and I wondered if I could borrow the armhole and sleeve cap shaping from that pattern so that I wouldn’t have to figure it out for myself. So I knitted up a swatch and talked myself into reading the gauge with numbers that would be compatible with that pattern’s sleeve. Then I handed the swatch over to Melissa to measure, and she slapped me back down to earth. Wrong gauge, not even close. I was going to have to figure out the sleeve on my own. Later. First, knit the body.
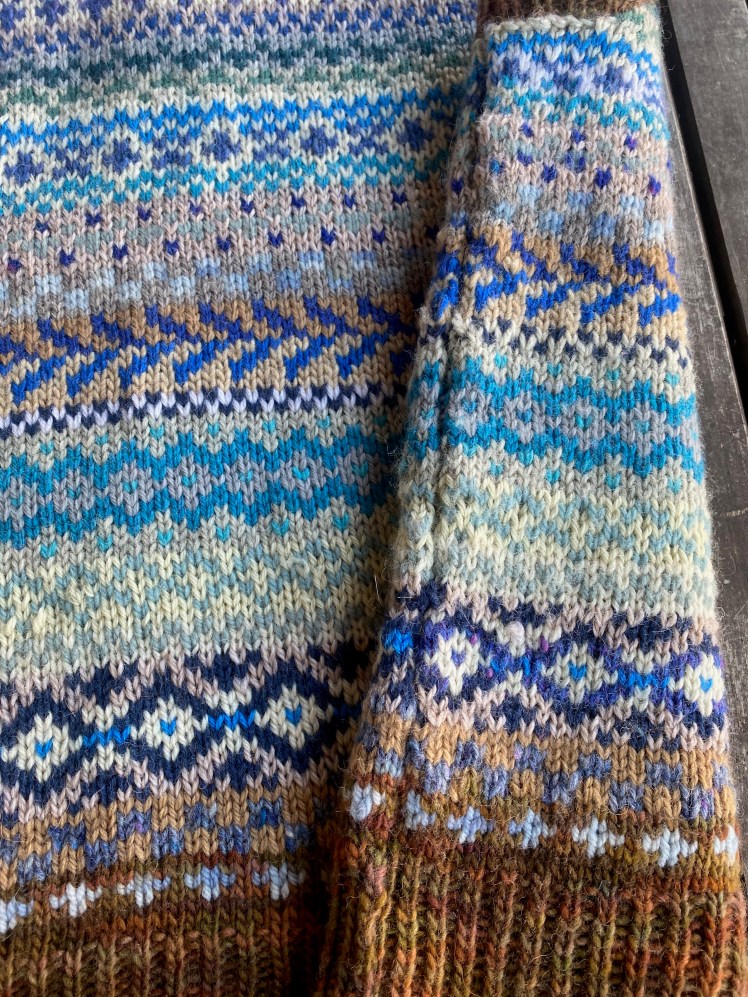
So the point to making a set-in sleeve was to avoid the bunchiness that could result from a dropped-shoulder sleeve with a straight line at the shoulder seam. That was the old style of knitting sweaters, they had set-in sleeves and no shoulder sloping. But as I worked through the front of this sweater, I began visualizing a method for overcoming the obstacles two-pass stranding poses to the usual method for short-rowing a shoulder slope. The usual method, on an LK150, is to have the top and bottom levers on the carriage pointing upward so that needles in hold (D position) don’t knit. You knit the needles that are in working position for your short row, then you wrap your yarn around the needle next to the last knitted stitch so as not to leave a hole, pull out the needles you want to short-row on the other side, knit them, wrap the last needle, and repeat as needed. But in two-pass stranding, the needles that don’t get knitted in one pass, using one color, do get knitted on the other pass in the other color in order to create the stranded patterning. This is done by reversing the direction of the levers on the other side of the carriage, so that on one side they are pointing upward to skip the needles in D position, and on the other side the levers are pointing downward so that the needles in D position are knitted and the needles in B are skipped. This means that if you try to do short rows the usual way, by not knitting needles in D position, those needles are going to get knitted when the levers are pointed downward.
I am in the habit of knitting my background color first, with the levers pointing downward on the left side, and knitting the contrast color second, with the levers pointing upward on the right side. It’s possible to reverse that order, but please don’t make me think about it because it makes my head hurt. It’s important to remember that every row of patterning is done in two passes of the carriage, from right to left in one color and left to right in the other color, and the row isn’t complete until the carriage is back on the right side, with one color on the right side of the machine and the other color on the other side. In order to avoid having a half-knitted row, I had to start my short-rowing on the right side of the knitting, at the start of the completed row, whereas normally the short-rowed side would be on the left. I suppose it’s possible to contrive a way to start the short-rowing on the left, but I started it on the right by pulling out my short-row needles to D position and bringing my yarn underneath the pulled-out needles and over the needle next to the stitches that were to be knitted before starting the row. This prevents holes, so don’t forget to wrap the yarn around the short-rowed needles at both ends of the knitting. Then I knitted the right-to-left pass and stowed the knitted yarn on its assigned side of the machine. Next I used the transfer tool to put the held needles into B position and knitted the return pass with the other yarn. This completes the row.
This procedure is repeated on the left side, remembering to pull out all the needles that have already been short-rowed after the two-pass stranding operation required them to go into B so that they wouldn’t be knitted on the return pass. The important thing is, every set of short rows requires a right-to-left pass of the carriage to start and a left-to-right pass to finish. The held needles are out in D on the right-to-left pass and in B on the left-to-right pass. Push the needles all the way into B using the transfer tool to make sure that the stitches are secure. They will fall off the needles if they aren’t safely inside the hooks. Ask me how I know this.
I was full of trepidation when I first put this plan into operation, but I figured that if it was a disaster I could take the knitting off the machine and do the short-rowing by hand. But it wasn’t a disaster! My first attempts weren’t perfectly even because I lost track of which set of short rows I was on, but there was still a perfectly usable shoulder slope and no holes at all! By the time I got to the short-rowing on the back I had figured out how to keep track of where I should be on either side, and it went without a hitch. I was even emboldened to put a slight curve into the back of the neck in the last couple of short row sequences, by starting a new set of short rows on the right, with the neck needles and the left side of the shoulders all in D position. Then I bound off the neck needles, minus three needles on either side for the neck curve, and set up the needles on the left side for patterning. I can’t really explain exactly how I managed the last bit of the short-rowing because it was very improvised and seat-of-the pants, since the left side and the right didn’t have the same number of needles remaining. Not a mistake, just the inevitable consequence of having to start at one side (the right) and equalizing the number of needles after the left side is done. So I scrambled my way through it, decreasing the three stitches whenever I had a finished row that gave me the opportunity to do so. It’s not perfectly symmetrical, but the finished result looks perfect.
After accomplishing this, I googled to see if anyone else has ever documented the process I had just executed. I think I might be the first to have achieved this highly niche operation in a highly niche realm of machine knitting, the use of the Needle Beetle. I don’t think there’s much competition for my claim to be the inventor of this method, but I might ask Diana Sullivan, Anna Haferman, and Kris Basta (the inventor of the Needle Beetle) if they have ever done this, although there’s no indication on the internet that they have. I’ll hedge my bets by using Elizabeth Zimmermann’s term “unvent” for the unique knitting innovations she came up with, on the rationale that there’s no way to know if someone else in the past had already done the clever things she came up with. So I appear to have uniquely “unvented” a procedure for short-row shoulder shaping using the Needle Beetle.
Now I have seamed together the front and back and have hand-knitted a folded ribbing at the neck.
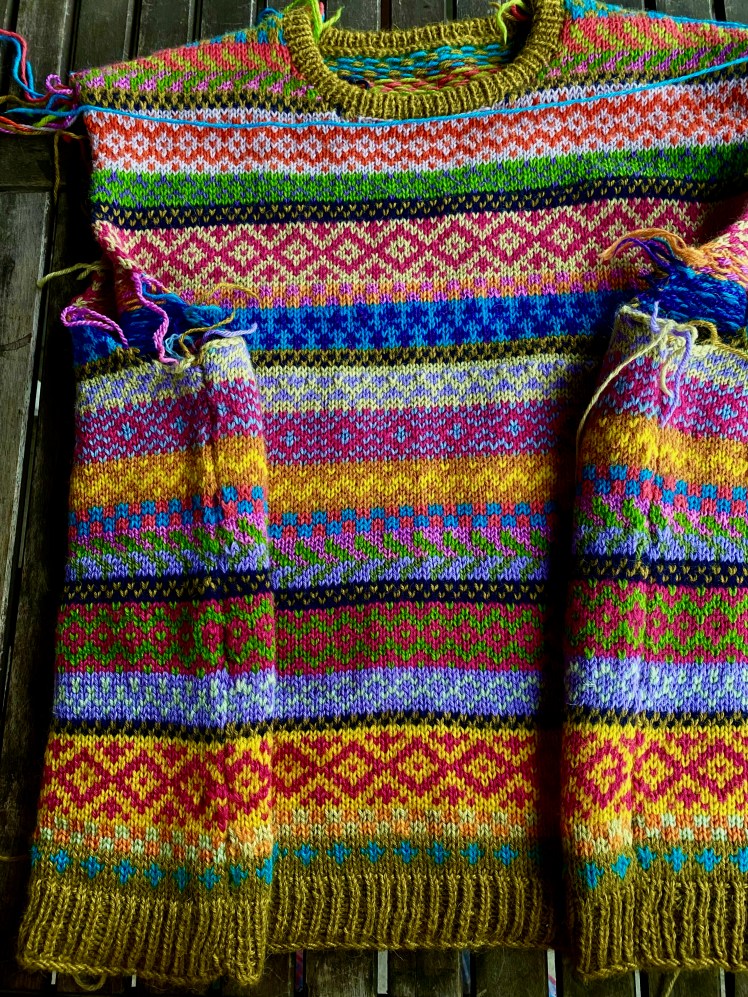
It’s drying right now, so that when I try it on, I will get an accurate sense of how long to make the sleeves. I can’t procrastinate any longer about calculating my sleeve cap. Some years ago I knitted a couple of sweaters with set-in sleeves whose numbers I had calculated according to the very detailed and formulaic instructions in Shirley Paden’s book Knitwear Design Workshop. My results weren’t wonderful enough for me to want to use her formula on a regular basis, but there are some principles that I think I can apply to this sweater.
I took a closer look at Paden’s 8-page mathematical explanation of sleeve caps, got boggled, looked at the armholes of my own sweater, looked at the chart, looked at my Not Fine sweater, looked at its charts, walked to the yarn store, worked on something else, went to bed and slept seven restful hours, woke up, and now I have a tentative plan for my sleeve cap. At the start of the sleeve cap, I will have 81 stitches, and the bindoff at the end will be 19 stitches, slightly less than one quarter of the start, per Shirley Paden’s instructions. The height of the sleeve cap will be between 21 and 25 rows less than the 57 rows of the armhole, so I have to get rid of 62 stitches over 30-something rows, exact number to be determined when I get there. I’m going to bind off to match the bind-off at the base of the armhole and follow the same set of decreases as I did for the armhole shaping, and then keep on decreasing a stitch at either end every other row until I get down to 18 stitches shy of the 19 stitches for the bindoff, 37 stitches. Those final 18 stitches will be bound off over 6 rows, three at the right, knit a row, three at the left, three times. Hopefully I’ll get something that will fit into the armhole without looking like a dog’s breakfast.
I’m going to publish this post before I finish this sweater, so whether or not I can make a successful set-in sleeve will just have to dangle as a cliff-hanger to be resolved in a future post. And if you have made it to this point, you have all my respect for your fortitude! I expect that there are maybe 10 people in the world who will understand my technical explanations and only one of them reads my blog.

I love both sweaters and look forward to pictures of you and Charles wearing them.
Btw, I could follow much of your procedural discussion, despite not being a machine-knitter myself. Your reasoning and process were quite clear.
Congratulations on both projects!
LikeLiked by 1 person
Thanks, Gretchen! I’m glad my description of technique wasn’t total gibberish! Wish me luck on getting the sleeves to work out!
LikeLike
(ARGHHH!! This is the second time that WordPress has disappeared my comment. So infuriating. I shall do my best to approximate what I wrote the first time.)
Ha! I read your whole blog, and then re-read it. I understand exactly the problem you set out to solve, and your description of a process that nearly defies comprehension is very well done. I bow to your garment design and creation skills. I hope that Kris and Anna and Diana and others with an audience for the topic will link to your blog for this valuable documentation.
I audibly sighed when I set eyes on the Winter Vest. Oh, my! You have completely captured my very, most favorite palette of all in nature – the winter wetland. The tans and reds of the grasses, reeds, and shrubs; the brilliant white mounded snow; the black, bare trees; the sparkling, silver and blue water; the brilliant blue of the sky. It’s all there, and it totally transports me. I can smell the air. Thank you.
If the 12-stitch adapter works for the Needle Beetle (I have them in my grubby, little hands, but not installed yet), I cannot wait to see what you do with the 2/3/4/6/12 stitch capability. In fact, I can’t stand to wait any more, I’m headed down into my Rabbit Hole to see if I can install one and report back!
LikeLiked by 1 person
Tanya, of course you know that when I said that only 10 people in the world would understand what I was trying to explain and only one reads my blog, you were the person I was referring to! I told Kris about my “unvention” and she sounded interested in how I accomplished this feat.
I can’t wait to see this device you mention!
LikeLike
Abby, I salute you!!!
Alison UK
LikeLiked by 1 person
Thank you, Alison, I appreciate your praise!
LikeLike
Even though I am a beginner machine knitter, I love your blog and your explanations. Your sweaters are beautiful!
LikeLiked by 1 person
Thank you so much for this comment!
LikeLike
Beautiful work!
LikeLiked by 1 person
Thank you so much!!!
LikeLike