
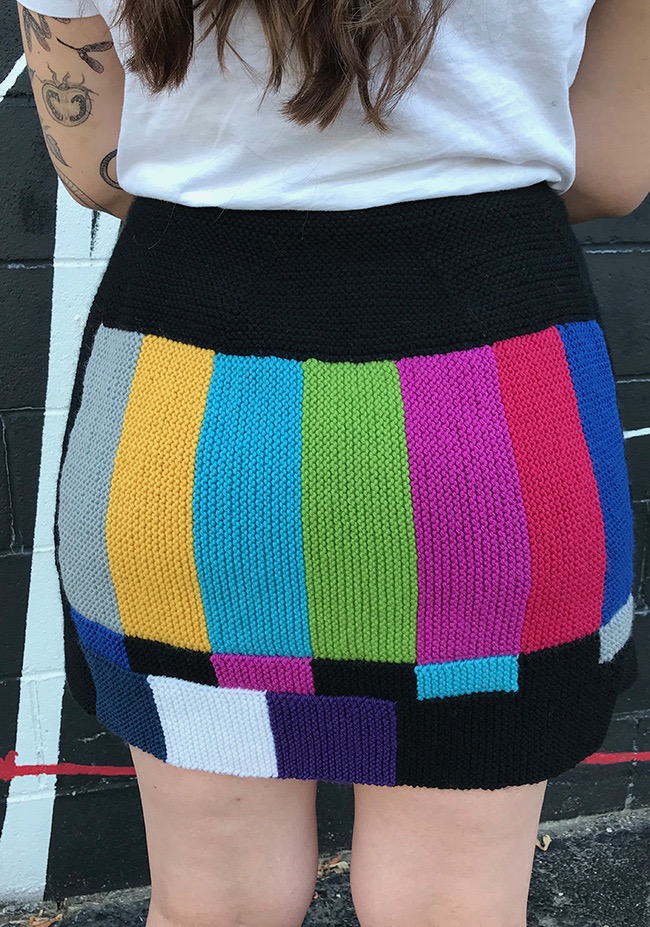
The first thing I do every morning is to go on Ravelry. I check in on my group, The Interior of My Brain, to contribute to any discussions that might have taken place in my absence if I have something to add, and search through my friends’ activity for interesting projects or patterns that might interest the members. I have hundreds of Ravelry friends, and the things they make or fave give me a curated digest of what’s new and interesting on Ravelry. One day last fall I ran into a form-fitting skirt knitted in garter stitch in colors arranged as a color TV test pattern. It was a free pattern in Knitty Fall 2022, wittily named “Please Do Not Adjust Your Skirt.”
Right from the start, the garter stitch was a turn-off. If I bought a knitting machine mostly because knitting plain stockinette bores me but I love the look of stockinette fabric, garter stitch is twice as boring because it’s nothing but knit stitch, plus I dislike the look and feel of garter stitch fabric. So my mind immediately went to re-envisioning the pattern in a machine-knit adaptation, and I began to study the skirt as it was presently constructed to see what aspects of it I could preserve and what I would change, strictly as a theoretical pre-breakfast parlor game.
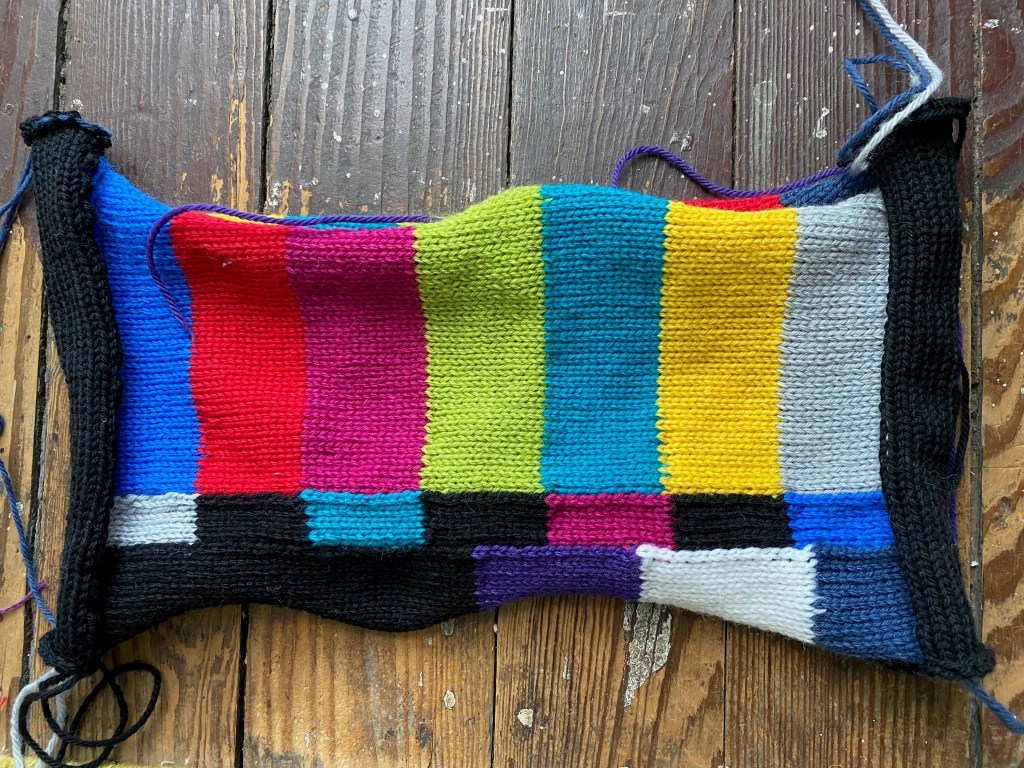
The test pattern color arrangement was knitted side-to-side in three intarsia segments, two identical pieces for the front and back. Two panels of black garter stitch were knitted bottom-up and seamed to the test pattern pieces to join them together in a tube. The stitches of the side panels were left live at the top of the knitting so that they could be knitted with stitches picked up from the top edges of the test pattern pieces for the yoke of the skirt, which was also knitted in garter stitch and decreased to fit the waist.
I don’t do form-fitting, never did thanks to parentally and societally instilled body dysmorphia, but I have two slender and pretty daughters who have the forms for form-fitting, even by my dysmorphic standards. I asked them if they were interested in this skirt. Secunda said, no thanks, Prima said, yes please. I asked her for her measurements around her hips, around her waist at the place where she wanted the waistband, and the length she wanted from that point to the hem.
The pattern is very specific about the yarn it calls for, and it gives good reasons for recommending Cascade 220 worsted wool. It has good memory, very important in a tube skirt whose shaped waist has to be pulled up over hips that are 10″ larger than the waist, and it comes in over 500 colorways. The designer went to pains to match the test pattern colors to specific colorway numbers. I sat down with Melissa and her Cascade sample book to figure out my order, which was still a theoretical at that point because I was up to my gills in birthday knitting, and then January Swatchathon would be in progress immediately thereafter, and I wasn’t in a mood to add more commitment to all that. We discovered that a bunch of the designer’s colorway numbers were no longer available, so we had to find substitutes. I’m good at colors, but Melissa knows every colorway in every yarn in existence, so I just said yes to everything Melissa recommended. The list sat in Melissa’s desk for several months.
At the end of February, Charles gave me a nice gift certificate from Lovelyarns for my birthday. Also Charles and I started talking with our two daughters in a serious way about the four of us and Prima’s daughter meeting at Secunda’s house in Madison during our granddaughter’s early April spring break. Now I had a deadline to work against, so Melissa hit the button on the order. The yarn arrived a week later, and I started swatching to get the pattern’s gauge, 5 stitches per inch and 7 rows per inch. The yarn was too heavy for my standard gauge machine at home, so I had to use Melissa’ bulky Brother 270 knitting machine upstairs at the shop. I did get gauge, but I had to tighten the tension all the way down to 1.1. But I got gauge, so I could use most of the pattern’s numbers for the smallest size.
The pattern calls for two inches of positive ease at the hips and two inches of negative ease at the waist. I didn’t quite see how any yarn could stretch that much when pulling the waist onto the body over the hips, without some other opening. I decided I would have no ease at the hips and knit the waist as large as it could be and cinch it in with elastic. That was one major modification, in addition to replacing the garter stitch with stockinette. Another modification was to replace the intarsia with modular knitting, in three strips of stripes knitted sequentially with the new strip attached to edge stitch of the previous strip through the “sew as you go” method that I learned from Diana Sullivan and have used over and over again in the last couple of years. It’s an essential technique in my style of garment construction. Intarsia is possible on knitting machines, but I’m not very comfortable with it yet and I didn’t think about experimenting with it for this project.
Since my gauge exactly matched the pattern’s, I could use its numbers for the width of the color strips, which were knitted sideways. I had to recalculate the number of rows to knit the color strips, because the pattern was based on garter stitch ridges and I was knitting stockinette. That wasn’t a difficult task. The total circumference at the hips would be 36″. The side panels would each be 3″ wide, which meant that the color panels would be 15″ wide each. For the first strip, the number of rows would be evenly divided by the seven colors for the patterning, which worked out to 15 rows per color, so each strip was 105 rows. Joining the next strip to the previous one was simple, just make sure the old strip is heading in the right direction (which isn’t necessarily that simple) and stick the end loop of each row onto the end needle at a 1:1 ratio. Also, don’t forget to return the tension to 1.1 after loosening it to 5.2 for a loop-through-loop bind-off at the end of each modular section. Yup, I forgot to do that for the third tier on the second piece and didn’t notice until I was halfway through the piece. The difference in tension is visible, but I figured that it would work itself out in the end after the rest of the skirt was assembled.

I didn’t get a chance to test that theory because I went back to Melissa’s machine the next day intending to knit the side panels joining the two pieces I had knitted the previous day, but when I got to the shop, I could only find one of the pieces. I had left that second piece in a bag at home that I didn’t bring back with me! So I had to reknit that piece, this time with the right tension throughout, and also using a bright blue dug out of ancient stash because we had forgotten to order this shade. After gnashing my teeth about having to reknit the piece, I decided I could repurpose the piece in a sweater I’m planning for myself using the leftover yarn. So that put me one day behind schedule. Next day I came back for another unforced error, which was joining the color panels along the long edge rather than the short edge, which would have produced a tube for a skinny arm rather than a skirt that could be pulled up over hips.
Eventually I got the pieces oriented correctly and cast on 16 stitches, about 3″ of width, onto which I would join the two color panels, which were 47 stitches wide and 9.4″ of skirt length. The side panels would need the number of rows that would equate to that measurement. According to the standard ratio for stockinette stitch, the height of a stitch is three-quarters its width, so the calculation would be 47 x 1.25, which equals 58.75. I rounded up to 60 rows, I think. I should have taken notes, but a row or two doesn’t make much difference. My method for joining horizontal knitting to a piece oriented vertically was the same I used for my machine-knitted Kurt, which was to attach the bottom loop of the two color panels to the first row of the new knitting (row 0) on either side of the connecting piece, knit back and forth, attach the next loop, knit back and forth, and skip the next loop at row 4. Every time the row counter is at a number divisible by 4, skip the loop and repeat the sequence until the two panels are completely joined. Now the skirt was a tube.
Finally, two days behind schedule, I got to the point where I could pick up stitches along the top edge of the color panel to knit the skirt’s yoke, which shaped the garment to fit the waist and provided the remainder of the skirt’s length. The circumference of the skirt tube was 36″, so each side of the skirt yoke would be 18″. The side panels gave me 16 stitches in each panel, 8 stitches on either side of the front and 8 stitches on either side of the back, and each color stripe was 15 rows, and there were seven of them. Three-quarters of 15 is 11 and a quarter, so I went with 11. Multiply 11 times 7 plus 16, which gave me 93.
Having figured out the math, I then crashed into the limitations posed by physics. My fabric was knitted at too tight a tension for my picked-up stitches to fit onto the needles, which were spaced farther apart than my edge stitches could stretch. After wrestling for an hour to get the stitches onto the needles, I was afraid that they would snap apart if I ran the carriage over them. I took the work home so that I could pick up the stitches by hand on a circular needle and knit the first row.

Even then it was still a fight to get the stitches onto the knitting machine. I looked at the pattern and saw that the number of stitches for the size was actually 87, so I gratefully dropped six stitches, which offered just enough slack for the stitches to grudgingly stretch onto the needles. Lesson learned, when I got to the second side, I picked up 87 stitches and hand-knitted the first four rows. The stitches got onto the needle with nary a whimper, and I didn’t whimper either.
I had to do some math and logistical thinking for the fit of the skirt’s yoke. I needed the total length of the skirt to be somewhere between 16 and 17 inches, and the skirt tube was currently 9 and a half inches lengthwise. I decided that the yoke should be 6 inches high for the shaped part plus another inch for the elastic waistband that would fit into the casing I would knit at the end of the piece. So at a row gauge of 7 rows to the inch, I would fit the shaping decreases into 42 rows, then knit another 16 rows with a fold line of loose stitches in the middle, for the waistband. The pattern prescribed 8 decreases per decrease round, which translated to 4 decreases done in two pieces for machine knitting. The circumference of the tube was 36″ at the hip, although the 174 stitches I picked up from the side edge of the color panels brought the measurement down to 34.8″, and it needed to end up at about 26″ at the waist. A total decrease of 24 stitches per side would be sufficient and mathematically tidy, because then I could knit the decreases on rows 6, 12, 18, 24, 30, and 36.

One advantage hand knitting has over machine knitting is that it’s a lot more nimble than machine knitting is. You can decrease wherever you want to just by knitting to that point and decreasing. On a machine’s needle bed, on the other hand, if you’re decreasing in the middle of the work, you do the decrease, which leaves an empty needle next to the doubled-up stitch, and then you have to move all of the other stitches in order to fill in the gap the empty needle leaves. I had never done this before, so I figured that I would make it as easy as possible for myself by placing two of the decreases on the third stitch from the end, in easy reach of the 3-eyed transfer tool, and the other two decreases at needle 24 on both sides. On the back half of the skirt yoke, I worked three sets of short rows between the 24th needle on the two sides at the midway point of each of the final three decrease rows, in order to keep the skirt from riding up at the back.


All this went without a hitch while I was doing it. Moving the stitches wasn’t confusing or arduous on a bulky machine since there were so many fewer needles than on my standard gauge machine. But after I sewed the seams and saw the result, I had regrets and apprehensions. No matter how much I steamed the skirt’s yoke, there was a weird protrusion at the junction of the seams and the color panels because the decreases were too close to the edges of the knitting. I wished I had moved all of the decreases about 10 inches toward the center. I also wished I had oriented the decreases so that they leaned in toward the center, parallel to the side edge, rather than taking a vertical line upward to the waist. I had more regrets when I finished the bottom edge of the skirt with several ridges of hand-knit garter stitch to stop the edge from rolling and to give the skirt a bit more length. I should have picked up fewer stitches or used a smaller needle so that the bottom edge wouldn’t bell outward. But no one else seems bothered by these perceived flaws.

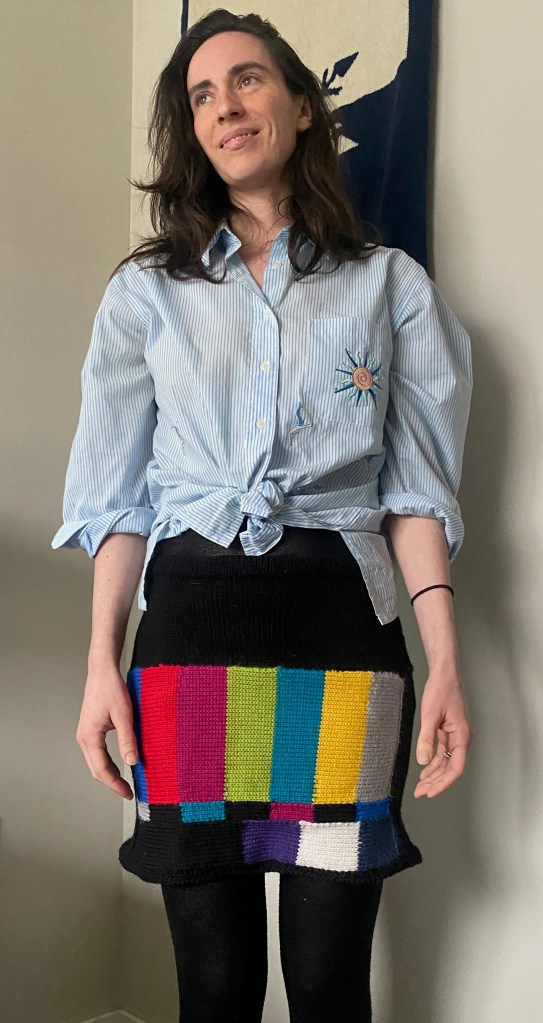
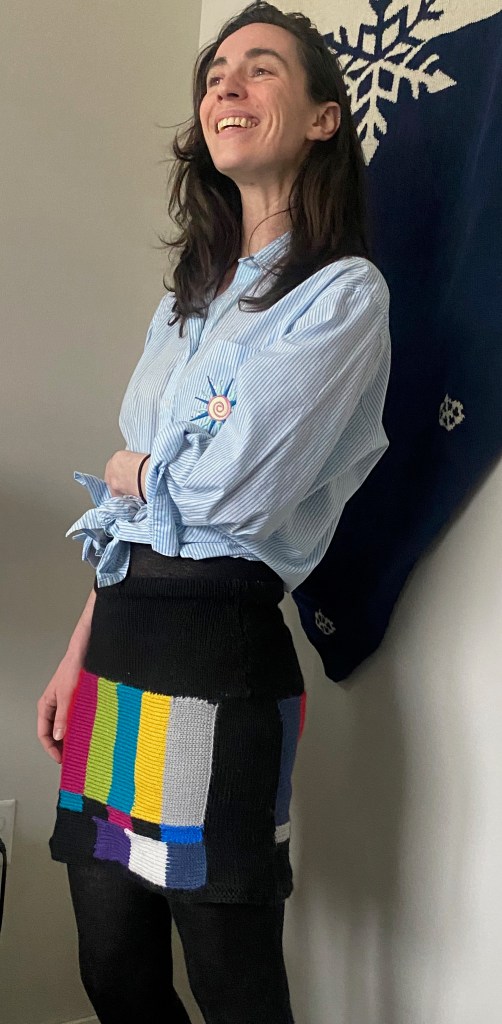
I saved the measuring, cutting, and insertion of the elastic of the waistband until I saw Prima in person. The skirt fit her perfectly without the elastic, so I closed up the waistband, wove in and snipped the dangling ends, and gave the piece a final steaming. Then the photoshoot.


I have enough yarn left over for a sweater for myself, although I might have to supplement it with another skein or two of black. I knitted a swatch for the sweater using a 5.2 tension, which loosened the stitch gauge to 4 stitches to the inch and the row gauge to 6.25 rows to the inch. That’s fine for a sweater. More importantly, it was loose enough for me to be able to pick up stitches from the side edge without any problems at all, so the modular construction I’m envisioning will be easy.
My plan is to create an oversized, boxy shape with dropped, sloped shoulders, 27″ front and back. I’ll expand the color strips so that they cover the area from above the bust to the hem, and I think I’ll see if I can make the intarsia setting on Melissa’s Brother 270 machine work and make the strips as intarsia rather than as sew-as-you go panels. If it’s too hard, I’ll go back to the way I did it for the skirt. I’m also thinking about doing one part of the neck and shoulder sweater yoke in plain black and the rest of it with a grid in black and white using a Diana Sullivan technique for hand-manipulating a contrast color into plain knitting. She calls it Vertical Floatless Fair Isle. I experimented with it in my 2022 Swatchathon and have been thinking about it ever since. One sleeve will use that color panel that I couldn’t put my hands on when I needed it for the skirt, attached modularly to the rest of the sleeve. The other sleeve will either use the grid technique in some combination of black, white, and gray, or intarsia, if I can do it without too much misery. Now to work out my numbers and carve out time during my afternoon machine-knitting time to get over to the machine at the shop and get it done!

Absolutely worth all that work, what a cool skirt!
LikeLiked by 1 person
Thank you! It was such a great design that it begged to be adapted in a way that wouldn’t require the dreaded garter stitch. Hooray for knitting machines!
LikeLiked by 1 person
all that figuring and finagling makes my brain hurt, but it brought you another resounding success! Can’t wait to see the sweater.
LikeLiked by 1 person
I wonder if I made it seem more complicated than it really was, especially since I used a lot of the designer’s numbers. And then I did a bunch of spacial errors and just plain dumb stuff.
LikeLike
I love this project on so many levels. I actually DO love the feel of garter stitch – usually. I must admit that your stockinette take on this pattern looks MUCH better! The colors are so perfect, and the skirt is absolutely adorable and looks wonderful on your daughter. I have to wonder whether anyone of a generation still lithe enough to wear such a skirt has any inkling of what this pattern actually represents? (Those of us who woke up after falling asleep watching TV in our youth have it burned into our memories!) I am put in mind of a really wonderful intarsia piece that I first saw quite a number of years ago. Maybe it was done by Donatella Mestriner? I’ll see if I can find it and share the link with you.
LikeLiked by 1 person
Thank you for the kind comments! The credit for the colors goes to the designer and Melissa. I should ask my daughter if she understands the significance of the the pattern. I think she does. No, I know she does, because I asked her to help me find a good name for the blog post and she sent me a screenshot of a website that used the phrases “interference glitch” and “noisy stripes”. So she’s one millennial who can wear the skirt and knows what it means.
LikeLike
Oh, yes, I found it. And it was knitted by Donatella. https://ravel.me/tv-monoscope Also, you seriously need a garter bar to make decreases across a row. It was a absolute life saver for the round yoke sweater I recently machine knitted. Failing that, it’s also pretty easy to remove the knitting to a circular needle, then rehand on the needles, with decreases across the row. Also, removing onto waste yarn and rehanging from that, pretty easy.
LikeLike
TIP: Place a spring loaded cord clamp (the sort of thing that keeps your jacket hood cinched down) on one end of the needle, and you don’t have to worry about the stitches sliding off the end while you’re working.
LikeLiked by 1 person
Thanks, Tanya! I missed your comment until just now, sorry! But I don’t understand. One end of what needle? On the knitting machine? Wouldn’t that cause a collision with the carriage?
LikeLike
Oh, sorry, I was referring to the idea of taking stitches off of the knitting machine on a circular knitting needle.
LikeLiked by 1 person
Thanks! I never thought of that.
LikeLike