
I took an online machine knitting seminar in February with Diana Sullivan that she called “From String to Things.” One of those things was a recipe for machine-knitted mukluks, which I thought might be adaptable for use as socks. I really need new socks since my current wardrobe of socks is sprouting holes every which way. Nope. Not adaptable. Mukluks are mukluks, not socks. They don’t fit into shoes.
In the mukluk recipe, Diana provided schematics, verbal instructions, and numbers for every weight of yarn knitted on machines of every gauge, and I followed her instructions as faithfully as I could. Her mukluks were knitted as a long, single shape, with increases and decreases forming triangular flaps to be attached together in order to encase the foot, short-rowed pockets for the heels and toes, and long stretches of plain knitting for the leg and cuff. Toward the end of the knitting, the piece is folded over to form an inner and an outer layer, and all of the triangular flaps are joined together while the final triangle is being knitted. Besides being an item that I thought I could use as-is, it had techniques that I wanted to learn, like the sew-as-you-go method of joining an already-knitted piece to knitting that is in progress, and the short-rowed pockets for heels and toes. I made lots of mistakes and frogged and reknitted over and over again before producing a pair of enormous mukluks that were supposed to have fitted me. I decided to make another pair in the smallest size, knitted on a tighter tension than Diana recommended. I knitted this second pair much more proficiently than the first pair, and it fit me much better. But the inner layer bunches up inside the slipper, and the only time these slippers are comfortable is when I’m sitting down and not trying to walk in them. I sent the first pair to my younger daughter, and she says they are very warm and cozy. I’ll probably tuck the second pair into a care package to my older daughter whether she wants them or not.

So Diana’s mukluks were a bust for me, but they provided news I could use. Generally I lack the vision to innovate a technique that isn’t based on something someone else has developed, but I have plenty of visions for adapting ideas I have learned from someone else. During this same seminar course, Diana taught techniques for making other kinds of footgear, and I gleaned some further ideas. She had instructions for making plain, single-layer socks on one bed, and I closely watched her demonstrate how to make a ribbing by laddering one stitch out of three and then latching it up by hand, instead of using a ribber. I have a ribber, and it worked perfectly well when I used it several times when I first started machine-knitting, but I have avoided it for years and now I’m scared of it. I watched her use the same short-row method she used for the mukluks to make heels and toes, and then she used sew-as-you-go to join the top of the foot into a tube after knitting the sole. I was just finishing my entrelac tunic, knitted entirely in the round on the top bed, and it occurred to me that entrelac wouldn’t require sew-as-you-go or side seams.
I went to the Ravelry pattern database and searched for a hand knitting pattern for entrelac socks using fingering weight yarn knitted cuff-down with entrelac around the foot. I found a free pattern from Drops that had all of the characteristics I wanted, and I studied its numbers and construction method. I always have trouble understanding the concept behind knitting instructions, but eventually I grasped that what I wanted to do was to create a tube with an elbow midway down for the heel and a little bag at the end for the toe. So I posted a picture of the Drops sock on the Facebook group Diana had created for the seminar and asked her how she would replicate it on the knitting machine. It was too open-ended a question. She gave me an answer that must make sense to a true machine-knitter, but I’m an imposter hand-knitter who thinks like a hand-knitter and uses the knitting machine as an extension of my hands, so her construction method didn’t register with me. She said something about starting with the heel and then knitting something and then knitting something else and then doing sew-as-you-go, but you can see how much her reply didn’t make sense to me. I asked her if it wasn’t possible to start at the cuff and knit downward like the hand knitting instructions said, and she warned me about gauge discrepancies. Clearly she didn’t think the way I was envisioning this was the best way to do it, but eventually my thinking got clear enough for me to describe what I had in mind, and she conceded that it should work.
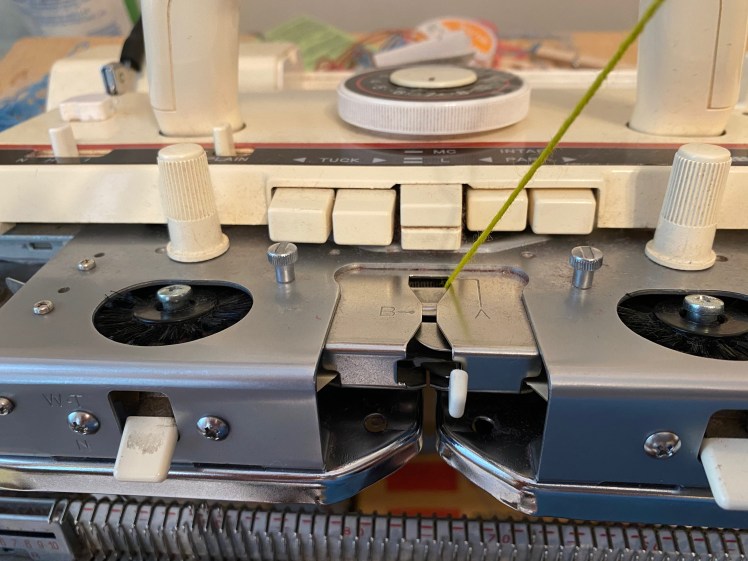
When I hand-knit a sock, I usually like to reinforce the heel with stranded striping for two layers of yarn that won’t wear through as quickly as a single layer of yarn. Alternatively, heels can be reinforced using a method called Eye of the Partridge (don’t ask me why it’s called that) done by slipping every other stitch, every other row, and alternating the slipped stitches every two rows. I didn’t know how to make my knitting machine slip stitches, but Alison came to my rescue yet again and gave me a link that described the process for Brother machines. You press in both part buttons and put the needles you want to knit into upper work position while leaving the needles you want to slip in work position. I needed to combine this procedure with the short-row pockets for the heels and toes, so I tried out a swatch. I also tried out the cast-on method Diana used for her single-bed socks, the double e-wrap cast on, except that Diana does hers with waste yarn. I always have trouble removing waste yarn when it starts off the knitting, and I didn’t understand how the waste yarn makes anything better anyway, so I tried the cast-on without it.
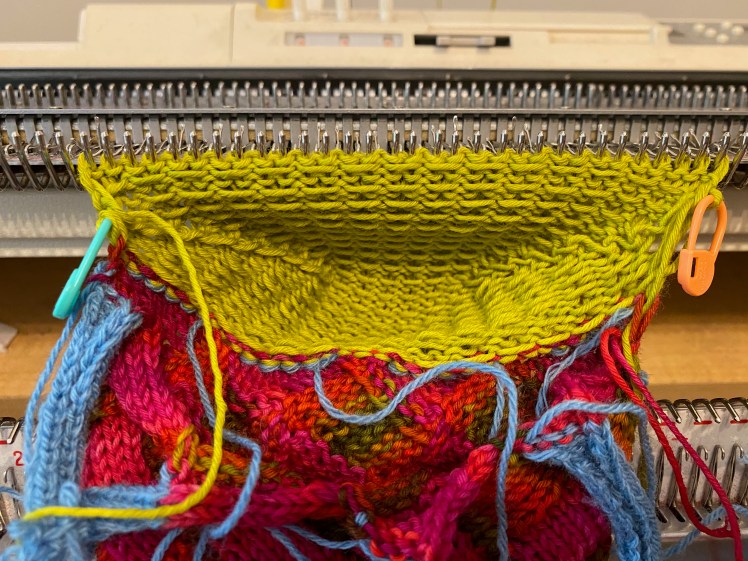
My swatch tried out the double e-wrap cast-on, a laddered ribbing, and a short-row/slipped stitch heel. The double e-wrap cast-on is done by e-wrapping the first needle, then passing the yarn under the first and second needles and up and over the two, catching the yarn inside the latch of the first needle and manually pulling the needle back so as to form a stitch. Pass the yarn under, then over the remaining needle and the next one and catch the yarn inside the latch of the first needle and pull it back to form a stitch, and so forth. It was fun and easy and it made an attractive corded edge, no waste yarn necessary.

Making the ribbing manually made me think I ought to get over my ribber aversion, but I got better at it with practice. I was having a bit of trouble consistently ending the raveling on the same row, so I decided that on the sock, I would do the double e-wrap cast-on plus two rows in a contrast color, both as a design feature and also to delineate where the raveling was to end. I stuck my latch tool into the stitch in the last row of the contrast color to hold the stitch after raveling down from the top row of that stitch, then stitched it back up with a knit stitch next to the purl stitches that are on the facing side of the knitting hanging from the needles. It isn’t the fast way to do it, but it got faster the more I did it.
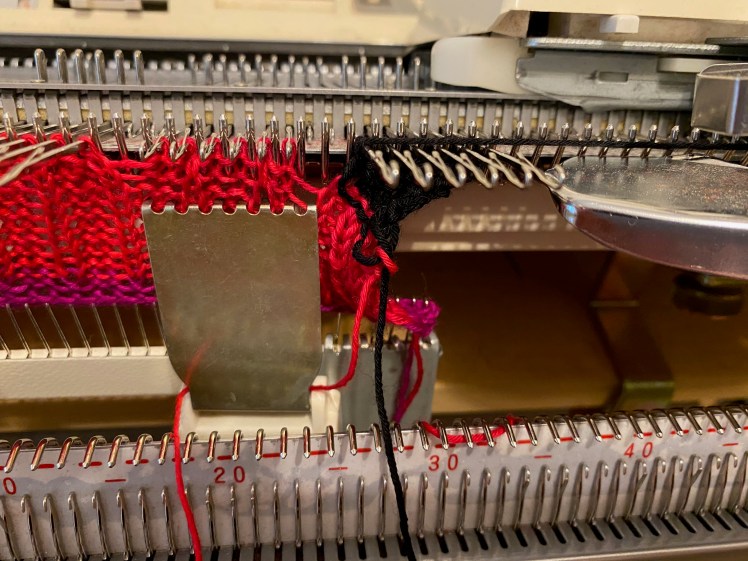
Using Diana’s mukluk instructions for shaping the heel and toe, I short-rowed the decreases by pulling out the needle closest to the carriage while trying to remember to push in the part buttons, pull out the edge needles so that they knit, and use the every-other-needle pusher to slip the other stitches in pattern, and then remember to release the part buttons for the plain row. When it was time to do the increases for the second half of the pocket, I had to remember to wrap the last needle on the carriage side and push in the needle on the other side to return it to work, while also remembering all the things that needed to be done to produce the slipped stitches. It took a lot of practice to figure out the rhythm of the process. Alternating the arrangement of the slipped stitches for the Eye of the Partridge was one step too many for me, so I decided I would just line them up and spare myself a little mental wear and tear. Although really, it makes absolutely no difference to the feel or wear of the socks where the slipped stitches line up. One just gets a little OCD about things like alignment. So it took a while to work it out, but at the end I had a plausible heel/toe swatch.

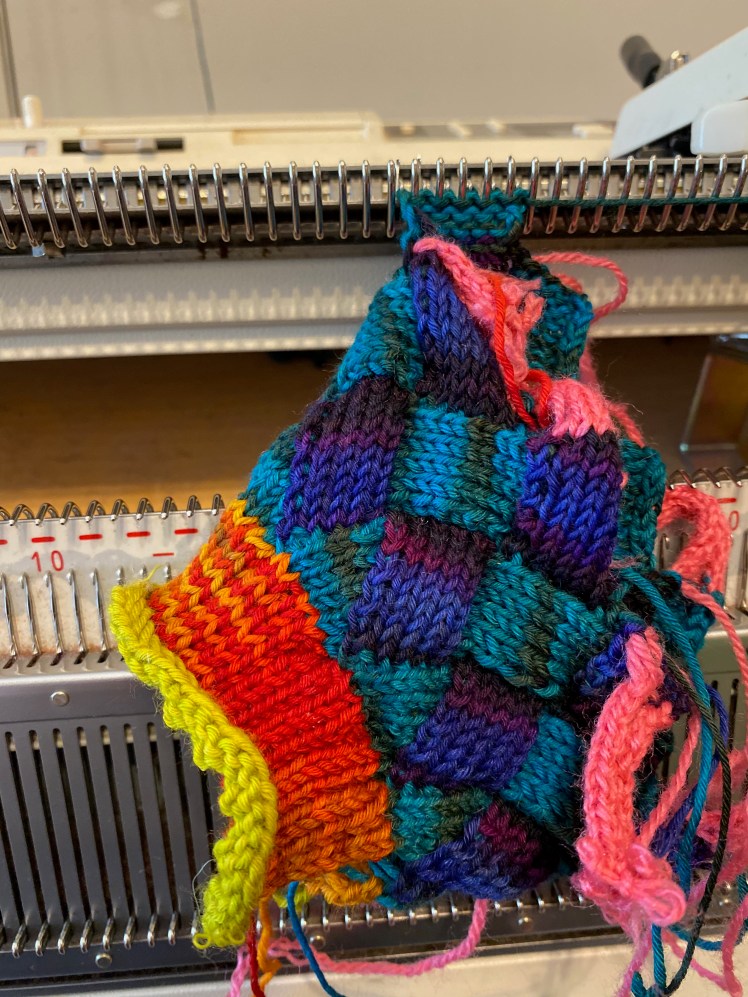
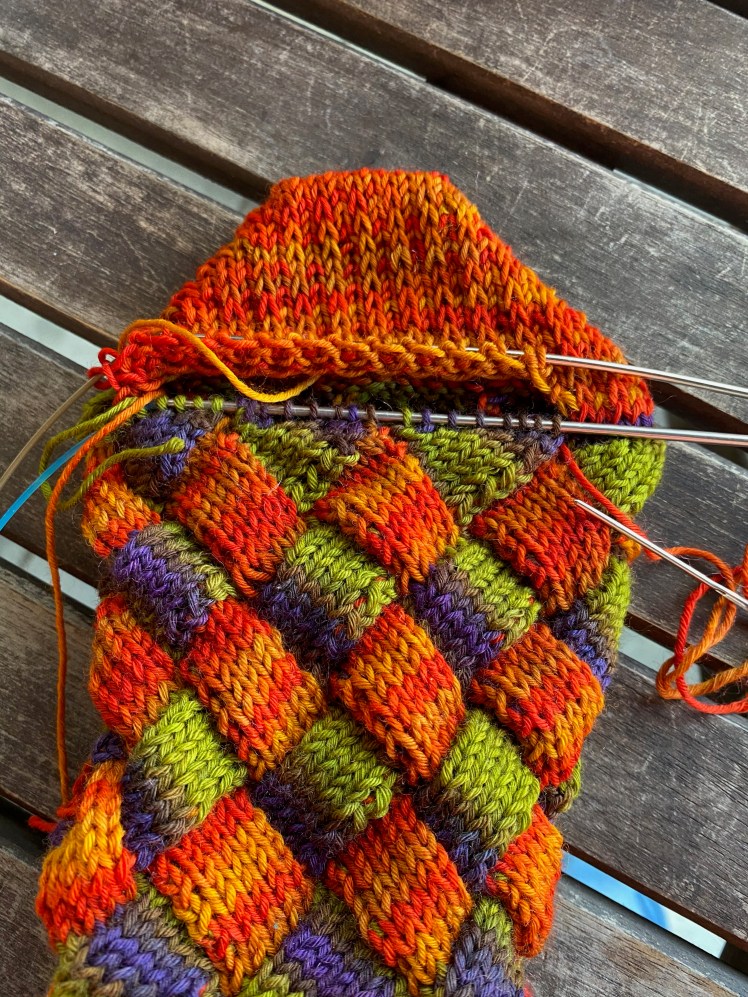
Now I had the elements for my sock prototype. I borrowed the essential numbers from the Drops hand knitting pattern, which were a cast-on of 64 stitches for the ribbing, reduced to 48 stitches for the entrelac, 34 stitches over half of the sock for the heel, short-rowed to 12 stitches at the corner of the heel, and 32 stitches for the toe, short-rowed to 10 stitches at the peak of the toe. The Drops pattern divided the 48 entrelac stitches over six 8-stitch diamonds. For logistical as well as aesthetic reasons, I divided the 48 stitches over eight 6-stitch diamonds, because it was simpler to decrease two stitches in a 6-stitch space than the uneven number of stitches to decrease 16 stitches in six 8-stitch spaces, since 16 doesn’t divide evenly into 6. I could have done it, except that I liked the look of many tiny interwoven shapes better than fewer larger shapes.
I will describe my construction method with a photo tutorial.
1. Double e-wrap 64 stitches in a contrast color for two rows. Knit 10 rows in a different color. Hand-manipulate the ribbing, raveling down to the contrast color.

2. Set up the entrelac, dividing the 64 stitches into eight groups and decreasing two stitches per group. Use a tighter tension than the ribbing, two or three clicks tighter. Knit the foundation triangles and then knit the waste yarn into each group of six stitches. Join the left bottom corner stitch of the first triangle with the right bottom corner stitch of the last triangle to work the full entrelac diamonds in the round. Careful, don’t twist the knitting!

3. Knit the leg in full diamonds, maximum length limited by the ribbing’s capacity to get around the calf. When approaching the heel, knit half in full diamonds and half as finishing triangles. (It’s important to make sure there’s an even number of entrelac squares in the sock because the heel needs to start on a flat edge, which isn’t possible in a full diamond.)

4. The heel is built on four triangles, six stitches each, for a total of 24 stitches. Pull out 34 needles, temporarily skip the two on the right edge, pick up the six stitches of the first triangle on the right from the base of the waste yarn, and transfer them to the next six needles. Leave two needles empty. Repeat for each of the remaining three triangles, until all of the 24 stitches are on the needles and there are two empty needles between each group of six and two empty needles at the right and the left. Pick up loops in the gap between each group to make stitches to fill the empty needles.


5. Knit one plain row across 34 stitches, right to left, loosening the tension about two clicks. Begin the short-row heel pocket on the next row, needle nearest the carriage pulled out of work, part buttons pushed in and needles arranged for slipped stitches. Next row plain, needle nearest the carriage pulled out of work and the part buttons released. That means the plain rows are knitted right to left and the slipped stitch rows are knitted left to right. Repeat until 11 needles on both sides are out of work and 12 stitches remain in work in the middle. Then start the increases by wrapping the needle on the carriage side and pushing the needle on the other side into upper work position. Maintain the alternation of slipped stitch rows left to right and plain rows right to left. Do this until all of the needles are back in work.

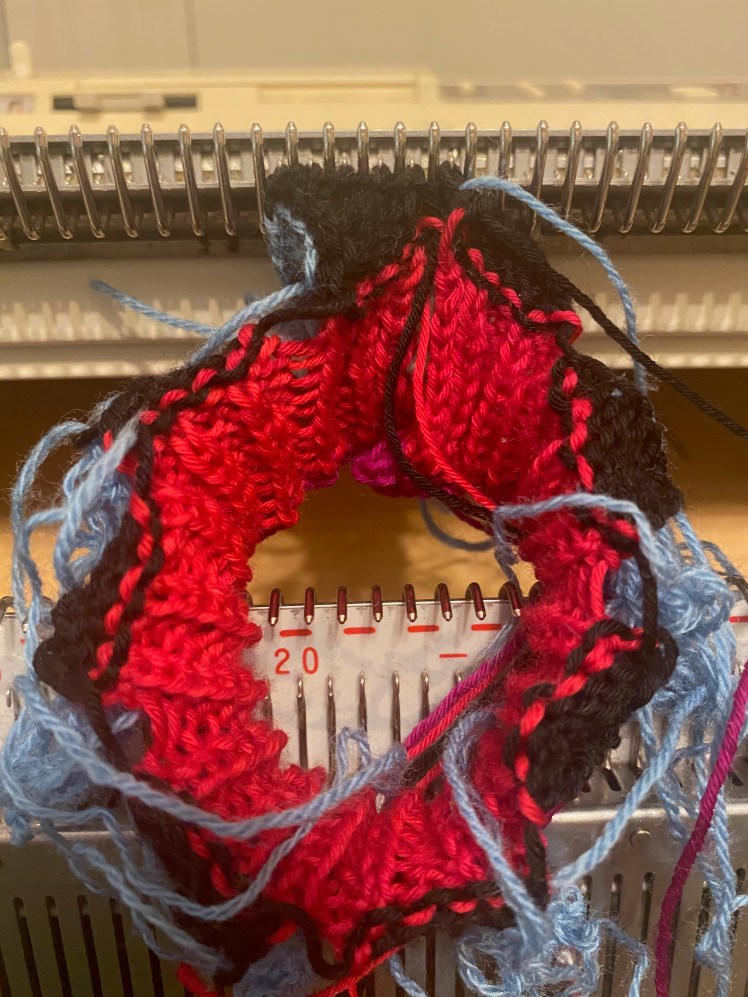
6. With stitches on 34 needles, put the right-most and left-most stitches each onto a stitch marker, to be joined to the neighboring entrelac diamonds when it’s time to knit them in the next full diamond sequence. The remaining 32 stitches are divided into four groups of eight stitches. The edge stitches of each group are transferred on top of stitches in the group to reduce the number of stitches in each group from eight to six, like at the start of the entrelac after the ribbing. Make foundation triangles with the same color used before starting the heel, going in the same direction as the four full diamonds, to finish the sequence.

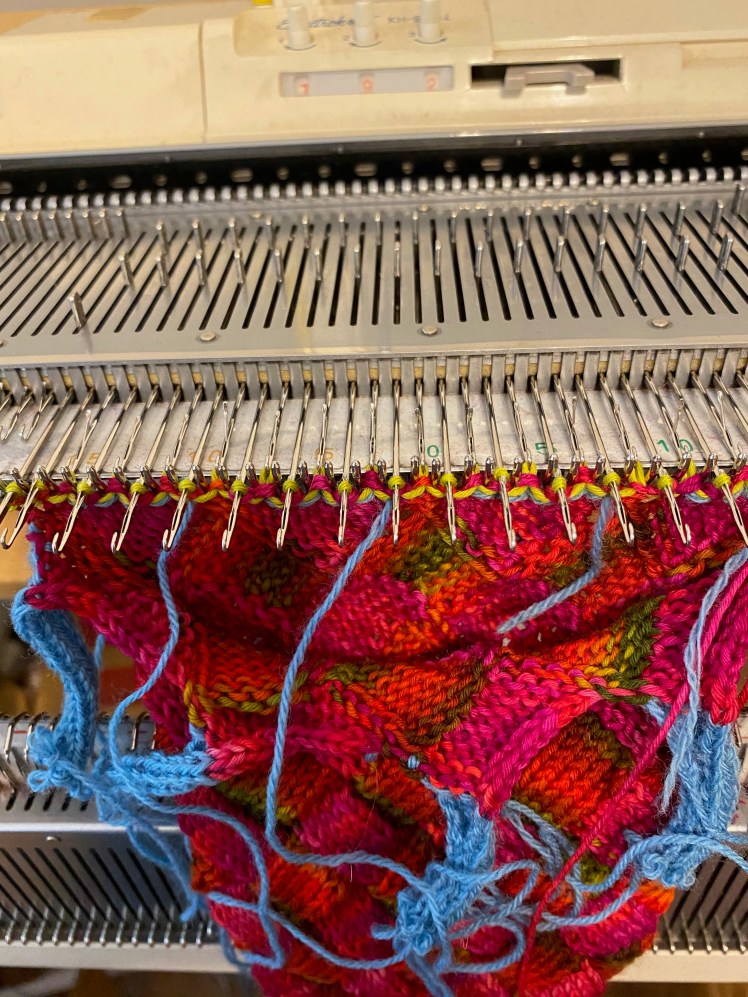
7. Resume full diamond sequences to cover the length of the foot to the base of the toe. Do finishing triangles with a plain row to knit the wrapped stitches and then another row to get the yarn to the side where the next triangle needs to be knitted. This makes life a lot easier when it’s time to do the kitchener stitch that closes the toe. Seal off each triangle with waste yarn.


8. The toe is made almost exactly like the heel, but it’s done on 32 needles instead of 34, with the same number of decreases (11) ending in 10 stitches in work before reversing the process to make the top of the toe. On the half of the stitches that line up with the heel, place the stitches that align with the heel onto the needles. I’m expressing it in terms of stitches rather than just saying to put half of the triangles on the needles for the toe, because I found that my desired length required me to end on a different color than the one I used at the beginning and end of the heel. So the alignment with the heel meant that I used the stitches from two half-triangles, at the edges of the heel, and three full triangles.


9. Scrap off the 32 toe stitches when all stitches are back in work. Put the stitches onto double-pointed or circular needles. On the top of the foot, pick up two stitches between the triangles so that there are 32 stitches on both needles. Join with Kitchener stitch.

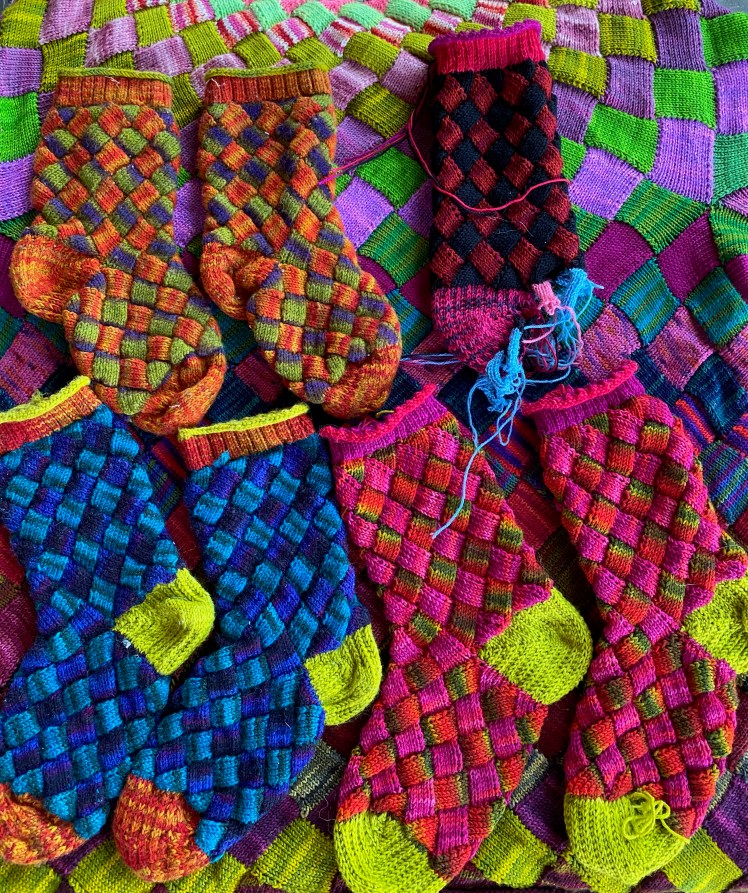
As the photos show, I have made three pairs with a fourth pair now on the machine. The prototype is the green and orange pair, which showed me that my numbers and construction method were good and produced a comfortable and serviceable pair of socks, but the fit needed some tweaking. They were short and wide and looked, a friend told me, like mukluks, which made me wince because of the ill-fitting foot-bags that started this adventure. They fit comfortably in shoes because I knitted them on a relatively loose tension (7.0 for the entrelac and 8.0 for the ribbing, heel, and toe) that allows them to stretch to fit the length of my foot, but for the second pair, I added an additional full diamond sequence to both the leg and foot and tightened the tension a click, 6.2 for the entrelac and 7.1 for the rest. Then I thought the second pair was still a little loose, so I tightened the tension by another click for the third pair, 6.1 for the entrelac and 7.0 for everything else. The third pair is perfect for me. The fourth pair, now in progress, is Charles’ birthday present. The second pair fit him nicely before I put in the toe, so I will use the same numbers and tension and add some more sequences to the length of the leg and foot, probably about 3″.

I have put together this very detailed photo tutorial in case anyone else wants to make machine-knit entrelac socks, but I don’t think that there are a whole lot of people who are going to want to do that. They’re a ton of work and don’t take that much less time to machine knit than to hand knit them; for me, about 30 hours for a pair, noting that I’m not a fast machine-knitter and am easily distractible. People hand knit pairs of socks in less time, although maybe not entrelac. What I love about entrelac socks is that 6-stitch entrelac squares show Wollmeise multis to their best advantage, and I have a lot of Wollmeise multis that have been waiting years for their moment. And I really hate hand-knitting entrelac. So 30 hours of working time is actually a lot quicker than never, which is the amount of time it would take me to hand knit them. And now I have three new pairs of socks to get me through next winter.

Such an explosion of color. It looks like machine knitting requires much manipulation.
LikeLike
It doesn’t have to, but the things I’m attracted to always seem to require a lot of hand manipulation.
LikeLiked by 1 person
I admire the amount of detail in all your knits.
LikeLike
Thank you! Detail keeps me interested.
LikeLiked by 1 person
I don’t think I’ve ever enjoyed any blog post more!! Thank you for explicating your process! I am new to machine knitting after decades of handknitting, and apparently have the same mindset that you describe. The way you describe how you figured out what to do and how to do it was so useful. It’s good to know I’m not alone.
AND your socks are GORGEOUS!
LikeLiked by 1 person
I’m so glad you liked the post and found it helpful! If you really want to feel better about yourself as a handknitter trying to master machine knitting, check out my post from 2016, Scary New Toy. A machine knitter told me I shouldn’t write things like that because it might make people think machine knitting is hard. Well, guess what???
LikeLike
Just read the post you recommended! I read bits of it out loud to my husband–partly because your writing is so good, and partly to let him in on the fact that I’m not the only one who learns, and does, and learns, and does. : -) I need to apply my learning to something real so that I have a place to hang that memory of learning.
I started working my way through my LK150 manual and was very pleased with myself until I realized I didn’t know how to do a closed cast on, or how to bind off! I bought my machine online from a “local” (2 hours away) dealer during the Covid plague, and so didn’t really have access to a teacher. So, to the interwebs! I got tired of learning technique bits, and decided to start a project to keep my interest–soakers for new baby! This really pushed my understanding of what the machine was about, combined with Susan Guagliumi’s essentials class on Craftsy and Diana Sullivan’s videos, I am feeling more and more confident. One of the things that helps the most for me is to see how Susan and Diana work a garment
So much fun to read your posts! Thank you for sharing your process!
LikeLike
You sound so much like me! And I’ve been hankering for an LK150! Are you happy with it? I haven’t encountered anyone who didn’t love theirs. You really can’t go wrong learning from Susan and Diana. They are so good.
LikeLike
Abby, you don’t just knit on a machine, you perform feats of engineering! I admire your tenacity,,there is no jumping in at the shallow end for you! Well done, Respect lady!!!!!!!
LikeLike
Thank you kindly for that! You know how I am, I don’t know much about machine knitting, but I take the little I know as far as it will go. Then I think of a way to take it a little further.
LikeLike
I love these so much! My machines are sad and lonely and jealous of all the glorious things you make on yours. They are just sitting there…staring at me. I’m going to go back to the basics and work my way up because I REALLY want to make some socks like these. ❤
LikeLike
Thanks, Melody! The one thing I didn’t get specific about is how to form the entrelac shapes in the various parts of the sock. If you don’t know how to knit entrelac, Diana Sullivan probably has some YouTubes. I bought her book and DVD and have marked up the book with notes on my variations.
LikeLike
Wow, so many ends! You have more patience than I! I was scared of my ribber, but after about 25 minutes of playing we became firm friends (and I wondered what I had been scared about!).
LikeLike
Oh, I’m sure you’re right! I think maybe the source of my trauma is a person who was trying to teach me how to use it, and she and I didn’t hit it off.
LikeLike