
I have previously described my The Interior of My Brain Ravelry group as my brain trust. No matter what the question is, someone has an answer or a creative solution. We also inspire each other with projects that spark questions in other members’ minds that we want to work out in our own way while consulting with each other for ideas on how to get from here to there. That’s our way of doing a “knitalong”, or KAL, knitter jargon for a group of people following an agreed-upon pattern and knitting it at roughly the same time. Except that we don’t use patterns and we do what we want whenever we want to do it.
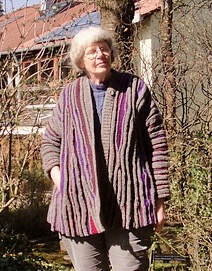
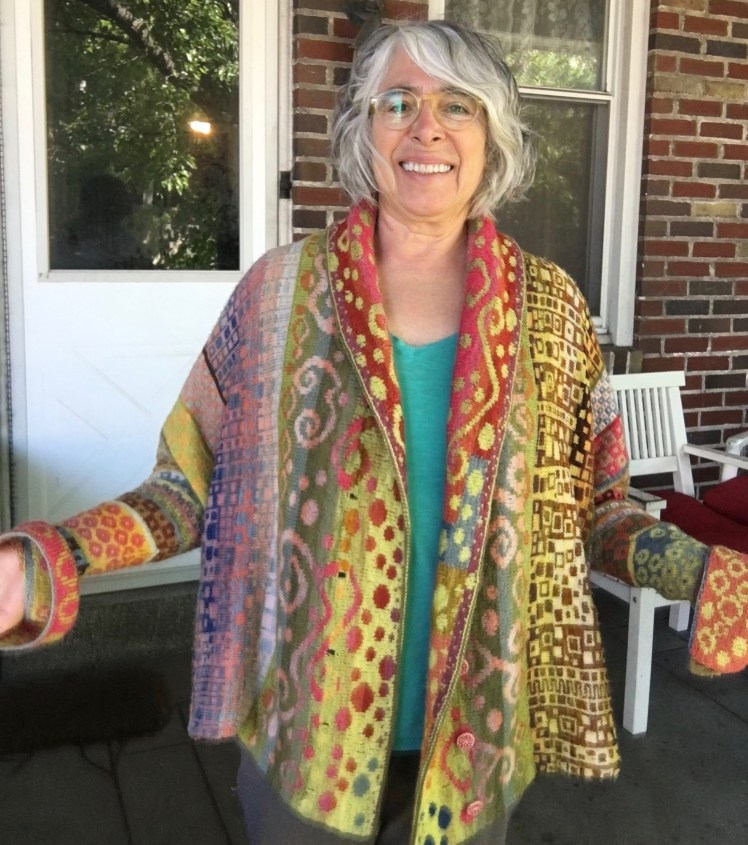
Our member Johanna, a prolific knitter, spinner, natural dyer, weaver, and all-around Renaissance woman from Vienna, Austria, presented a jacket made of her natural-dyed yarn for our rapturous admiration:


There was so much to analyze to figure out how Johanna constructed this creation. Priscilla, my co-moderator and Johanna’s American analog, from Augusta, Georgia, explained Johanna’s construction method this way:
Knit both sleeves and hold the stitches on circular needles. Try the sleeves on and see where the lower portions fall on your body. How much extra length do you want the sweater to have? There’s a transitional band that Johanna knitted onto the sleeve shown (it’s soft orange in color). Most of the band simply continues the sleeve stitches, but below the sleeve it looks like she’s cast on several more inches of stitches. This means that the orange band extends beyond the sleeves and down to the lower hem of the sweater. So – this length of cast on stitches could in itself solve the overall length issue of the sweater. If we want the sweater longer, then we cast on more stitches than Johanna did.
It look like after the orange band was knitted, Johanna may have started a triangle for the front by casting on several stitches (I would try 3). At one end of every row (knitted back and forth), increase one stitch. At the side of the triangle which should join onto the the orange band, knit the last stitch of the row together with one stitch from the orange band. And at the beginning of the next row, knit the first stitch of the triangle together with one stitch from the orange band. (But, Johanna might have used a different increase ratio for her stitches. I’m just putting in one stitch increased per row because this will yield a good triangle shape, or at least it did for me in another sweater I knitted.)
Once your triangle is as wide as you want it to be – and for this measurement you also want to include the finishing band that is knitted around the entire neckline – then if you need the triangle to keep growing taller but you don’t want it to become wider, then you need to pair an increase at the sleeve side with a decrease at the center front – this will give a vertically straight line. And here we are deviating from Johanna’s design because she has left her fronts with sloping lines in a surplice wrap style.

Right away there was a lot of enthusiasm for a KAL. This is my group, and I always want to encourage any activity that sparks creativity and discussion to keep the group interesting and lively, so I agreed that I would participate in it too; but honestly, I didn’t know how I was going to manage my time with projects that were already in my queue. Also, much as I admired Johanna’s work, I didn’t immediately have any idea of how to adapt it to my own preferences. The one thing I knew was that I would use my own plant-dyed yarn. So I hung back for a while, but fortunately others jumped in.
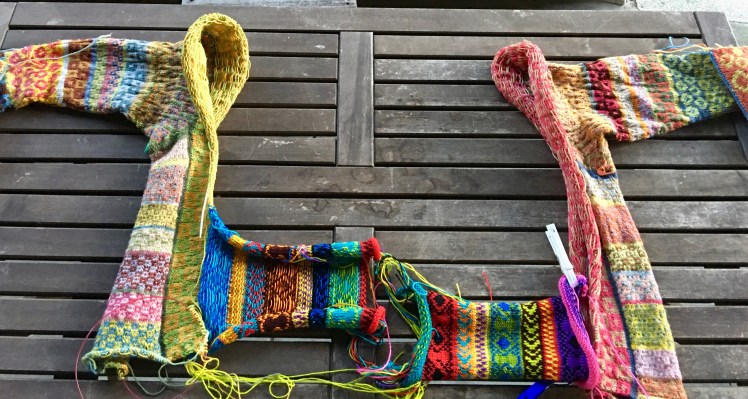
Priscilla led the way with her version, using her own handspun and a stranded miniature checkerboard pattern that she borrowed from a sock pattern. She knitted the sleeves two-at-a-time after first knitting cuffs side-to-side in garter stitch and then picking up stitches from the edge of the cuff and proceeding up the sleeves in a conventional fashion. Her first major modification to Johanna’s design was to make the sleeves much narrower, the size of a conventional sleeve, until she got midway up the upper arm, when she started increasing like mad with an increase every two stitches in three increase rows, one per repeat of the stranded checkerboard pattern on the plain rows, until it reached her shoulder, to make the knitting large enough lengthwise to cover some part of her torso. Then things got interesting. She cast on additional stitches at the bottom back edge of the sleeve to make the jacket as long as she wanted it to be and started knitting only the stitches for the back in flat knitting, side to side, with all other stitches set aside for later. First she knitted one side of the back, then the other, and grafted the two sides together, at which point she realized that the back was too big to stay on her body without corrective action. The correction would be done in a part of the construction to be knitted later.

Next Priscilla created the fronts, deviating from Johanna’s construction method by knitting them in pieces whose shape she formed by drawing them out on a piece of paper and using that as a pattern. She knitted back and forth from the bottom and plotted her decreases to conform to the shape of her paper pattern.

Then she sewed the fronts to the rest of the jacket. I’m not sure if she bound off the front stitches that she was holding on a needle while she worked the backs or if she joined the live stitches with the separately knitted front pieces. After the pieces were joined together, she picked up stitches, up one side of the front and around to the back, where she corrected the excessive width of the back by spacing her picked up stitches fairly widely apart and then decreasing stitches to gather the fabric in so that it would fit her shoulders and not fall off her body. Johanna had dealt with the same problem also by gathering in the excess width in stitches picked up for the final band of stranded knitting that traveled up one front triangle, across the back, and down the other front front triangle.

When Priscilla got to the other side of the front, she picked up the same number of stitches as the first side. Then she did several more color sequences of the checkerboard pattern. She ended with a garter stitch button band and bottom edging.


While Priscilla knitted and posted progress pictures in the thread, my thoughts about my version were evolving. I had practical reasons for not wanting to make the garment shape Johanna had made. The big sleeves wouldn’t fit inside a coat, while the deep V surplice front would leave my body exposed where I suffer most from cold, at the upper chest and neck. The length hit at a place that my back wants to be covered. I didn’t know how I would use a sweater shaped like Johanna’s or if it would even look good on my body. But Priscilla had demonstrated a way to take elements of Johanna’s design and adapt them to a shape that suited her style and environment. Like the magpie I am, I picked it over for the bits that resonated with me: slim sleeve, starting with the cuff, and a drastic expansion of the upper sleeve to provide some of the body length. Also the little checkerboard pattern, which made me think about bigger checkerboard patterns, and then about circles and concentric circles, and about improvised double-knitting, which I had experimented with during January Swatchathon 2019 and loved madly despite its slowness and fiddliness. But I wanted a straight line at the point where the sleeve turns into body, or at least a minimized curve. How to achieve that?
Then Kim, the group’s other moderator, from Rochester, New York, decided she wanted to play too. Kim is a very inventive and resourceful knitter, and she knits like the wind. Before long, she was showing progress pictures that showed how the upper arm grew into body length and then turned into body width. She innovated an approach to her sleeve increases that resonated with me, since I wasn’t enthusiastic about creating the curved line between the sleeve and body resulting from large number of increases placed all around the sleeve: she concentrated them at the top and bottom of the sleeve, which straightened out that line.

Then she shaped the body of the garment to suit the shape of her own body by creating short-row wedges at the fronts, and also used short-row wedges to form a V-neck.

Now my own ideas were starting to coalesce. I had already started my own jacket with double-knit pirate cuffs and narrow, conventionally shaped sleeves in stranded knitting with patterning of concentric circles and concentric squares, little concentric squares and larger concentric squares, up to just above the elbow, first one cuff, then the other cuff, then one forearm, then the other forearm.

That way I was able to do more or less the same thing to shape the two sleeves, repeating the same patterning on the second sleeve but in purposely different color combinations. It also bought me some time while I tried to figure out the dimensions and shape I wanted my jacket to be and how to achieve it. Priscilla had demonstrated one way to get from the curve of her dolman-ish sleeves to the straight line of her button edge, by separately knitting a piece from the bottom up that conformed to the curve of the sleeve on one side and was straight on the other side, and sewing that piece to the front edge of the sleeve. Kim had avoided a curve at the meeting of the dolman sleeve with the body by concentrating increases at the tops and bottoms of her sleeves and then shaping the body with short-row wedges in the fronts starting at armpit level down to the hem. Other members of the group started linking patterns knitted side-to-side that demonstrated other ways to get from here to there. Jennifer Beale’s Belleoram design helped to orient me, thanks to the schematic and dimensions she generously provided on the pattern page in Ravelry.
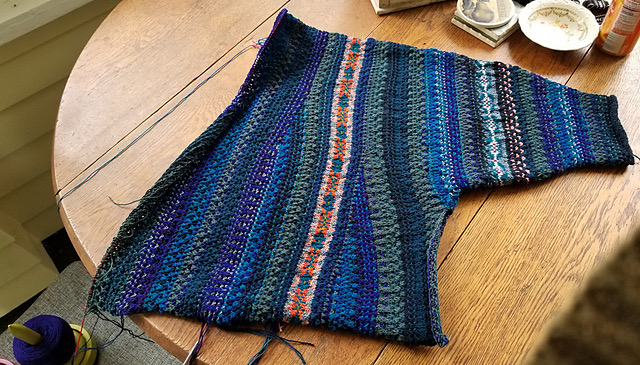
Then Dorothea, a knitter in Munich, Germany, got a wonderful start to a Johanna’s Jacket knitted in bright super-saturated Wollmeise colors, based on the charts Johanna had provided for flower, leaf, and vine motifs. She knitted close-fitting sleeves, then increased around the circumference of the sleeves to get up to the shoulder. One of her pictures gave me the missing link I needed to formulate my construction method. It looked to me as if she had the very start of a panel hanging down from stitches at the armpit of her sleeve.

Dorothea had to interrupt her progress because she had an injury that knitting exacerbated, but she knitted both sleeves and the backs, which she joined together for a short, fitted dirndl-like jacket. When she stopped, she was pondering how to knit the fronts. I am avidly awaiting her solution, whenever her body allows her to get back to her jacket.

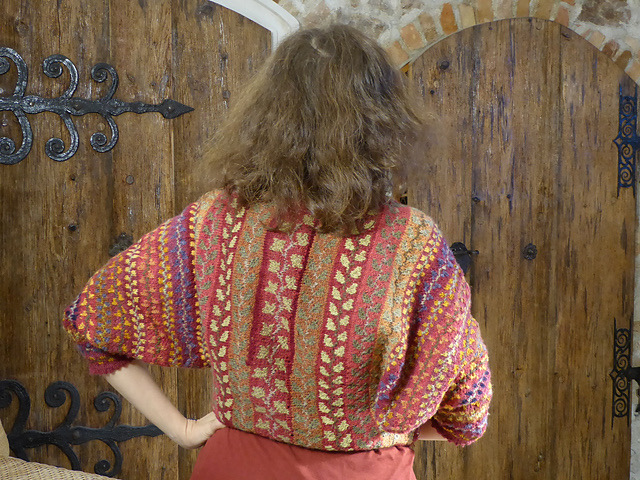
Thanks to the insights Kim and Dorothea had given me, I now had my plan. I would bridge the space between the lower sleeve and the body with several sets of all-around increases worked into the increasing size of my circle motif at the top of my sleeve. Then I would put some increases into the several inches at the armpit of my sleeve and use those stitches as the base of the panel heading downward and knitted back and forth. But first I would do a few short rows in the very start of the panel to straighten the curve of the sleeve where it meets the body. After having achieved that straight edge, I would knit sequences of the little checkerboard pattern until I had the length where I wanted the hem to be. From there I would pick up stitches at the sides of the panel, for a modular construction, and knit side-to-side up the front, around the shoulder, and down the back, until I reached the width I wanted at the nape of the neck. I wanted to achieve a boxy shape, very oversized, with shoulder shaping done in paired increases slightly less than an inch apart. So there would be two pieces, each with a sleeve, a front, and a back still on the needles, that would be joined with another panel knitted from the bottom up and modularly attached to the two pieces by knitting the live stitches of each side together with the knitting that was progressing up the back. I would also work a hidden pocket into the fronts of the side-to-side knitting. Once the back panel was knitted and the two sides joined to it, I would double up the live stitches on the sides and the neck and knit a button band/shawl collar for eight inches of double-knitting. This photo of half of the back of my jacket shows the order and direction of the knitting, which does not have a single seam.

I got working dimensions by measuring one of my oversized, boxy, dropped-shoulder pullovers, which gave me some numbers for the number of stitches I would pick up from the edges of the side panel, the number of rows I would need to get the body width I wanted to have when it reached the nape of my neck, and the slope I needed to shape the shoulders. The actual finished garment was much wider and the sleeves much longer than the sweater I used as a template, but using a tangible object that had many of the characteristics I wanted in my new garment helped me a lot to visualize how to apply the measurements to a side-to-side construction. I will describe the construction of my jacket in great detail in my next post, with lots of photos. This post is about how different knitters with varying thought processes interpreted a seminal idea and expanded on each other’s ideas to create very different results.
While I was slowly knitting through my plan, Giselheid, a knitter in Munich, Germany, came up with her own interpretation. Like the rest of us, she started her jacket at the cuffs and knitted her sleeves first, with some increases at the armpit to ease the transition from sleeve to body length. We all did that. Giselheid’s increases seem to have been done at the underarm seam line, starting a few inches down from the armpit, which created a straight line between between the end of the sleeve and the start of the body. Then she knitted a strip the length of the side of the garment down to the hem, attached it to the armpit, and knitted the fronts side-to-side, and then the backs, which she sewed together. The broad strokes of Giselheid’s construction method was generally similar to the approach the rest of us took. However, her jacket looked strikingly different from the rest of ours. Giselheid’s style is deconstructed, with a close fit at the upper body, flowing into a generous A-line at the hem, and unlike the rest of us whose color work was stranded or slipped stitches, she used stripes, short rows, and welts to make irregularly shaped purples and reds pulsate out of a stone gray main color in stripes and wedges that looked accidental-on-purpose. We had some discussion at one point about doing a KAL using Giselheid’s oeuvre as an inspiration, because of the inventiveness of her construction methods, her use of texture and short rows, and the deceptive simplicity of her designs. One of these days I’m going to revive that idea. The Interior of My Brain Knits Giselheid! It’s going to be brilliant!

The Johanna’s Jacket KAL started without a pattern or even any real definition of what qualifies as a Johanna’s Jacket. We all took elements from her jacket that we interpreted according to our own personal styles and preferences. Some of us chose to knit stranded patterns as Johanna did, and a couple of us even used one or more of Johanna’s motifs. We all started from the sleeves and built our jackets from the sleeves with at least some side-to-side construction that joined the two sides at the back, although none of us emulated Johanna’s diagonal construction of the fronts, and all of us went our own way in our construction of the fronts and the way we joined the two sides at the back. The one common element among all of the jackets is the sideways construction growing out of the sleeves. But if a knitter decided to make a Johanna’s Jacket based on some other element of Johanna’s design, or went through our thread and found something in one of the second-generation jackets that Johanna didn’t do but which was inspired by Johanna, who am I to say that it’s not a Johanna’s Jacket? As I said at the beginning of this post, I’m all for anything that sparks creativity and original problem-solving.
If you’re curious about the gory details of making my Johanna’s Jacket, watch this space. It’s coming next. Until my next post, this photo is a teaser.

Your jacket came out beautifully. I enjoyed hearing about your unconventional KAL group.
LikeLike
Thank you! I found some kindred spirits in my group!
LikeLiked by 1 person
Now, THIS is knitting. Bravo!!
LikeLike
Well thank you, Holly!
LikeLike
Brilliance all around! I love seeing creative minds hard at work
LikeLike
Thank you! I’m honored to know (virtually) these creative minds!
LikeLike
OMG!! Such beautiful work!!
LikeLike
Thanks! It’s wonderful to have these amazing knitters to create with!
LikeLiked by 1 person