
My younger daughter got married at the end of June to a fellow who has many pursuits, among them a detailed interest in meteorology. The two of them have jobs whose work doesn’t end when they leave the office, and they stay up late and wake up early to complete it. They are sleepy people a lot of the time, and they cherish their naps on the couch. As a fellow afficianado of the couch nap, I appreciate the value of a good blanket, so I began thinking about temperature blankets as soon as they started planning the wedding.
Temperature blankets assign colors to temperature ranges and present the colors for the high and low temperatures of a given time period in a given location in any arrangement the maker chooses. When the first temperature blankets started to appear a decade or more ago, they were a daily, year-long project recording the high and low temperatures of the previous day in pairs of stripes. These two-stripes-a-day blankets provided an interesting presentation of a year’s weather trends, as well as an impressive presentation of the maker’s persistence and dedication. I knew from the start that I wanted to make mine on the knitting machine, but I didn’t want to immobilize my one and only machine for a year by leaving the work on the needles so that I could add two stripes a day. If I knitted the stripes in seasonal chunks, that was going to be a whole lot of data to assemble, which was going to be a whole lot of not-fun, although I know that plenty of people love doing that and will jump at any opportunity to create a spread sheet. I wish that were me, but it’s so contrary to my nature that if I could do that, I wouldn’t be the person who does what I do.
Temperature blankets offer infinite design opportunities. The questions whose answers needed to shape my design were:
- Machine knitting produces a flat stockinette fabric, unless you do things that I don’t have the equipment or knowledge to do. Stockinette curls. How was I going to tame the curling to make a flat blanket?
- I wanted a blanket that was at least six feet square. The capacity of my single bed machine is 200 needles, which is maximally a bit more than two feet wide. What method would I use to get the much larger dimensions that I wanted? How could I use that method as a design element?
- Was I going to use 365 days of data? Where was I going to get the data and record it in a way that would make it easy for me to access it as I knitted, knowing that I don’t do spread sheets?
- If I didn’t do a day-by-day presentation of the data, would it be weekly? Monthly?
- How was I going to use the high-low temperature color pairings as a design element?
- How was I going to deal with ends? Did I want to make the blanket reversible?
As I was thinking about these questions, I was finishing my Zebra Kurt sweater, and my sister commented that the color pairings looked like a temperature blanket. That made me think about the modular construction method used in Kurt, which would be the answer to the question about how to get the dimensions I wanted given the physical size limitation of my 200-needle single bed machine. It also answered the questions about using the construction method and color pairings as a design element, thanks to the 90 degree offset of the component squares that turns the striping vertically and horizontally. The next question was, how many squares? 52, for weekly average high and low temperatures? The problem is that 52 is an awkward number. It’s divisible only by 2, 4, and 13, and four rows of 13 squares is not a useful blanket shape. Maybe 56 squares, representing a year and a month, because eight rows of seven squares does work for a blanket. I thought about it for a while, while I also thought about options for patterning to fill the squares.
Around this time I had figured out how to fix the problem I was having with the needle selection mechanism of my machine, a Brother KH965i, which was skipping every 16th stitch of the pre-programmed fairisle patterns (as the manual inaccurately calls 2-color stranding) I was trying to knit. It turned out to be a pretty simple fix: unscrew four screws, lift off the panels covering the patterning mechanism, direct food-grade silicone spray at the gunk, and wipe off the mess. And now I could do fairisle patterning on my machine again, so I began thinking about the logistics and aesthetics of using color pairings in stranded squares joined modularly. I got stuck on the logistics of joining a side stitch of a previously knitted square to the first or last needle of new stranded knitting, because I had tried that when I was knitting the side panel and sleeves of my Zebra Kurt, and the stitch fell off of the needle 100% of the time, which required me to redesign that part of the sweater. So I abandoned that thought for the temperature squares.
But stranded panels could be my answer to the question about taming stockinette curl and making the blanket reversible. I definitely wanted to make the blanket reversible. I had made my daughter a single-layer knitted blanket last year, and went to extreme lengths to finish the two sides so that it was perfectly two-sided, but functionally, it isn’t warm enough. Panels were my best solution for the 200-needle width limitation when the width of the blanket far exceeded that capacity.
I really intended to have the blanket done in time to send to the couple as soon as they returned from their honeymoon in mid-July, by knitting it during the winter and spring, but my winter and spring were full of unplanned disruptions that kept me away from my knitting machine. Also, I was in the throes of a mental block because I couldn’t commit to an organizing concept for my design. I messed around with my stash to find colors for the temperature map, but then I got distracted from January to July by covid, air conditioning installation, a sewer backup that put us in a hotel for a lot of a week, travel, and a massive decluttering and refurnishing project to make room for my older daughter and her children to stay with us for several weeks before the wedding, then the wedding itself. But at some point during that time, I got the answer to my indecision about the blanket’s organizing design concept. One of my Ravelry friends made a blanket based on Kaffe Fassett’s Pennants design, which is a cardigan made of square shapes with interconnecting elongated triangles done entirely in intarsia, each square turned at right angles from the adjoining squares. My friend modified the idea by knitting the intarsia squares separately and sewing them together. Immediately I saw how I could use this format to present the data by pairing the high-low temperature colors in short-row wedges using one color at a time.
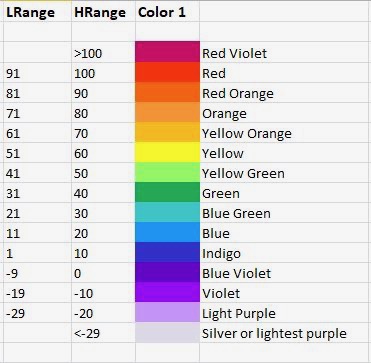
I had another set of questions that still needed answering, but now I could start to answer them. The first question was how many squares to make, and what period of time each square would represent. My decision was that the time frame would cover January to December 2023, 12 months, four squares per month, 48 squares, 6×8. I was still stuck on exactly which data to assemble for each square in the 4-square monthly blocks, but then another friend of mine finished a temperature blanket consisting of mosaic crochet squares whose colors represented the extreme temperatures for each week in 2022 in our hometown of Baltimore, Maryland. That seemed like a great idea to borrow for my blanket, in which one square would represent the month’s average high and average low, the square next to it would represent extreme high and extreme low, the square underneath on the left would represent the high and low temperatures for the 1st of the month, and the one on the right would represent the high and low for the 15th. Now that I had my format, I could finally research and assemble the data and assign colors to each pairing. This was my color key:
I googled “temperatures Madison Wisconsin 2023” and found websites that gave me the numbers I was looking for in the simplest possible format. This is how I set up my data:
These are the colors I found in stash to correspond to the data:
But before I could start knitting, I had to figure out my numbers. I decided that the format that would break my brain the least would be 48 squares representing four seasons widthwise and the three months of each quarter lengthwise, and each square would be about a foot long and wide. My stitch gauge was 7 to the inch, so that came to 84 stitches for each square. 84 is a wonderful number. It’s divisible by 2, 3, 4, 6, 7, 12, 14, 16, 24, 21, and 42. The numbers that became most immediately important were 7 and 12, because I needed to divide the 84 stitches into sections for the short-row wedges: seven sections of 12 stitches. I used the other numbers in other ways later.
Finding the numbers for the vertical direction of the square was more complicated. Normally I would multiply my row gauge (10 to the inch) times the number of inches I needed (12), but my modular construction required a number that would enable me to pick up stitches from three out of four end stitches and end up with 84 picked-up stitches for the bottom of the new square, and expand 84 stitches into this magic number of rows on the side of the square, from which the stitches for a future square would be picked up. 120 rows would have been too large a number to end up with 84 stitches at the 3:4 ratio I wanted to use. 3:4 is 75%, and it would stand to reason that 4:3 is 125%, but I failed in my efforts to compose the equation that expressed the question I was asking. I got 105, an unusable number, when I multiplied 84 by 1.25 or added a quarter of 84 to 84 (84 + 21 = 105).
Instead I drew pictures of the actions I was going to perform on the knitting machine, and discovered that the seven sets of back-and-forth short rows resulted in 14 rows, plus a plain row over all of the needles at the beginning of the wedge and another plain row over all of the needles at the end of the row, for a total of 16 rows per wedge. It’s easy to pick up three out of four row stitches from 16 rows to get 12 stitches, so all I needed to do was to multiply 16 by seven to get 112 rows, for seven pairs of 16-row wedges. That was my magic reversible number that would enable me to pick up 84 stitches from the row edge, and attach the picked-up edge to the new knitting at a rate of 16 rows from 12 stitches. Perhaps my mathematically and scientifically trained daughter and son-in-law can tell me how I should have written the equation to start at 84 and arrive at 112.

After a year of thinking, I was finally ready to start knitting. I cast on my 84 stitches for the first square of the first quarter using the color for the warmer color of the pairing (an arbitrary decision), knitted across the stitches, then put 12 stitches into hold at the side where the knitting had begun, and did the same for each of the subsequent six short row groups across the initial plain row until all of the stitches had been knitted in short rows, seven groups of short rows. At this point the row counter was at 13 rows. Then I put all of the needles back into upper working position and knitted across to finish the wedge, row counter at 14. I took the yarn out of the feeder without cutting it, pressed in the buttons for a free pass, and moved the carriage to the opposite side, the narrow point of the newly knitted wedge, row counter at 15, reset the row counter to 0. These numbers were important for keeping me accurate. The number 16 never appeared on the stitch counter unless I did something wrong, but there were still 16 rows at the wide end of each wedge. That was a bit baffling, but I just figured it out, at this late date. It’s because the two rows that weren’t counted on the row counter were the narrow point of the previous wedge, the first and last rows, and had been counted as row 1 and row 14 when the previous wedge was being knitted.
Then I knitted the other color in the pairing from the opposite side of the needle bed, same process, same numbers, but trying to remember to carry the first color up the edge stitch of the wide end of the wedge at the beginning of every short row pair. After the first square of each quarter, I also had to remember to join an edge stitch from the previously knitted square that formed the right angle edge of the new square. This was at the wide edge of the wedge when the carriage was at the beginning of the short row pair, along with the yarn that was not being knitted in order to have it in position for its turn in the next wedge. To aid the more-or-less even join of the 12-stitch groups into the 16-row wedges, I placed markers at 12-stitch intervals into the bound-off edge of the square that was being joined.
Because the knitting machine shows only the back side of the knitting, all of the work appears as the inverse of the intended orientation while the knitting is in progress, and then each square is worked from the side edge of a previous square, which is a further challenge to one’s spacial faculties. I had to work very hard to prevent disorientation, and sometimes I failed. Sometimes I had to undo squares that went out of order or were in the wrong place, and even worse were the times when I undid correctly positioned squares because I got disoriented. Eventually I learned to stick a clothespin onto the edge of the square from which I had to pick up stitches for the new knitting and stick stitch markers into the edge that was to be joined modularly to the new knitting. Then I laid the work flat to verify that the new square was correctly positioned and commanded myself not to second-guess myself during the process of knitting, no matter how confused I might and would get while the previous knitting was in strange places that didn’t make sense.
So I knitted and knitted and knitted. This wasn’t fast work. I started in the middle of July and knitted several hours a day, until my back hurt and my brain couldn’t be trusted not to do stupid things. We went on vacation away from my knitting machine for a couple of weeks in August, but when we were home again, I got back to work and only finished the temperature blocks in mid-September. In the process, the yarn use offered a practical insight into which temperature ranges occurred most frequently in Madison in 2023, because then I had to go back to my stash and look for more yarn in that colorway. The yellow-green (41-50º Fahrenheit) used more than three full 150 gram skeins. Fortunately, I had it and every other color I needed more of than expected. My bottomless stash had finally met its moment. I really had not anticipated how much yarn this blanket would require.
As a graphic compilation of weather data in a specific place over a specific timeframe, it was also really interesting to see the swings in temperatures depicted in the extreme temperature block for each month. For example, in March, a spread of 55º Fahrenheit between an extreme high of 64º (yellow orange) and extreme low of 9º (indigo), and a 55º Fahrenheit disparity again in April between the high of 83º (red orange) and low of 29º (green). June had a high of 92º (red) and a low of 38º (green), which caught my attention, because Baltimore in June often sees temperatures in the 90’s, but never lows of 38º. If I were to do a composition with a similar scheme for Baltimore, there would be a lot more red and orange red and even more yellow green than I used for the Madison blanket. We haven’t seen subzero temperatures (violet and blue violet) in years.
Now that I have finished the top layer of the blanket, I’m working on the panels for the reverse side, to make the blanket lie flat and cover the joins, seams, and ends. For the past eight years of my ownership of a Brother electronic knitting machine loaded with all the bells and whistles, I have felt unworthy of it because all those bells and whistles boggled my little Luddite mind. I didn’t feel ready to take on the cognitive load of learning how to use them, other than the occasional use of a preprogrammed stranded pattern here and there. Friends told me it wasn’t at all difficult to input one’s own patterns into the machine’s computer, and during a visit to Madison last spring, Tanya Cunningham sat me down at one of her electronic Brothers and guided me through the process. It actually was easy, fun too! I had enough muscle memory from my previous forays into the machine’s preprogrammed patterns to understand what I was doing and why.
It has been six months since Tanya showed me how to do it, but during the last week I tried it on my own. I just followed the steps, and Bob’s your uncle! No problems whatsoever. I bought the fancy machine back in 2016 knowing it would be something to grow into, and now I’m finally growing into it. At least I used it during the last eight years and found interesting ways to use my basic skills, rather than taking a look at its complexity and running away terrified, with the machine hidden under a bed for the rest of my life. Yay me! I’m using my new skill to make four panels in stranded patterns that represent each of the four seasons. My source material is charts from the Alterknits stranded knitting stitch treasury and a traditional Fair Isle pattern from Mary Jane Mucklestone’s 200 Fair Isle Motifs treasury.
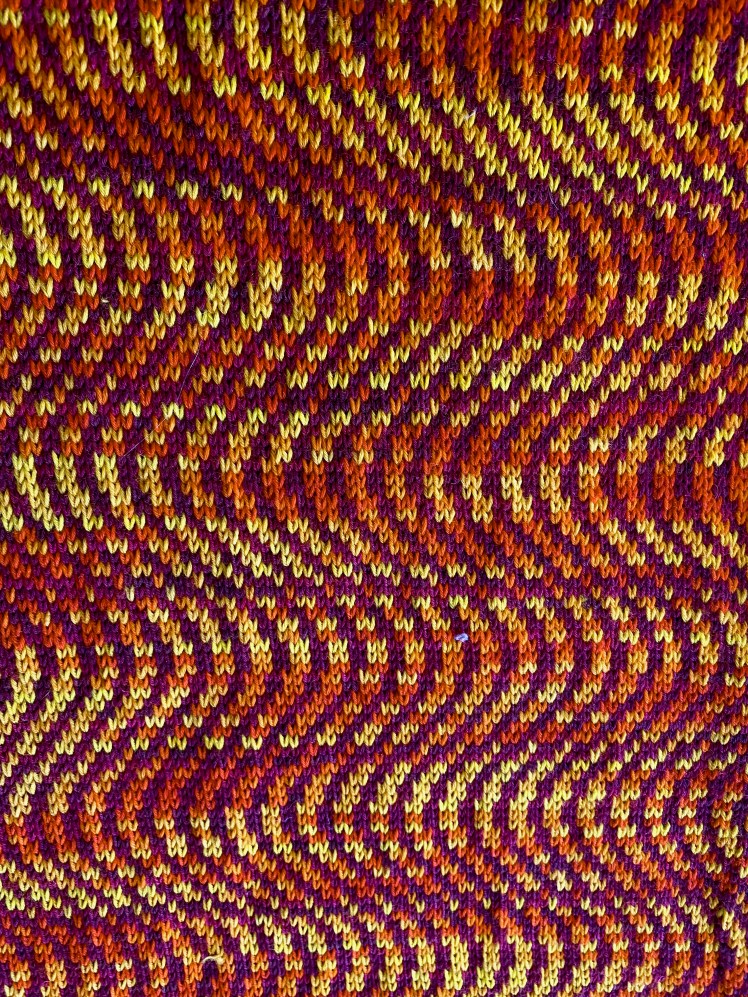
I started off with the summer panel, using a vertiginous op-art pattern of vertical waves (appropriately named Vertigo) that suggested blistering heat. It was only 12 stitches wide, with the same number of stitches moving in the same direction over the width of each row, so I chose it as my maiden foray into this new skill because its simplicity would make it easy to learn the feel of the buttons. I used an orange-yellow Wollmeise multi with a dark red multi, two skeins of each color, which really adds up for the entire blanket. Each quarter of the blanket uses four 150 gram skeins of Wollmeise fingering weight yarn, 16 skeins for the backing. The front of the blanket used slightly less yarn, weighing in at 1,982 grams, about 13 150-gram skeins.
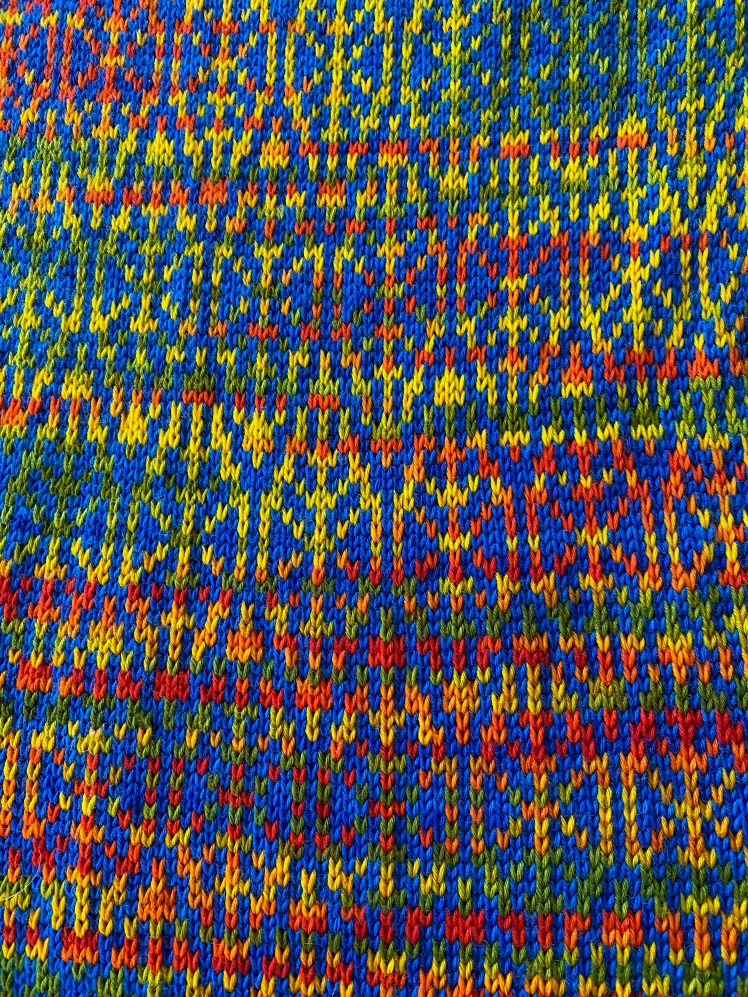
After success with the summer panel, I input the pattern for fall, the Leaves in Water pattern from Alterknits, also only 12 stitches wide, each side a mirror of the other. At this point I felt comfortable enough with the position of the keys that I kept my index finger on the gray key and my middle finger on the white key while looking only at the chart, with the row delineated with a Post-It. Again, no problems, no errors. The colors were a yellow-orange-green multi against a cobalt blue. From a distance, the colors blend together for an oil slick effect.
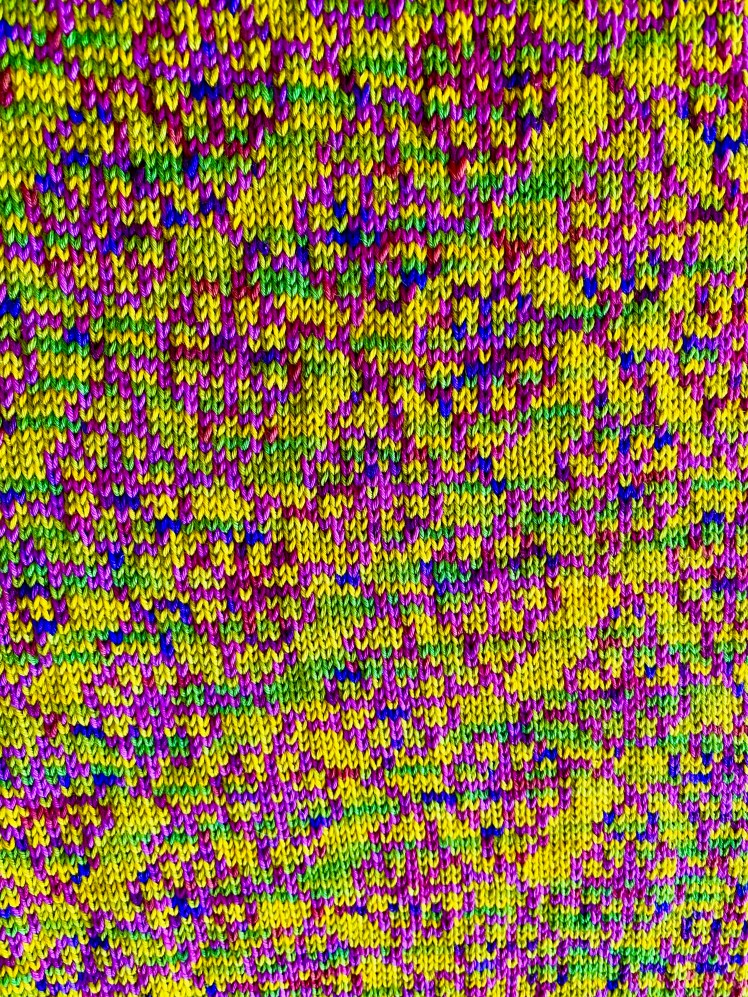
Next, the spring panel, using Alterknit’s Traveler’s Joy pattern, 20 stitches over 20 rows. I was getting confident with inputting these patterns, and the rows for this pattern were not a mirror image on either side of the half-way point, but I was able to poke in the squares accurately and quickly. The colors for this panel are a variegated leaf green with the traveling blossom pattern outlined in a pink-orange with purple flecks.
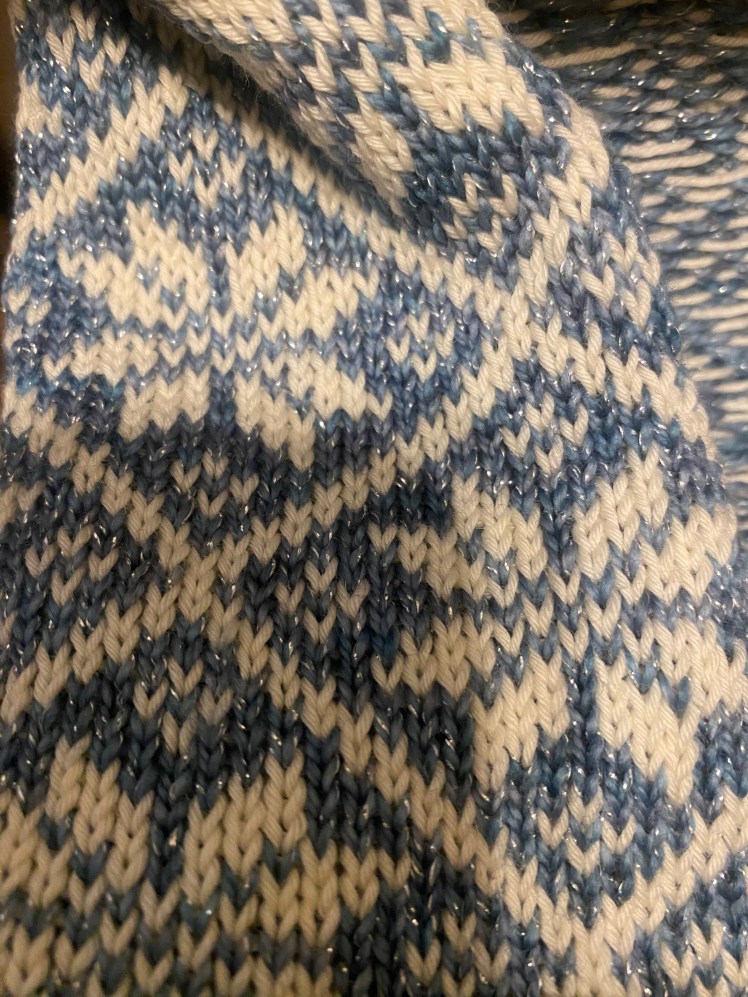
I saved the hardest for last. The final panel, winter, uses a traditional Fair Isle snowflake pattern from Mary Jane Mucklestone. It’s an all-over pattern, 48 stitches wide and 26 row high, and the chart is tiny and needed a lot of attention to keep my place. This time I did make a mistake, and I needed to learn how to fix it. I discovered that the inputted pattern can only be accessed by pressing the check program button and then using the directional arrow buttons to get to the stitches that need to be corrected. But the instruction manual was pretty straightforward, and now the pattern is completely right and I’m feeling pretty darned pleased with myself. It’s a beautiful pattern. The colors for this one are white snowflakes against a background of sparkly gray with a color fade of blue-gray to gray-blue to a sparkly variegated yarn of cobalt blue and deep aqua.

The seasonal panels cover the same area as the temperature panels in a lot less time for the knitting, but the knitting is physically strenuous. There’s a lot of resistance to moving the carriage across stranded knitting patterns over 164 needles and 662 rows, the dimensions of each panel. It’s a bit of a balancing act, getting the work done while not injuring my back. I was wondering if the machine was trying to tell me that two strands of Wollmeise fingering weight yarn in stranded patterning is a bit too thick for it, and after knitting the winter panel using a thinner yarn for some of it, I can confirm that that was exactly what the machine was telling me. In the future I will use Wollmeise Lacegarn for stranded patterning. It will be a great way to knit down my excessive stash in that yarn base.
Now I have all four of the season panels knitted, and I might love them even more than the front side’s temperature blocks. I think that the final weight of the completed blanket might be close to 4.5 kilograms, in the neighborhood of 10 pounds. Unfortunately I won’t get this monster done in time to get photos of the completed work by my self-imposed monthly publication date at the end of the month. That will have to wait until next month, when I will probably have something to say about seaming and finishing the blanket, and some thoughts about the aesthetic effect of the design. Right now all I have is pictures of the finished knitting, and every knitter knows that finishing the knitting is not the same as finishing the project.


Fascinating and complex. You are indeed an ambitious knitter. Congrats on getting the blanket off your needles.
LikeLiked by 1 person
Thanks so much! It does indeed feel good to get that thing off the machine!
LikeLiked by 1 person
Favorite line in this post: “I wish that were me, but it’s so contrary to my nature that if I could do that, I wouldn’t be the person who does what I do.” So true, for all of us, just that most people don’t recognize that! And, of course, you being the person who does what you do is what makes you so wonderful, and fascinating to the rest of us!
You know that calculations and brain work and computer work are probably my favorite part of the knitting I do, and yet I am daunted by all that you have been able to keep in your head in order to keep this project moving forward. I love the back panels, at least as much as you do.
WHAT a delicious, cozy cave this blanket will create over any napper lucky enough to recline beneath it!
LikeLiked by 1 person
Thank you, Tanya! Speaking of calculations, I dug deep in my subconscious and re-taught myself basic algebra so that I figured out the equation that I needed for the row count. No need to ask DD2 and SIL for remedial math lessons! I’ll write about that when I have finished photos of the blanket, the follow-up post.
LikeLiked by 1 person
Akways love reading about your process. Thank you so much for sharing your journeys!
LikeLike
Brilliant. I’m looking forward to your eventual post on the (truly, really, all-put-together) completed blanket.
LikeLiked by 1 person
I sent it off to them yesterday. I’m sick today, so it might be a few days before I can write the update.
LikeLiked by 1 person