
There’s a sentence in the Duolingo German course that’s intended to be funny because it’s deprecating to grandmas and knitters: My grandma’s riskiest hobby is knitting. After absorbing the condescension, ageism, and sexism implied in the sentence, I concluded that it was actually true in my case, because some of my projects are wild and bumpy rides. Breaking a leg isn’t the only way to take a risk.
I really didn’t think I was taking on a particularly gnarly adventure when I first conceived my plan for my second machine-knit adaptation of Junko Okamoto’s Kurt pattern.
This is my first one, knitted by hand, following the instructions very closely.

This is my machine-knit version with different numbers and construction methods, especially at the side joins and sleeves.

I started thinking about a third version during the 2023 January Swatchathon, after I had grappled with my still unresolved needle selector problem that was failing every so often to knit the contrast color on the 16th needle of the preprogrammed stitch patterns. But I had discovered that I could completely avoid the problem if I set up the 1 x 1 knit-purl pattern for stranded knitting, because every 16th needle was the main color anyway. I tried the same concept on the 2 x 2 pattern, but I got random dots of the wrong color if I forgot to look at the way the needles were arranged for the next row and push the errant needles into their proper position. (Machine knitters, if you have advice on how to diagnose and fix this problem, please share in the comments!) Nevertheless, I started thinking of ways to use these vertical stranded stripes as design elements in garments.
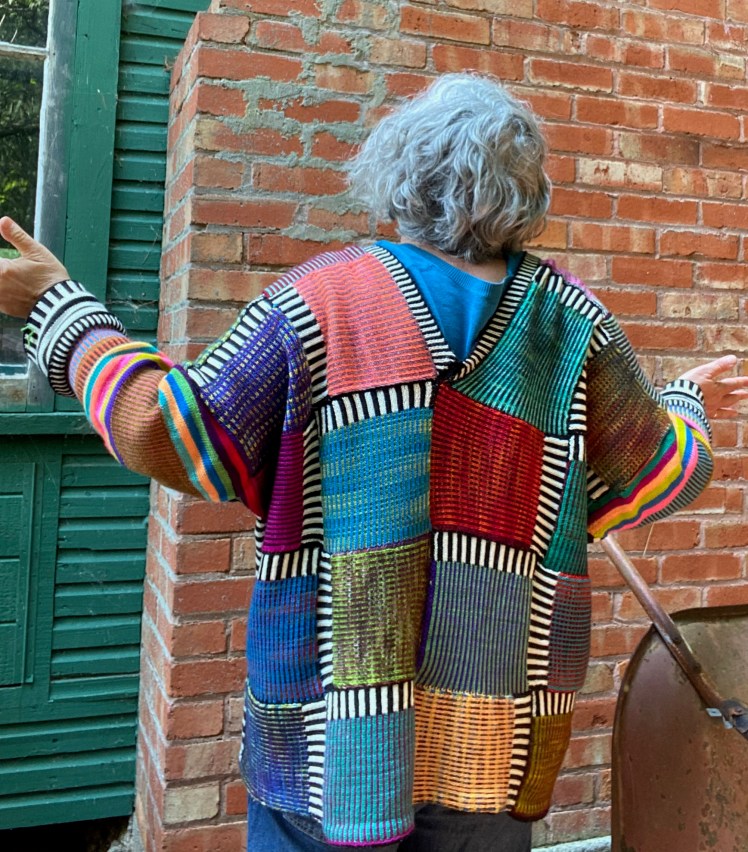
I don’t remember the thought process for getting from my swatches to the plan to use the Kurt design to apply the 1 x 1 pinstripes in colors and the 2 x 2 stripes in black and white. Probably there wasn’t one, because it was obvious. I also don’t remember if I had much of a color scheme in mind before I started knitting, but I knew that the repetition of the black and white stripes wending their way over the patchwork would be the unifying factor of the composition. I think I visualized using dark solids for the main color and a second solid color that would contrast only enough to be visible, but then I realized that the colors I already had wound in cakes were largely multis, and I wanted to use those leftovers before I wound more.
My swatches were the same gauge as my previous machine-knit Kurt, so I used all of the same numbers for the new version, that is, 48 stitches across and 64 rows lengthwise, 12 of which would be the black and white striping. I used the same ratios as before for the modular joins, 3:4 for the stitches picked up along the rows to start a new square, that is 75% of 64 to get 48 stitches, and 4:3 for the modular join along the bound-off edge, that is 125% of 48 to get 64 rows. I explained it pretty well in my post about the first machine-knit Kurt, Machine Translation, so I’ll just copy-paste that explanation:
“48 is 3/4 of 64, so I picked up three stitches from the edge stitch of every four rows. In order to connect the square in progress to the 48 bound-off stitches of the previous square, the math went in the opposite direction, because I needed to knit 64 rows while evenly joining the 48 stitches of the bound-off edge to the new knitting. The math worked a lot like the handknitting pattern, but it was a little easier on the machine, because the knitting machine has a row counter. The easiest way to get 64 rows out of 48 stitches, I found, was to attach the first bound-off loop at the intersection of the new and old squares, onto the edge needle on the first row (row 0 on the stitch counter), knit the row, knit back, then attach the next bound-off loop to the needle on row 2, knit, and knit back. At row 4, skip the loop of the next bound-off stitch, attach the loop after that one, knit back and forth, pick up the next loop at row 6 and knit back and forth. Every time the row counter is at a number divisible by 4, skip the loop and repeat the sequence up to row 64, and bind off.”
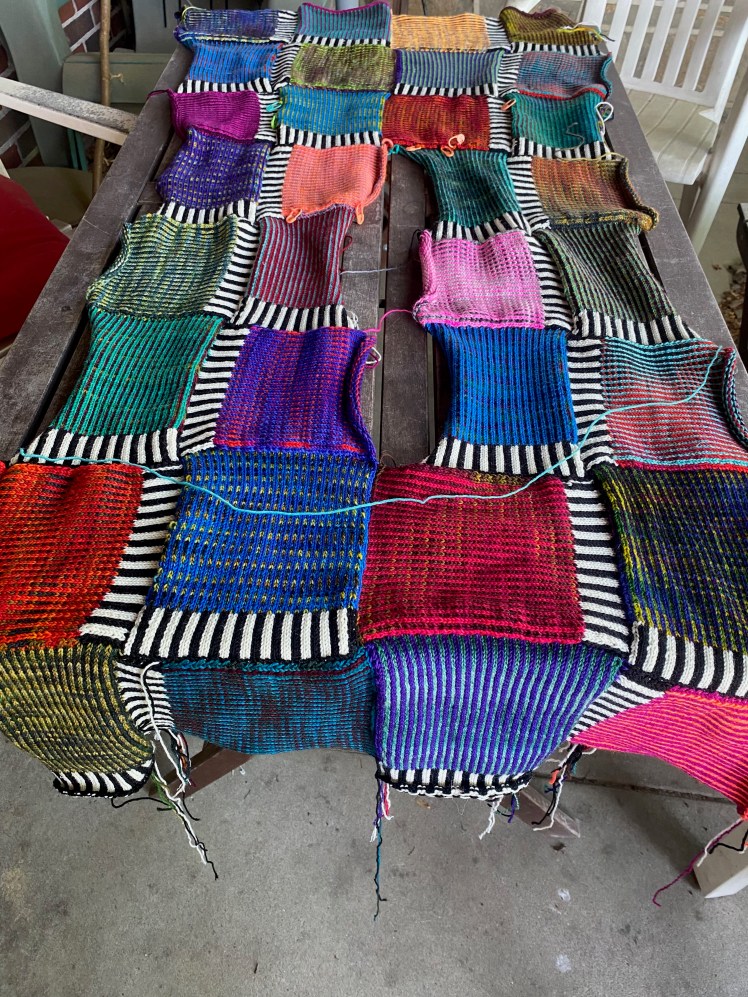
The formation of the 32-block back-to-front V-neck piece went quite well, notwithstanding the stitches that dropped from the contrast color needle closest to the end, and the odd misplaced white stitches in the black striping when I failed to push the needles into their proper position. These were flaws that I would have to fix after the entire sweater was put together. I also picked up the rhythm of the contrast stripe placement and stopped having to consult Junko’s schematic. If the previous square is knitted vertically, pick up stitches from the edge and knit horizontally, and vice versa. Also, if the previous square ended with the contrast stripe, the new square starts with the contrast stripe, and if the previous square ended with the 1 x 1 pin striping, the new one starts with it.
I also got fairly smooth at toggling between the two stitch patterns so that the carriage was at the start of the knitting on the right side. I don’t know how other people do it, but I found that I was less likely to shoot myself in the foot with time-consuming mistakes if I turned off the machine when I finished one pattern, turned the knob to N, pressed in the part buttons with all of the needles in B, and moved the carriage to the left side. Then I turned the machine back on, turned the knob to KC, cancelled the previous pattern and poked in the pattern number for the next one, hit the step button until the ready light came back on, and brought the carriage past the left turn point. Then I brought the carriage over the knitting and prayed that I hadn’t done something dumb that would drop everything off the needles. Then I made sure all the needles were in the right position. If I was really clever, I also remembered to push in the top MC button after I got the carriage back to the right side. Otherwise, frog the row and return to step one.
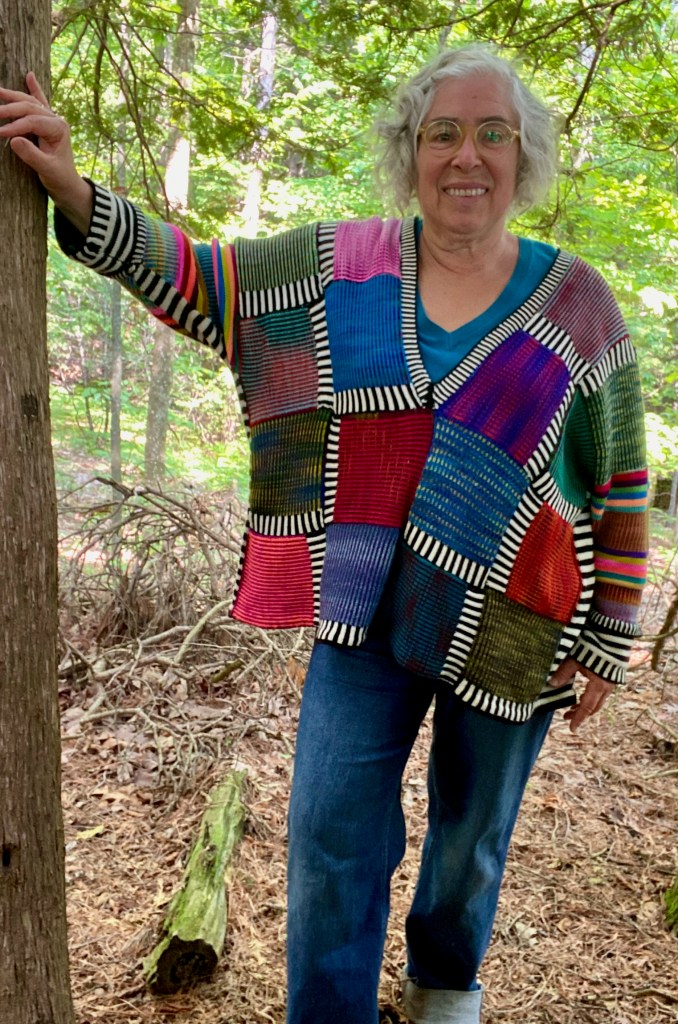
Since I was using leftover yarn without a predetermined color scheme, I was a bit surprised when I inadvertently strayed into something that looked like kente cloth. I love kente cloth, but it’s so closely identified with a culture that I can’t claim membership in that I didn’t want to intentionally imitate it. So I avoided the oranges, bright yellows, primary reds, and kelly greens that I associate with kente cloth and carried on. No one culture owns stripes and patchwork and using up leftovers. I didn’t really have a color scheme in mind, but I usually used dark solids and multis that didn’t have extreme value contrasts, paired with colors that showed up in the striping but were generally not light values. Except for several squares where I shook off those restrictions and used hot pink and neon orange.
Building the squares for the body wasn’t quick knitting, but it went relatively smoothly and efficiently. I hadn’t completely decided on a plan for the sleeves and the pieces at the sides joining front and back and connecting with the top part of the sleeves, so I moved on to the neck band while I mulled that over. In the previous two Kurts, I had hand-knitted a folded ribbing around the V-neck. This time I wanted to try machine-knitting the neck band with 1 x 1 black and white pinstriping on the front of the band, knitting a fold line, and knitting the back of the band in plain black. I think knitting in the round on knitting machines is theoretically possible if a ribber is used, but I don’t know how to do that, so I had to knit the bands in two separate pieces picked up from stitches on either side of the V. The V comes from a slit between three layers of squares, one on the back and two on the front, each 48 stitches wide. So I picked up 144 stitches (48 x 3) from the edges of the slit squares and knitted 10 rows in the 1 x 1 pinstripe, a plain row in black, and another plain row for the turn row. I also decreased a stitch at the ends every other row for the V.
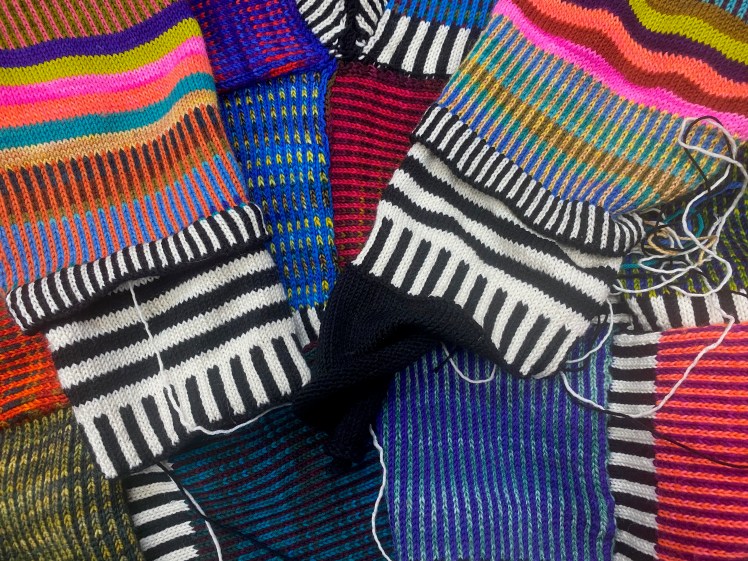
Then I made a decision that added days to the process: to hand-manipulate the stitches of the turn row to make a garter stitch row, as one might do in hand knitting. I had seen Diana Sullivan do it, and it looked fun and easy. But Diana Sullivan wasn’t doing it on 144 stitches on a standard gauge machine in black yarn. Twice. But I did it and hated my life and my decisions with every stitch, until I learned how to do it using sound and feel and tiny glints of light to find the right black stitch in the blackness and pull it through the correct loop on the latch hook. I would have used my senses of taste and smell, if they could have helped. But overall the garter stitch turn row was a nice effect, and what black yarn taketh, it also giveth, because the mistakes and my efforts to fix them are invisible. I liked it enough to do it on my cuffs. All of the cuffs, because there were more than the usual two.

Which brings me to the side panels and sleeves. So far I had been using my previous machine-knitted Kurt as my model for numbers and construction method, but the one thing I find annoying about the garment is the too-long sleeves and the many ends from the narrow stripes of its design. In the previous Kurt, the side panel is 36 stitches wide, to give me the voluminous garment circumference that I wanted. The stitches of the side panel also form the underside of the sleeve. The top side of the sleeve is picked up from the sides of the two squares on the front and back of the shoulder and half a square below each square, for a total of three squares, 48 stitches per square, 48 x 3 = 144. The cuff was to end up at 76 stitches, and I didn’t decrease the stitches of the side panel, so all of the decreases came from the top part of the sleeve only, at a rate of two stitches every three rows for 162 rows until I got to 36 stitches. On top of 162 rows, I also needed a ribbing at the cuff, minimally an inch. All that made a really long sleeve, and when I rolled it up, there was a fringe of ends that a more fastidious knitter would have somehow eradicated.
On this new sweater, my correction was based on a simple reading error. Somehow I got it into my head that the sleeves of the first version were 126 rows long rather than 162 rows that I had clearly indicated in my write-up, and I needed the sleeves to be about three inches shorter. Based on this flawed premise, I came up with a sleeve length of 96 rows, which is a very nice number. It’s divisible by 3 and 6, also numbers I’m very fond of, and also numbers that are good intervals for sleeve decreases. It’s also divisible by 24, and 24 was the number for the alternating sections of simple 4-row stripes and 24-row 1 x 1 pinstripes that I envisioned for the patterning of the upper part of the sleeves, ending in 24 rows of 2-color pinstripes so that there wouldn’t be a forest of ends showing when I rolled up my sleeves. But decreasing 144 stitches at a rate of 2 stitches every 3 rows for 96 rows meant that I got to row 96 with 82 stitches still on the needles. My mathematical thinking got intractably deluded here, because I had the number 72 stuck in my head, contrary to basic math, and not even the actual number of stitches physically on the needles could shake that delusion. Anyway, despite my numerical delusion, I did know that all of the stitches on the bottom section of the sleeves would need to be decreased from 36 to zero.
The knitting of the top part of the first sleeve went swimmingly. I loved the colors I chose for the two sections of six 4-row stripes. I think they’re going to inspire some future knitting. But I got to the end of the 96 rows and, thanks to the delusional thinking I described above, I was surprised by how short the sleeve looked. I think I also noticed finally that I had 82 stitches, not 72, on the machine, but decided that 82 stitches was fine for a cuff, then promptly returned to thinking that there were 72. Whatever I was thinking, this was not my finest instance of knitting math. Then I knitted a 12-row folded cuff edge of 1 x 1 black and white pinstriping with a hand-manipulated garter stitch fold line. This time the garter stitch manipulation was a little faster and less precarious. I was pretty sure there was a problem with the sleeve length that I was going to have to resolve somehow, but the solution was dropped into my lap by a brilliant British machine knitter named Von Morley, whose page, Machine Knitting Showcase, I follow on Facebook. She hadn’t liked the length of the sleeves on a recent creation, so she added an afterthought cuff in a different color. What a great design element! I let the idea take shape in my mind while I worked on the side join/sleeve bottom, and then could see just how short the sleeve would be when it was all knitted and joined in a tube.
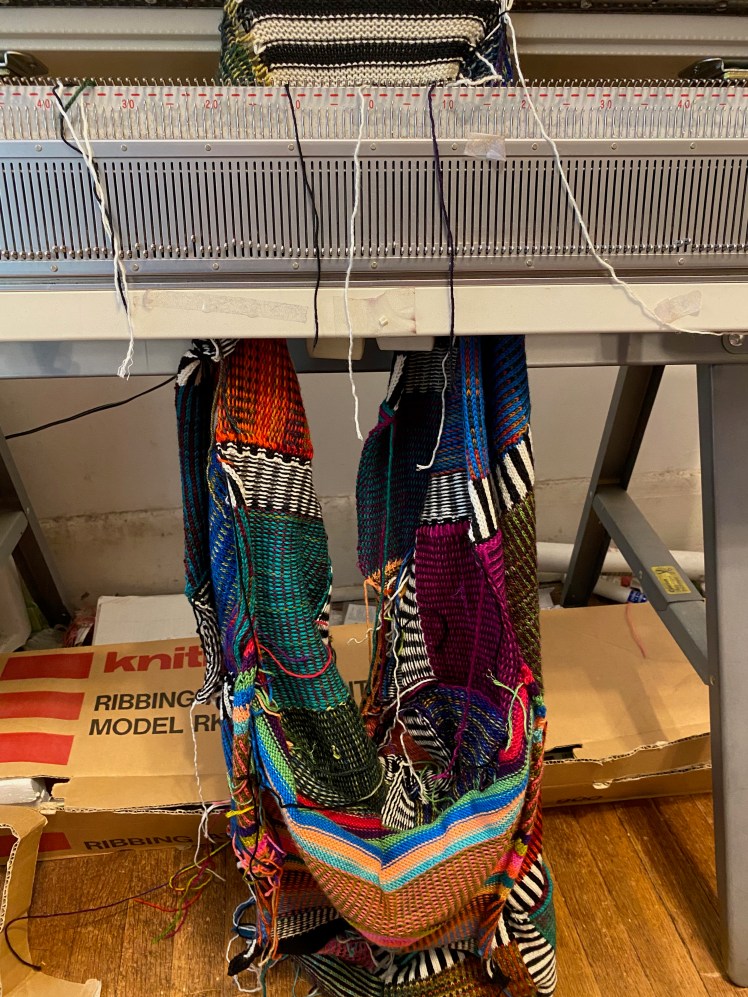
I had plenty of time to mull over the afterthought cuff while I worked on the side join panel, because the side join panel took several forevers. It was cursed and disaster-prone. For some reason, my spacial thinking went badly on the blink for this project, and I had a terrible time orienting the sides of the front/back panel so that both sides were facing the same and correct direction when I modularly joined them with the black and white vertical stripes I was attempting to knit. I no longer remember how many times I tried to knit the first row, probably because I can’t count that high. The next challenge, once I had the sides oriented so that everything was facing the right way, was to knit the 1 x 1 pinstripe so that all the stitches stayed on the needles when I placed the side stitch of the already knitted piece onto the end needle on either side. The contrast color on the second needle in from the end needle on the right side fell off and unraveled every single time I moved the carriage. I had end needle selection turned off– could that have been a factor? Machine knitters, if you have any insight, please advise me. After a couple of days of futility, I gave up on the 1 x 1 pinstriping and knitted simple alternating 4-row stripes in black and white. I think they look at least as good as the pinstripes would have, with the added advantage of restoring my sanity.
Attaching vertically knitted rows to a patchwork of knitted fabric whose orientation alternated between vertical and horizontal meant that I was picking up stitches at a different ratio on either side. On the vertically oriented squares, the 64 rows per square was the same as the number of rows I was knitting to make the join fit the length of the already-knitted fabric, so I joined a loop from the side stitches every other row, since I was knitting a plain row on the return to the right side. As for the pieces where the 48 bound-off stitches would be joined to the new knitting, it was the same procedure I had used when I was knitting the patchwork fabric. Every other row, I picked up a loop from the bound-off stitch, then knitted back, picked up the next bound-off stitch, knitted back, and then skipped the next loop and picked up the loop after it whenever I was on a row that was divisible by 4. It’s a lot harder to describe what I did than it was to do it, but I put markers at the quarter points of the side edges of the fabric (every 12 stitches of the bound-off edges, every 16 rows of the vertically-oriented squares) to ensure that I was knitting the right number of rows at the right place.
Eventually I knitted all the way up the body and then down the sleeves, with decreases on either side of the knitting every six rows. Meanwhile I was joining the top of the sleeve to the new knitting to align the colored 4-row stripes of the sleeve top with the black and white 4-row stripes of the sleeve bottom, thus forming the tube of the sleeve. Except that I realized, as I neared the end of the sleeve, that I wasn’t seeing a tube. I saw a knot. With growing dread, I took the stitches off the machine and onto a circular knitting needle to see how bad the situation was. It wasn’t just bad, it was really, really bad. I had knitted a Möbius strip. It was so bad that even frogging it was an exercise in yarn barf unfankling. I just turned off my emotions and frogged, unfankled, and tried not to repeat my previous error, which wasn’t easy because I didn’t know how I had done that error in the first place. There were several more attempts that did repeat my error before I stumbled onto the way to hold the patchwork front and back so that I was knitting up the sides on the inside of the knitting and forming a tube for the body and sleeve. You’d think that would be obvious. Well, I suffered to accomplish the obvious.

When I finally got down to the final several stitches of the sleeve bottom, I was still laboring under the mathematical delusion that I could decrease all of the 36 stitches in 96 rows at a rate of two stitches every six rows, and was wondering why it took 108 rows to get down to the final two stitches, requiring me to join the final stitches into the sides of the folded hem of the black and white pinstriped edging. My rational self tells my deluded self, that’s how math works. 18 decrease rows x 6 rows between the decreases = 108. It just is. Funny how delusion works.

Now that I finally had finished a sleeve tube that I could actually put my arm into, I could see that my cuff was a full three inches short of what I wanted. The afterthought cuff would come out from under the original folded cuff starting from the closure of the folded fabric. That was about an inch, so then there would be another couple of inches of black and white stripes, then another generous inch of 2 x 2 vertical stranded stripes, the hand-manipulated garter stitch fold line, and finally the inside lining in plain black for the same number of rows as the outside-facing layer so that the folded hem could be closed at its starting point. Since I had already closed the folded hem of what should have been the finished sleeve, I knitted the afterthought cuff as a separate piece and hand-sewed it onto the inner edge of the original cuff. I’ll spare everyone several thousand more words and explain with pictures instead.


Now I tried on the half-finished sweater with its one assembled sleeve and the front and back joined on one side, and of course it looked awful. It was unfinished and unblocked, so of course it looked awful. I panicked, because I always do, but I tried to be zen about the panic. The one relevant piece of information was that the sleeve was the right length. Now I had a template and lots of experience for doing the other side. It would be smooth sailing, and after I discovered I had miscounted the number of stitches I needed for the side join just as I was about to start the decreases for the sleeves and had to frog all of that knitting and start all over again… it was smooth sailing. At least I had figured out how to not knit a Möbius strip. This second time the afterthought cuff wasn’t an afterthought, so after I finished knitting the first folded hem, I put the stitches of the first row of the hem onto the needles with my live stitches, and knitted another row to close the hem, then embarked on the final stage of the cuff. I bound off those stitches with the most massive sigh of relief I have ever sighed after any final stitch I have ever knitted, then hand-sewed the cuff into place. No risks in knitting? This one was an exercise in thrills and chills.
I wasn’t really done yet though. I had to seam the cuffs from the outside and inside, and finish the bottom hem with a hand-knitted garter stitch fold line picked up from the stitches of the bottom hem. Then I hand-knitted about an inch for a folded hem that I bound off and sewed to the fabric. Also I had to fix the dropped and odd mispatterned stitches and tighten up the loose joins with a crochet hook. Before I could get to the hem, I had to get rid of some of the dense forest of ends. Of course there would be a lot of ends: 32 squares, two sets of 2-color color changes per square for a total of 8 ends per squares. That comes to 256 ends just for the patchwork part, and I don’t feel like doing the math for the rest. I stuffed a lot of the ends into the many folded hems of this garment, but I also ignored a lot of them. Now I just shove them back into the inside of the sweater when they poke outside the edges. Even my tenacity has limits.
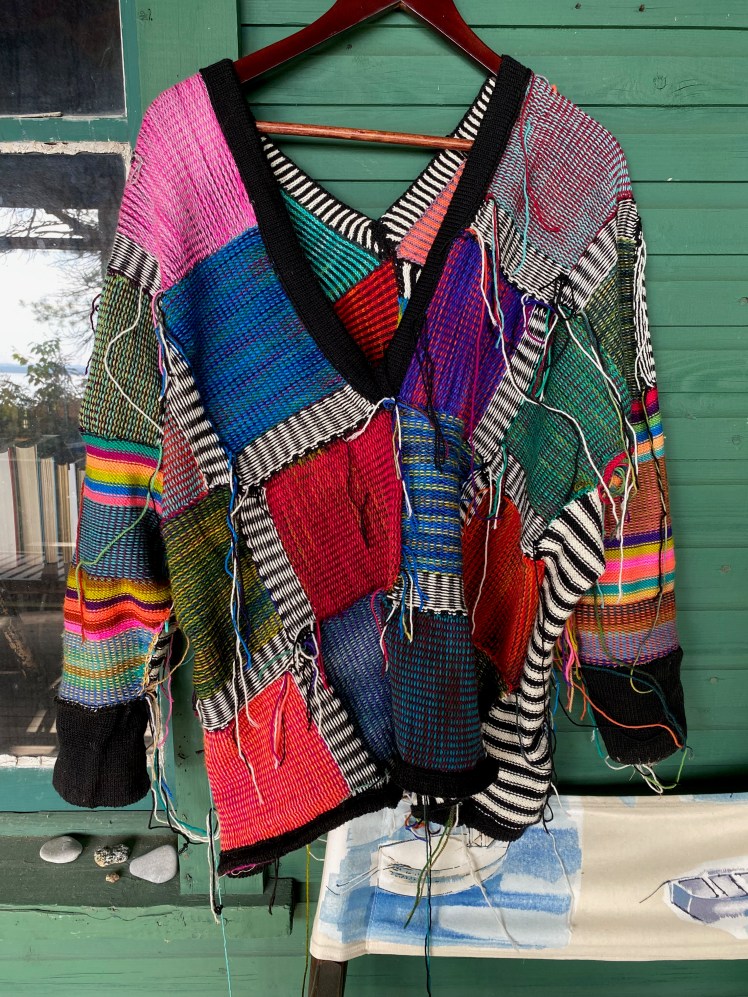
Finally, the sweater was blocked and dry enough to put on for a selfie photo shoot. That was when I discovered that I had forgotten to bring my tripod on our annual Lake Michigan vacation, because of course nothing about this project could be simple. So I prowled the cottage and roved the woods and the edge of the beach looking for surfaces where I could balance my phone to get some pictures I could use here. It was precarious. Sand and ground-up pine needles got into the hole for the charger and had to be cleaned out before it would charge again. But like the entire project, all’s well that ends well.


Popping in to say (1) what a fun and exuberant project! Bravo! and (2) the mispatterning is probably caused by old dried up grease in the cam mechanism buried in the guts of your machine. I had a similar problem with my KH965i and was able to take it apart and clean it up with the guidance of a video on the “Ask Jack” YouTube channel. Now it works perfectly. Here is the link: https://www.youtube.com/watch?v=w-LZ-Xepg18
LikeLike
Thanks so much, Kay! I really appreciate your encouragement and the link! I hope a cleaning will resolve the problem. Was it difficult and confusing to disassemble the machine?
LikeLike
Difficult – not really. You must be methodical about all the tiny screws and the little plastic rivets that connect the metal case to the frame of the machine! Probably it would be good to take photos of every single step. Which I did not do.
LikeLiked by 1 person
I would absolutely do that. Also tape the small pieces to a piece of paper and note the order in which I removed them— good idea?
LikeLike
Love the zebra stripes!
Lynda Latifa Wilkinson
On Thu, Jun 29, 2023 at 8:12 AM The Interior of My Brain: A Knitting and
LikeLiked by 1 person
Thank you, Lynda!
LikeLike
Abby, this is truly magnificent. It seems like this would all be a screaming dissonance of colors, but instead (in your inimitable way with color), they all sing joyously together. I buried my face in my hands and groaned out loud reading about the Möbius strip – argh! You have so much more patience and determination than I feel as though I would be able to give to a project. This is my favorite version of this sweater by a long shot! Thank you for your extensive notes, not just from the technical side, but from the psychological side, perhaps even more so.
WRT digging in to disassembly of the machine – for sure tape small pieces to paper and label and photograph everything as you go. Good screwdrivers are a huge help in this work. Make sure they fit well, it’s too easy to strip out the top of a screw, and goddess knows if you can ever get replacements. Watch a video about the little plastic rivets that hold the plastic to the metal parts of the case. Replacements for those ARE easily obtained, but it is possible to remove and replace them with care, if you understand how they work. Good luck, and feel free to message or call if you get stuck. Also, the Ask Jack YouTube videos are an absolute treasure!
LikeLiked by 1 person
Thanks, Tanya! Would you like to see this sweater in person? It’s possible! In three weeks.
LikeLike
I’m absolutely astonished by the effort, the color choices, and the harmony you achieved in this project. The white striped cuffs reminded me of piano keys. Abby, you are a star!
LikeLike
Thanks so much, Nancy!
LikeLike