
Being BFF’s with the owner of a thriving yarn store has tangible perks for a dedicated knitter. Many knitters, and I’m one of them, accumulate more yarn than they can ever knit during their time on earth. We call it SABLE, an acronym for “stash acquisition beyond life expectancy”, and it sounds like a joke, but it’s no joke. What are the knitters’ children supposed to do with all that yarn when it’s time for their parent to move to much smaller living spaces or into a non-corporeal realm? They dump it on Melissa, owner of Lovelyarns, my home away from home, and she summons me to help her sort through the yarn, books, and notions they haul in. If I like something, it’s mine. I’m well aware of my own SABLE situation and my ever-approaching expiration date, so I am selective and come home with only with yarn and items I know I can use, and I make a point of using them. It might take a while, but I will use them.
I got one of those summons during the summer before last, after excellent interpretations of Junko Okamoto’s Kurt pattern began appearing in my friends’ activity on Ravelry. The pattern consists of stockinette squares mostly knitted in a main color, with a contrast color knitted at the beginning or the end of each square, and connected to its predecessor with a modular construction, either by picking up stitches or knitting stitches of the new square together with stitches of the last row of the previous square in a specified way. The contrast color stripes intersect with each other to form right-angled paths up, down, and across the patchwork. I looked past the pattern when it first appeared because Junko’s colors didn’t interest me and I thought the big intentional Japanese shapelessness was a young person’s game for 20-something waifs, or Japanese ladies of any age. The finished projects made me think again. Some were scaled down, some were oversized, many explored the construction method and the path of the contrast color in unexpected and illuminating ways that excited my imagination. The knitters were people of all ages and body shapes, and their garments were right for each individual, mostly. I warmed to the oversized intentional shapelessness, and considered doing marls of my plant-dyed yarn, combining several strands of the lace-weight yarn to get the heavier weight the pattern called for. But the ideas stayed in the back of my mind for months, marinating…
…Until Melissa called me to the store and a huge bundle of color-coordinated vintage yarn fell into my arms. It was a collection of bulky weight yarn, each hank very different from the others in fiber content, dye method, and colors, although the colors had a connecting logic from one to the next when arranged as a gradient. The yarn was all from the British yarn company Colinette, which no longer markets to the United States, and the hanks were tied together as a kit. There was even a pattern, which I discarded with a shudder, for a saggy, frumpy duster coat that arranged the diverse yarns in stripes. All of the yarn, as well as the discarded pattern, reflected the esthetic of its time, which I estimate as early 1990’s. There were two hanks of variegated cotton tape each in different colorways, a thick-and-thin variegated wool, a variegated chenille made of some kind of man-made fiber (I’ve misplaced some of the labels), as well as a couple of variegated mohair colorways, all trendy in the late ’80’s and early ’90’s. Dyeing techniques have evolved since then, and the yarn is an artifact of what was edgy and experimental back in the day. Melissa also gave me many skeins of modern marled self-striping worsted yarn dyed by a local dyer, Feederbrook Farms.
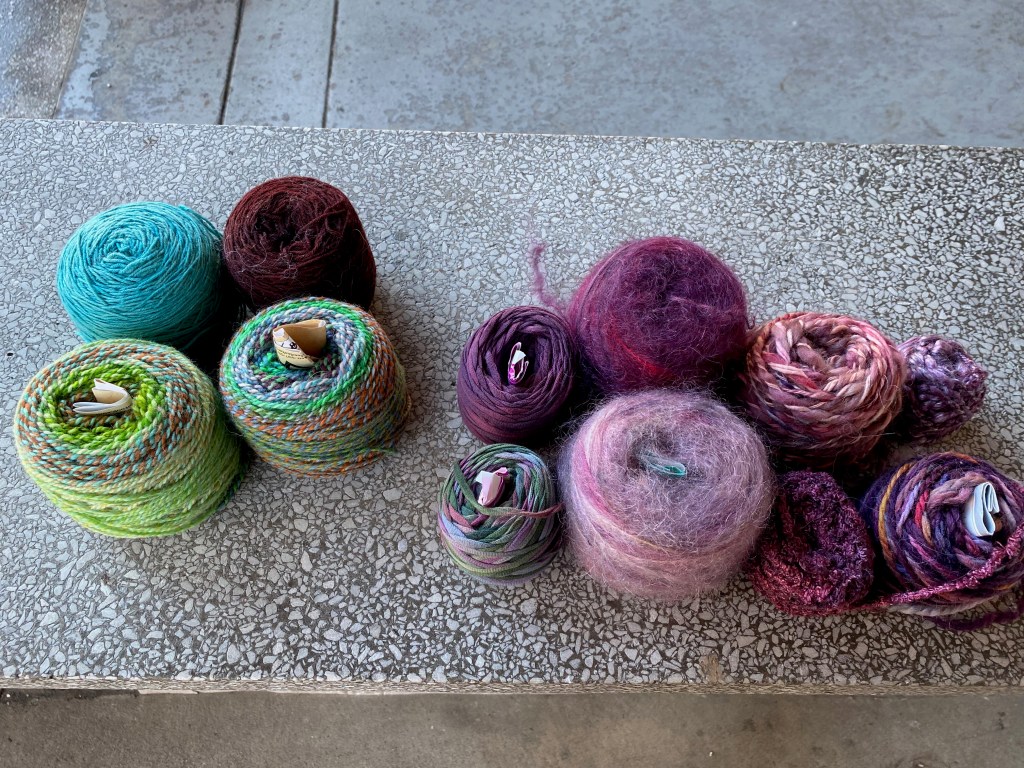
I instantly knew that the vintage Colinette yarn was going to end up in my version of Kurt. But it had to sit in stash and wait its turn. It had to wait over a year to rise to the top of my queue, and during that time I would check in on the yarn Melissa had bestowed on me during that giveaway session. I needed to decide on a contrast color. There was enough value and textural difference between the components of the Colinette bundle that I could have chosen one of them for the contrast color, but I noticed that the blues and greens of the Feederbrook Farms yarn were very compatible with the earthy red spectrum colors of the Colinette yarn, although it wasn’t the same weight. Eventually it occurred to me that I could beef up the weight of the yarn and act on my marling idea by pairing the long-change striping yarn with a solid Wollmeise DK that was already in my stash. I chose a medium-light aqua.
There were eight different hanks in the bundle. When I wound them into cakes, I could feel that they weren’t all the same weight. The two cotton tapes seemed to have been dyed in the same colors as the mohairs, one pair in light colors and the other in darker colors, so I decided to pair the tapes and the mohairs together and knit them double-stranded. That gave me six sets of yarn with which to knit the patchwork squares, which I arranged in a gradient rota. The pattern scrambled my rota. It starts at the back, and you knit squares 1, 2, 3, and 4 from bottom right to left. Squares 5, 6, 7, and 8 are knitted on top of the first four in the reverse direction, left to right. I knitted squares 1 through 6 according to my gradient rota and repeated the 1-through-6 rota every six squares, which placed squares of each kind of yarn catty-corner from each other and grouped light value and dark value squares in separate clumps. The front is knitted downward from the back shoulder, so the rota looks even more scrambled on the front because it’s upside-down and reversed. The body consists of 32 squares, which is not divisible by six, so the rota ends up in a different place from where it started.


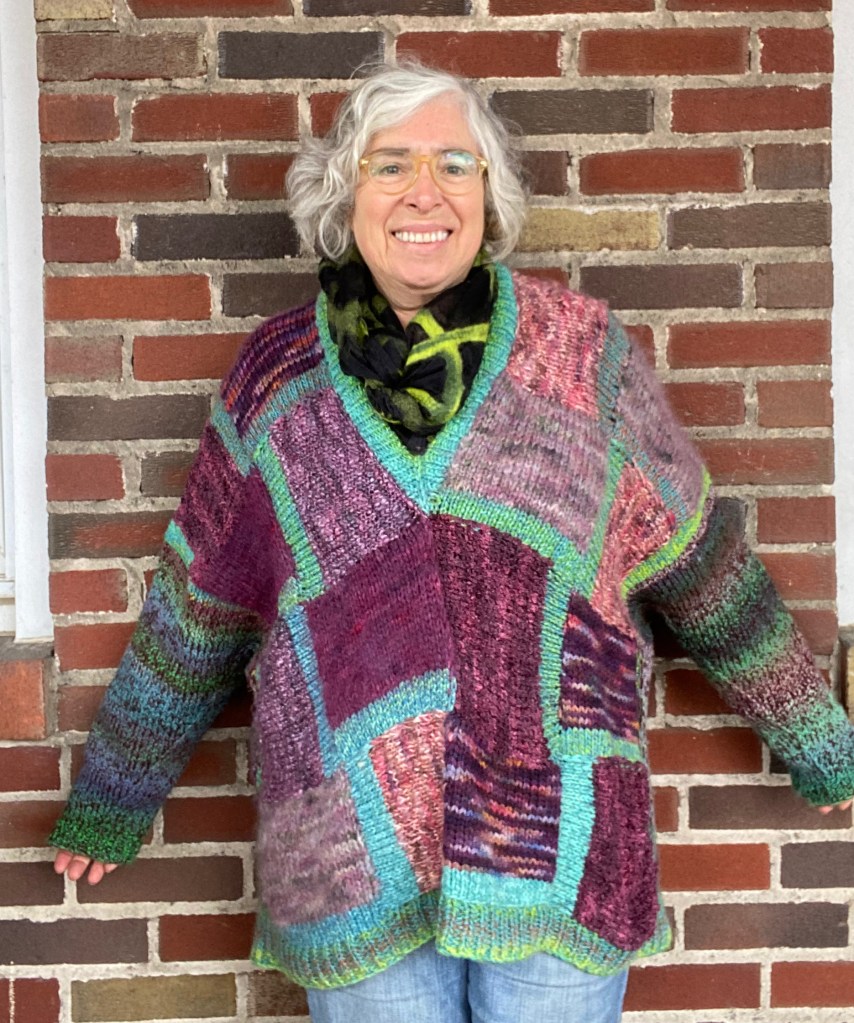
The pattern is carefully and accurately written, and the numbers are all accurate. Nobody ever writes patterns in the holistic terms that suit my thought process, so I had to work hard to keep track of which line I was on in the pattern until I learned it well enough to find my own guideposts and progress markers that would enable me to make and attach the squares accurately. That was kind of a miserable task when I had to work with the chenille yarn, because its fuzziness obscured the row count and the edges of the stitches when I had to pick up the stitches for the new square built on top of the chenille square. I had another grievance against the chenille, which was that it knitted up so much looser than any of the other yarn that it sagged and ruched, but I decided not to despair until I could see if the neckline would rein in the floppiness of the chenille. Speaking of the neckline, I was skeptical that I would like wearing as loose a neckline as I would get from the deep V in the front and the shallower V in the back, but I decided to knit the neckline as written, and I’m glad I did, because I love the look and it’s not as drafty as I feared.
I really liked the way the long-change striping Feederbrook Farms yarn behaved when it was combined with the solid aqua yarn. The aqua stabilized the blue of the contrast color while the striping yarn cycled through its areas of blue, green, and muted orange. Meanwhile, the contrast color was wandering up and around the edges of the squares placed at right angles from each other, its colors changing subtly as it followed its path. Melissa had also given me a darker, more purple/brown colorway of this slow-change, self-striping yarn. It had a lot in common with the colors of the Colinette bundle. I could have used the Colinette yarn for the strip at the sides that connects front and back and then grows into sleeves knitted from the shoulder down to the cuff, but I remembered how I didn’t like the stripes of the coat pattern that came with the bundle. True, I was going to get stripes with the Feederbrook Farms yarn, but marling it with the main color of the Colinette bundle, the dark maroon, would tamp down its stripy-ness and connect the sleeves visually with the body. I decided to use a dark red-brown Wollmeise lace for the marl because I thought that a heavier weight yarn would make the sleeves thicker and bulkier than I wanted.

This pattern is all done in plain stockinette, which is tedious for me, although it is done in square chunks attached to one another through modular techniques that require enough counting and manipulation to keep me awake. As I worked through the stockinette squares, I thought about adapting the pattern to the knitting machine. I’ve been eyeing my collection of plant-dyed yarn, especially the weird and murky colors, and thinking about how a patchwork could bring out their subtle and overlooked beauty when paired with my blue/green colors as the contrast color. Stay tuned.
I finished this sweater on New Year’s Eve, and since then I have worn the sweater daily, taking it off only to shower and sleep. It has been a cold January, and it is exactly what I want to wear. The yarn blocked out to give the garment a lot of drape that keeps it from giving me bulk that I don’t have, and is kind to the bulk that I do have. It’s warm, roomy enough to pile on the layers underneath, and still fits inside my winter coat. It’s exactly right. I want to knit more Junko Okomato patterns.


More recently another elderly lady bestowed her stash on Melissa. Apparently the lady had been a knitting instructor, with excellent technical skills and a good understanding of garment construction and knitting math. I got flashbacks looking at her collection of Penny Straker patterns from the early ’80’s. Her taste was classic, tasteful, aristocratic, with a special fondness for alpaca yarn in muted and natural colors, and I swooped in on it like a yarny hawk, carrying off two squees (knitter jargon for sweater quantity -> SQ -> squee) of alpaca lace and alpaca worsted. The first squee consisted of six 50-gram skeins of Isager Yarn Alpaca 2 lace weight, five colors, a skein each of pale blue, light beige, fawn, black, and two of gray-blue. The second squee was 10 balls of Rowan worsted brown alpaca yarn, enough for a simple stockinette pullover. But I don’t handknit simple stockinette because of my attention deficit issues, and my standard gauge knitting machine won’t knit worsted. I would have to come up with a different plan for this yarn.
But first the Isager yarn. The colors were cool, subtle, understated, sophisticated, elegant. But I had 50 grams of four colors and 100 grams of one color, which was not enough of any one color for a pullover and just enough, total, for a striped pullover, provided I didn’t run out of a color at an awkward place that made the whole thing look like a mistake. Several years ago I finessed this problem with the help of advanced math and an advanced mathematician who did the advanced math for me. I wrote a blog post about the optimization process at the time, and I could have gone back to the post to try to apply the thought process to this current situation. Failing that, I could have recruited the savant boyfriend of the daughter who will be getting the sweater to help me through the math. But I didn’t. It’s a lot of math just to get an ordinary, not very interesting striped sweater. There was another way to use up all of the yarn by feel and improvisation, making a design element of the irregular color usage: panels, once again.
I visualized a pullover with the same size, shape, and numbers as the sweater I had recently machine-knit my daughter for her birthday, bisected at the center of each part of the sweater, two panels each for the front, back, and sleeves, all knitted in stripes of varying widths and usually not matching the corresponding side. Since I had two skeins of gray-blue yarn and one skein of each of the other four colors, all of the edges would be gray-blue. I knew I had enough yarn for the entire sweater, and this way, if I ran out of a color before I finished, the concentration of whatever color/s I had left would be a design element. But I could regulate the color use by using the color I had most of when it was time to switch colors.
I was seeing Mondrian-style color blocks, but simple 80-stitch panels would produce stripes of various widths, not blocks. To get blocks, I was going to need to do intarsia. I had experimented with machine-knit intarsia during last year’s Swatchathon and I spent all of 2021 planning to do an intarsia sweater. Instead, I spent all of 2021 machine-knitting entrelac and then panels, which pushed this 2021 goal back to January 2022. A year ago, I had worked out the mechanics of knitting intarsia on the machine and had managed to do a very complicated swatch quite successfully. I forgot how to do it in the intervening year, but I thought I could manage simple squares without too much trouble. I was wrong. It was a lot of trouble.
I reviewed The Answer Lady’s video for intarsia on Brother machines, so I knew to press in the lever under the intarsia setting so that the button would move into the “I” slot, and to push in both part buttons, and to position the needles in upper work position right at the place where they would pass into the mouth of the carriage (not standard terminology) so that the needles would knit. I knew that the yarn had to lie on top of the needles with the hooks open, and I passed a plastic museum membership card through the hooks to make sure they were open. Ever so tentatively, I knit the first row of the intarsia, and it knit perfectly. I put the yarn over the needles for the second row, carefully did the wrap, checked the hooks, moved the carriage. Another perfect row. Third row, set it all up, moved the carriage, and in the two seconds before it registered that something didn’t feel right, half of my stitches fell off the machine. I guess that the yarn wasn’t lying on top of the needles properly, because the yarn somehow wasn’t engaging with the carriage. I got the stitches onto a circular hand knitting needle and repaired the laddered stitches, then transferred the stitches back to the machine and tried all over again.
Then I found myself in a mistake cycle. There were a number of stitches that weren’t knitting, so I repaired them. This kept happening to the same stitches, and finally I compared the stitches that weren’t knitting to the ones that were. It was subtle, but the difference between the good stitches and the problem stitches was that the good stitches were sitting behind or under the tips of the open hooks and the problem ones were on top of the tips. If only that had been the end to my problems. The hooks on the edges of the knitting kept wanting to close because I was joining the new knitting to previous knitting on the edge stitches, and if I failed to notice the hooks were closed and then knitted the row, I would lose my edge stitches and then I would have to repair them, which was an engraved invitation to laddering stitches that I couldn’t see, thus initiating new mistake cycles. I am not going to try my readers’ patience with a full recitation of every mistake I made and what I did to fix it. Suffice it to say that I made every possible mistake repeatedly. The only thing I did right was to be tenacious.
I think I can sum up what I learned. It might be helpful, if only to myself, because I’ve never seen any other warnings of these pitfalls:
- Make sure the stitches are under or behind the tips of the open hooks when placing the needles in upper work position.
- Be aware of the pressures that close the hooks at the end stitches when decreasing the end stitches or joining them to an already-knitted panel and make sure they’re open before moving the carriage.
- After remembering to check the position of the needles and the openness of the hooks, don’t forget to load up the yarn on the needles!!!!
- When starting new colors in intarsia, the yarn’s end is next to the carriage and the yarn supply is in the direction where the carriage is heading. Weigh down the ends with clothes pins and hold the strand connecting to the yarn supply in one hand with enough tension to keep the yarn on the needles while keeping the other end from getting too long or too short, and to enable the carriage to get the yarn it needs to form the stitches.
- Be very careful not to forget to do the joins and decreases when they need to be done, because fixing them afterward is going to be a nightmare while the work is on the needles. Checklist: manipulate edge needles first; lay the yarn over the needles and wrap properly; make sure hooks are open; get yarns in hand; check to ensure that edge needle hooks really are open; move carriage and pray.
- If a repair must be done while the work is on the needles, put all of the needles back into B position with the stitches safely enclosed inside closed hooks, because the slightest jostling of a needle with an open hook can cause a previously sound stitch to decide to commit suicide and leap off the end of the needle, causing laddering in the eight rows below. Ask me how I know this. No, don’t ask me how I know this.
But, as I said, I’m tenacious, and finally I could take the knitted and sewn-as-I-went garment off the machine, although it was riddled with tiny flaws. After I got minimally proficient at the simple intarsia on the front, I got more ambitious on the back, where I did a series of tiny boxes on the two sides.
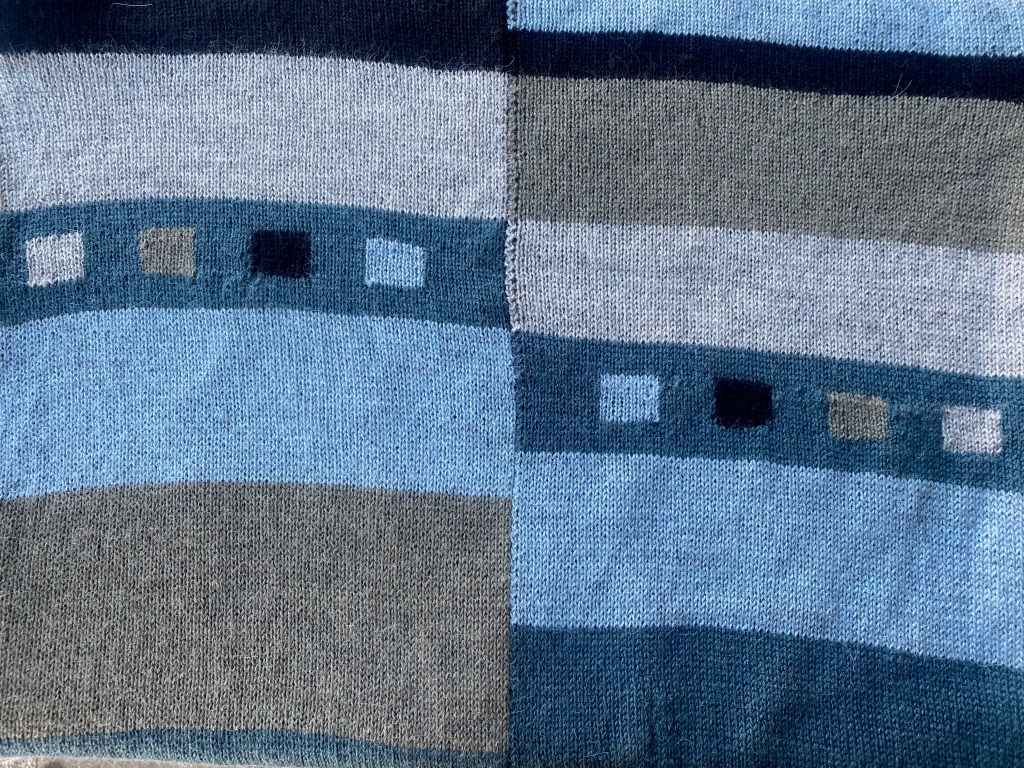
After much suffering in the process, it ended up as such a good design feature that it made the front look as if something was missing, so I decided to embellish the intarsia squares down the center of the front with embroidered rectangles.

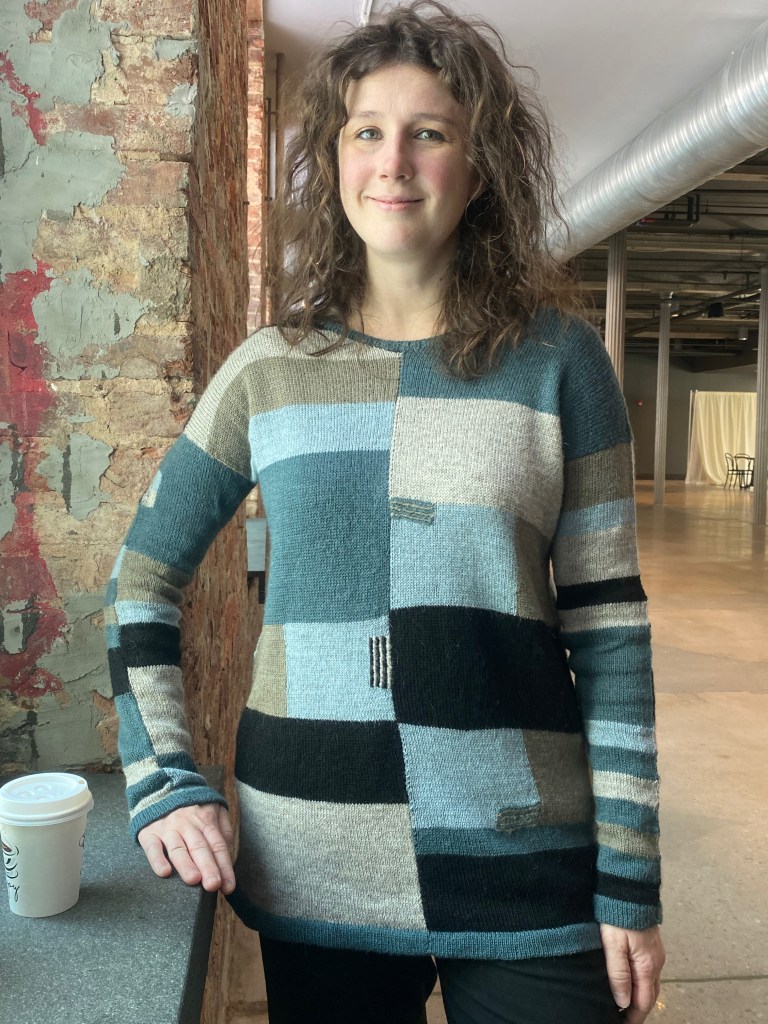
Then there was that whole world of battle-scarred stitches that needed to be duplicate-stitched into presentability. In the end I made it work, although I suffered for its beauty.
Sam kindly modeled for me in my daughter’s absence.


Now I’m in the process of working out what I’m going to do with the brown Rowan alpaca worsted, which isn’t enough on its own for the kind of knitting I like to do. I do have many huge skeins of alpaca sport weight yarn in lots of natural colors, and I have a pattern for a stranded top-down yoked pullover. I’m thinking I’ll knit the yoke in the thinner yarn so that the garment fits fairly closely around my shoulders, then I’ll strand the thicker yarn with the thinner yarn for the rest of the sweater until I run out of the brown worsted.

Melissa also gave me some linen yarn, mostly blue but also a skein of a rose color. Together it might be enough for a summer top, and it certainly will be enough if I can find where I’ve stowed some mint green, rusty orange, and pale aqua leftovers from other summer tops I’ve knitted with linen yarn of a similar weight. I found a pattern the other day that is built to accommodate improvised color arrangements, and I’m thinking that maybe when the weather starts warming up, I’ll knit it. It’s a modular construction based on a square center with trapezoid shapes radiating out of it. There’s enough textural interest in the design to look attractive in only one color, but random blocks and stripes of contrast color can add great design elements. If the blue linen looks as if it’s getting sparse, working in other colors would fit in with the design while getting me through to the end.
These windfalls of other people’s yarn choices present me with interesting design decisions, because what I get is what I get and I can’t get more of these particular yarns. Of course I can supplement them with additional, different yarn, and that’s a design decision. I can impose a logic on them by arranging them in some kind of gradient and following a rota that arranges the colors according to value and contrasts the higher and lower value groupings. I can supplement it with marls that refer back to the colors without repeating them. That was what I did with the modular patchwork and sleeves for the Kurt pattern. Or I could use stripes and some complicated math to use up finite proportions of yarn in hand that is sufficient to make a sweater of a certain size. Or I could forget the math and scramble the stripes, using the yarn according to what I had most of at any moment in the construction process, as a design feature. For the quantity of yarn that would be enough for a sweater that I don’t want to knit or wear, my approach will be to supplement it with similar yarn of a lighter weight to knit a sweater yoke top-down, then use up the heavier yarn in the body, paired with the lighter weight yarn, until I run out of yarn or get tired of knitting it. As for the blue linen, a modular construction of radiating trapezoids will make irregular placement of other colors look like intentional design decisions. Intentionality is the key to winging it.

I like to challenge myself with “what can I do with this odd amount of unobtainium yarn”, so naturally I love your approach to the game. Each of these sweaters is a grand success. I’m always been a fan of bulky oversized sweaters, so am particularly impressed that you can fit yours under your coat. (Such a stumbling block for us fans of the bulky yarns!) And if your daughter inexplicably decides against the Mondrian, I will take it off her hands without a moment of hesitation.
LikeLike
Well, it’s a big old ugly down jacket that has a lot of room. It really is a lot of fun to design around what you have on hand, isn’t it! Thanks for the affirmations!
LikeLike
Oh that Mondrian, absolutely my cup of tea, glass of bubbly or whatever! just love it,
Alison
LikeLike
Thanks, Alison! I have plans for more intarsia squares.
LikeLike