
After spending most of 2018 hand-knitting stylized faces for two pieces of wall art, DNA and Faces Come Out of the Rain, I thought I was done with knitted faces, until my Ravelry friend Rebecca Yaker created a machine knit version of the pattern and generously shared her recipe with me. I made a swatch during January 2022 Swatchathon, which I immediately started to envision incorporated into a sweater. I really enjoyed the irregular ruching of the hair, knitted in a green-purple-brown Wollmeise multi (Tant Grön, Tant Brun och Tant Gredelin colorway) in hand-manipulated lifted stitches that rearranged the pooling of the multi in wavy stripes. I thought it would be interesting as the front part of the neckline, if I used the swatch as an insert into the top front of the sweater.

Very quickly my eye fell onto a ziplock bag of three somewhat matching skeins of Wollmeise fingering weight yarn in the Roter Himbeermund colorway, a not-quite-tonal multi of reds and fuchsia. There used to be four skeins in that bag, but I must have used one of them at some point and put the leftovers somewhere irretrievable at the moment when I wanted it. I thought the dark reds/dark pinks would be happy next to the green-purple-brown ruching, which I decided would be good for the hem and cuffs. Also I liked the red multi next to the salmon pink of the swatch. I began thinking that as long as I was making a design element of a creepy stylized face, I ought to maximize the creepiness by placing disembodied facial features on the back and sleeves.
A couple of months passed between making the face swatch and getting serious about plotting out the numbers for the sweater. During that time, I had tidied up and put the swatch in a safe and logical place. But tidiness violates my nature, and the place of logic and safety at that one moment was not the place of logic and safety at the moment when I needed to put my hands on the swatch. And it wasn’t just that moment. I searched for it for weeks. So I had to make another face, but that wasn’t a bad thing because I needed more practice making the facial features, and I needed to know exactly how many rows would be knitted at the sides of the facial features, which were made up of short rows that would throw off the machine’s row counter. A precise row count is essential in designing a machine-knit garment. I can be spontaneous and loosey-goosey about many things in my fiber adventures, but not about the numbers of rows and stitches in machine knitting. So I knitted another face and was very careful to place markers at each side of the knitting when I came to the end of a section of knitting where the carriage knitted on both sides, between finishing one facial feature and before starting the next. I still wondered what on earth I had done with that first face.

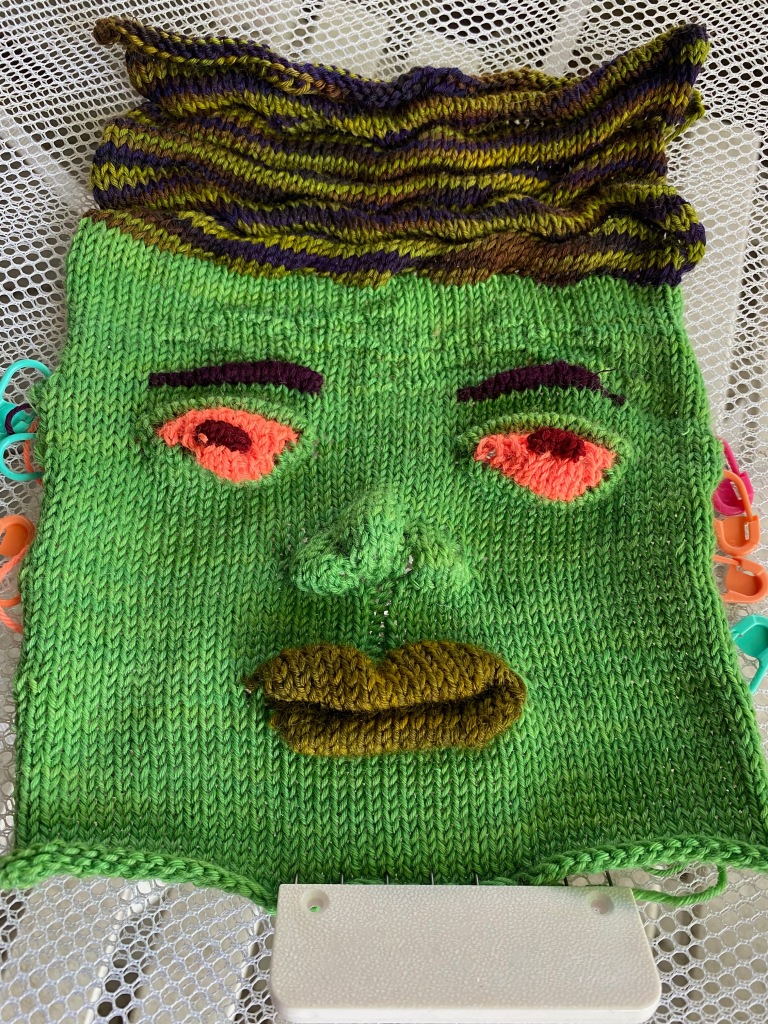
The finished face with the markers gave me the information I needed to calculate the size of the inset at the center top of the front. The total number of rows up to the ruched hair was easy enough to count, but the lifted stitch ruching had a very different row gauge from the plain stockinette. I had knitted 50 rows in the ruching, and it was about two and a half inches. I used those numbers to calculate the number of rows I would need in plain stockinette for the knitting in the garment to reach the top of the hair. That helped me to get the total number of rows I needed for the front and the back and to decide the placement of the armhole and how deep to make it. As for the width of the sweater, I wanted to make it as wide as I could comfortably make it given the limitations of the single bed machine, which is 200 needles, 100 on each side, the last 10 of which I find kind of precarious to knit. So I decided on a width of 180 stitches at a gauge of 6.5 stitches per inch and 11 rows per inch on a tension of 7.1. As for the actual numbers I used for the sleeves, I borrowed numbers I had used for set-in sleeves in a previous project. The width of the body was going to drop the sleeves down from the shoulders, so I needed to figure out how to get the right length for the sleeves.
I’m not going to pretend that anything about this sweater was easy. The ruched hem edging was from Susan Gaugliumi’s Hand-Manipulated Stitches for Machine Knitters book, and I tried to follow her chart to get the sideways braid she depicted. But my yarn kept breaking under the strain of being stretched across too many stitches to reach needles far, far away. I ended up with ripples rather than braids. Then there was a stretch of uneventful plain knitting in the red-fuchsia main color, up to the base of the armpits. That was a welcome relief, except that the yarn was being consumed at a rapid rate, and I started to worry that I was going to run short before the front was finished. That prompted a design decision to preempt that problem: a set of stripes on one side of the front upper body that repeated the colors of the green face, the orange eyeballs, and the dark red irises. I finished the front with a tiny bit of the red-fuchsia left, probably enough to have finished it without the stripes, but the stripes were an improvement to the design.

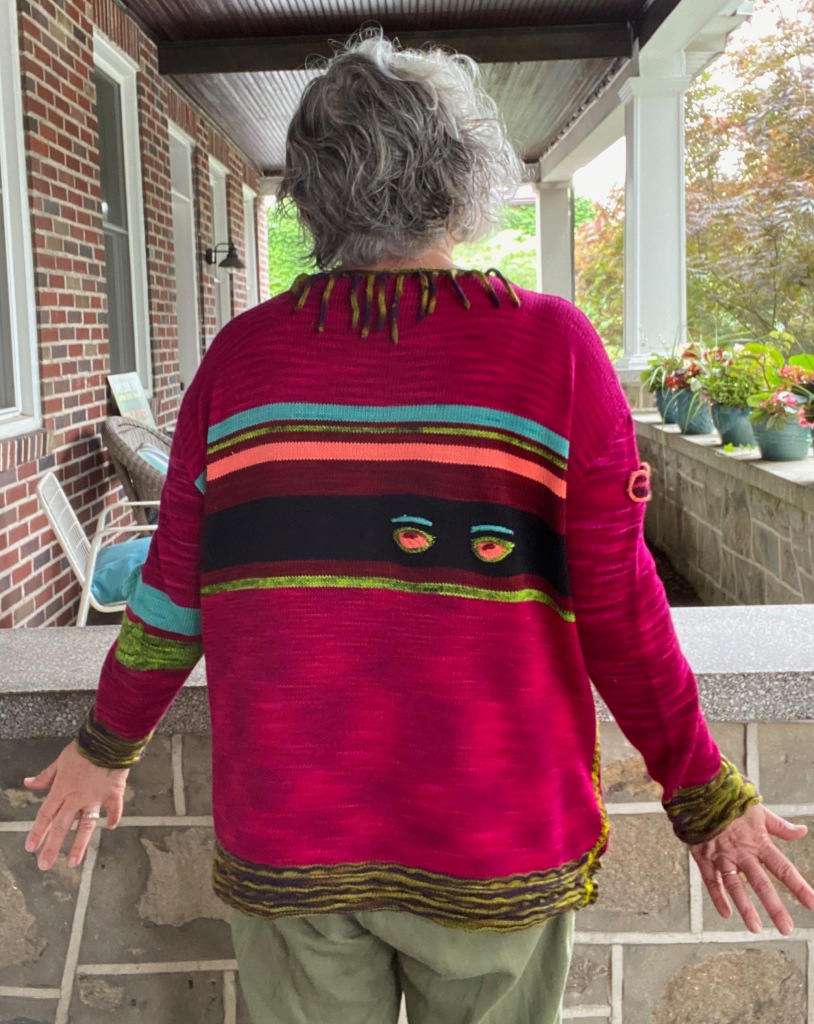
On the back, I was already planning to have a pair of eyes peering out through a wide black stripe. For the purposes of conserving my main color, as well as to emphasize the colors I used to make the eyes, I added additional stripes in those colors. As for the eyes themselves, I was not having a good day at the knitting machine. I just couldn’t get the weights right, and every time I moved the carriage to do the short rows for the eyeballs, all the stitches jumped off the needles and committed suicide. So I would manually reconstruct the stitches on the row and the rows underneath, then move the carriage, and again the stitches would jump off the cliff. Repeatedly. If those eyes had been flesh, the patient would have been blinded. If machine knitting were medicine, I would have lost my license to practice. Fortunately, yarn isn’t flesh, and I succeeded in building credible eyeballs by hand-feeding the yarn into the needle hooks and skipping the carriage. Not optimal, but eventually I got the job done.

I blocked all of the pieces after I got them off the machine so that I would have a more realistic idea of the finished garment size. While I was blocking the front and back, I became a little worried that the garment might fit me more closely than I like. So I decided to give it a tiny bit more ease by joining the front and back together with one of my old favorite panel joins, Diana Sullivan’s Zigzag Panel Join, to add another inch to the circumference of the garment. I used a froggy green Wollmeise multi that didn’t match but had things in common with the greens in the edgings, stripes and facial features. I also seamed the shoulders so that I could get a clearer idea of where the armhole seam would fall on my upper arm, to enable me to calculate the sleeve length.

My plan was to adorn one sleeve with two noses in the vicinity of the elbow and the other sleeve with a pair of lips on the upper arm. I decided to start with the noses. For some reason, it seemed as knitting the two noses before I got to the sleeve cap might be simpler than trying to position the lips in the middle of the upper arm while also trying to shape the sleeve cap. It wasn’t actually simpler, because I had to shape the lower arm. In fact it was more difficult, because I was free-styling a longer nose than Rebecca’s recipe instructed, and I had to keep track of how many completed rows I was knitting amidst the short rows sculpting the bridge of the nose, and then I had to remember to do the increases for the lower arm every six rows. I had decided to lengthen the noses because I wasn’t sure Rebecca’s cute little snouts would show up against the visual busy-ness of the red multi. I also thought that the noses would be more visible in the lighter colors I had used in the eyes on the back of the sweater. This time it wasn’t an economy measure to preserve the red multi, because I knew I had enough to do the sleeves entirely in one color if I had wanted to. But I had a design element going with these particular colors, and not continuing it would have weakened the design. Also, working the noses in a stripe of another color made it much easier for me to count up the number of rows I had on either side of the nose so that I could keep the sleeves even and the sequence of the shaping increases intact. I was pretty proud of the noses when I showed my Ravelry group a picture of the sleeve while it was drying.

Then my co-moderator, Priscilla, a multi-media artist with an interest in biomorphic forms, gave me a heads-up in the most delicate terms: some people might be inclined to interpret the noses as phallic shapes. My reaction was, “what??? My noses look like penises???” And then I couldn’t unsee it. The only way to make them look less like penises was to make them look more like noses, so I knitted up triangular patches, hand-stitched them around the area of the noses, with care to attach them to the inner edges of the nostrils, and stuffed them with leftover polyester filling from the Hippie Bus.


After I finished the noses sleeve, I could do the lips sleeve. It’s actually pretty easy to keep track of row count when knitting up the lips, because all of the short rows to make the shape are done in the center of the knitting, so there aren’t any completed rows to lengthen the garment piece. All I had to do was turn off the row counter when I started the lips and turn it back on when I was done, then resume shaping the sleeve cap as if nothing had happened. But when it came to shaping the lips, I didn’t remember how I had done it before, so I had to study Rebecca’s instructions very closely. That was when I discovered a couple of lines of instructions that I had overlooked previously, and I didn’t understand them now that I was doing them this additional time. I was trying to make the lips look fuller than my first two times, but my fumbled effort to follow all of Rebecca’s instructions resulted in something my older daughter described as “90’s duck lips”. That was better than Melissa’s comment, after the ambiguity of the noses, that there could be a similar interpretation of this pair of lips. I’m not trying to be the Georgia O’Keefe of knitting, so I thought about how to clarify just which part of the body I was attempting to represent here.

The final piece was the pocket, a sewn-on patch with a pair of eyes peering out of a stripe of black, similar to the eyes on the back of the sweater. This time I had a lot less trouble with weighting the work so that it didn’t fall off the needles, and I found the printout for the Diana Sullivan online workshop that gave instructions for automatic short-row wraps and turns, which enabled me to do the eyeballs in fewer rows so that they didn’t bulge so much. Hey, look at me, learning something and getting better with experience!

Now I had all of the garment pieces knitted and off the machine, and I sighed with relief. This had been hard, every bit of it. It’s challenging to carry out a process of building facial features involving dozens of tiny actions, any one of which can go wrong at any moment, all done on the wrong side of the work, and to have no clue of what it actually looks like until the piece is done and off the machine. I was really looking forward to the safety and meditative qualities of the hand-finishing, starting with placing the green face into its space just below my chin and sewing it in. Then I tried it on. It looked like a green bib with a face right underneath my own, and I didn’t like it. I pinned the pocket onto the front to see if the eye movement between the pieces would help break up that weird bib effect, and it did, a little but not enough. Then I thought of the original swatch, which I had finally found in the perfectly logical, safe place where I had lost it. If I attached it as a pocket somewhere onto the front, it would move the eye away from the green square under my chin and divide up the focus between the three design elements. I found places on the front for the pocket and the original swatch and hoped for the best. I also outlined the lips with surface crochet in the pink-orange I used for the eyeballs and embroidered a line of satin stitch in a lighter, orange-red between the top and bottom lips. Let there be no question that these lips belonged on a face, the rest of whose features had gotten detached from its lips.
This was going to be an eccentric garment. If you want to make a design element out of something that’s usually considered a mistake, like asymmetry, deconstruction, or the grotesque, it needs to look intentional, which means that the construction details need to be as perfectly finished as possible. So I gave my full attention to the seaming of the sleeves and their installation into the armholes. I gave long and careful consideration to the position of every entry and exit of my tapestry needle while I mattress-stitched the sleeve cap to the body and seamed the sleeves closed. I took joy in the even, in-line connections that are almost invisible. I stitched and pulled out my work over and over again when I sewed in the pockets so that the pockets didn’t deviate from the stitch and row on the garment that they were supposed to align with. When I tried it on, fully assembled but with millions of unfinished ends streaming down, I admired my workmanship. And hated the fit.
Hating the fit when I first try on a just-assembled, unfinished garment is a ritual I carry out every.single.time. Intellectually I know it’s too soon to panic, but I panic anyway. It was lumpy and clung too closely to parts of my body that want their space. There was a special urgency to my panic this time, because I had blocked all of the pieces before I sewed them together, and it still looked cramped and ungainly on my body. If the final blocking didn’t get it to the measurements I had planned, I would have poured a huge amount of effort into an eccentric garment that the thinner people of my acquaintance probably would never wear. I would probably have to donate it to the American Visionary Arts Museum here in Baltimore. Fortunately my older daughter said she would take it if it didn’t work out for me.

I went to work hiding the visible ends, although the inside remains a thicket of ends. When it looked presentable on the outside, I washed it and wrung it out by hand rather than my usual practice of running it through the spin cycle of my washing machine. Then I laid it out on my blocking tiles and pinned it firmly so that it measured its intended width. And hoped for the best. This was my last hope of having a wearable garment.
So is it a wearable garment? The blocking smoothed out the bumps and gave me the ease that I need to wear it comfortably. It’s certainly an eccentric piece of clothing, so the question is whether I have the attitude to wear it. I hope I have. I would like to think that at my current stage in life, I have aged out of caring what people think of my appearance, and that in fact I can get away with looking any way I want to by playing the old lady card. I’ll have to wait until it gets a bit cooler to wear the sweater and test out this theory, but you won’t know if you’ve got the old lady dispensation unless you claim it. I showed my sisters pictures from my photoshoot below. One said tactfully, “that’s so unusual!” The other was a lot more blunt: “Are you really going to wear that? In public???” The next day, they saw me wearing it. Another of my sisters, after picking her dropped jaw off the floor, got a tissue and wiped all four of the noses, then photographed me from all angles. They agreed that I definitely needed to wear it in public. I made it to be worn. I’m going to wear it. In public.


I just love this.The joy of finding another eye, nose or mouth ! I am 67 and would wear this funky art! Well done!
LikeLike
Thank you! I think that societal expectations of older women are so low that if we do something clever or attention-getting, we’re considered “feisty” and cute. It’s condescending, but we’re beyond caring.
LikeLike
I’m mesmerized. You have a wild imagination, and there is no question in my mind that you can wear this garment with pride.
LikeLiked by 1 person
Thank you! I think I’m going to have some fun wearing it!
LikeLiked by 1 person
That is one awesome sweater. This old woman would wear it without a 2nd thought (except for how fab I was). Congratulations!
LikeLike
Thank you! Hooray for the old lady dispensation!
LikeLike
It’s wild and crazy and fabulous! I especially like the eyes on the black stripe on the back. Wear it with attitude!
LikeLiked by 1 person
Thank you! An attitude, oh yes, I think I might have quite a fine one right here!
LikeLike
Oh Abbi, this project has lifted my spirits no end, it is just…well – it just IS!!!!!
LikeLike
This is an absolutely fabulous piece of art! I particularly love the “mom” eyes – on your back. Hahaha. And the nose pick is pretty hilarious. This is totally worthy of wearing in public. Thanks, as always, for the great write up and wonderful photos. It is such an honor and delight to live inside your artist’s head for a little while.
LikeLiked by 1 person
Thank you so much for the wonderful comment!
LikeLike
In French there’s an expression meaning “easy as pi” or “piece of cake” and it “les doigts dans le nez” (fingers in the nose) as you do on your sleeve….. This project is real fun!
LikeLike
Thanks, I’m glad you enjoyed it!
LikeLike
Thanks for writing up such a detailed description of your thinking whilst making this. I loved following your train of thought about asymmetry, and the noses shape, and all the rest. It looks fantastic and I would definitely wear it in public if I had made it.
LikeLike
Thank you, Denise! I certainly will wear this in public!!!
LikeLike
The process watching your work on ravelry was delightful and your blog post is a piece of wonderful and very entertaining writing. I love it all, the sweater and the writing and your attitude! Go, wear this, charming old lady, and pound your fist on the table dithering with conservative reserve! After all, we are responsible for this scary, silly, crazy world outside!
Those in search of private body parts, on sleeves, of all places! … don’t they know to use their mirror and just shut up? Seriously, I love a bit of ambivalence …
LikeLike
Simone, you have the best comments! Thanks so much!!!
LikeLike
Amazing, funny, enjoyable, artistic, and more! I first saw your sweater (and you) on Ravelry and now have just read your delightful blog. As an “older” woman of 84 years, I still find joy in creating and enjoying others creations…keep on keeping on…and I would definitely wear your wonderful sweater and hope I could carry it off as well as you….
LikeLike
Thank you so much! What a nice thing to say!
LikeLike
You should wear this in a house, you should wear this with a mouse, you should wear this here and there, you should wear this EVERYWHERE! Thank you for the wonderful writing, as always, with precision, and detail, and humor, and somehow we get a sweater bonus pictorial too (I would come for either, but with you, we get both writing and knitting).
ps. I like the penis-noses better….
LikeLike
Thank you! What a great comment! If you like seeing penises in the noses, you go right ahead!
LikeLike