
About 7 years ago, Andie Luijk, the color genius and owner of Renaissance Dyeing, asked me to write patterns for yarn kits using her beautiful natural-dyed yarns. It was a wonderful opportunity. I was deeply flattered at being asked to do it, I tried really hard to design things that other people would want to knit and to write instructions that made sense, and I couldn’t do it. I rarely follow patterns, so I couldn’t write them. But this time I’m going to write the closest thing to a pattern I’ll ever write. It’s not a pattern. It’s a description of how I turned Kirsten Hall’s Diamondback Socks pattern into a pullover, an explanation of my logic and decision-making, and the numbers and maneuvers I used to get the garment size and shape that suits me, with ideas about how people who are different sizes and shapes from me can adapt the design to suit them. Elizabeth Zimmermann’s discursive explanations of her thought process suit me better than knitting pattern shorthand and I’m going to follow her example.
I need to clarify my statement that I rarely follow patterns, since most of my projects on Ravelry do refer back to a pattern, especially recently. When I make socks, I usually follow the pattern very closely, since I’m not such an expert on sock-making that I can’t learn something useful about heel construction from the pattern writer (which I then forget as soon as the sock is done). But usually when I follow a pattern, there’s something in it that I want to use in some other way than the designer originally intended. I call that “cannibalizing patterns for parts.” In the case of the Diamondback Socks pattern, I did both. I made three pairs of socks and then adapted the diamond motif and its shaping maneuvers to a slightly A-line yoked pullover.


If anyone is motivated to make a pullover like mine, the first step is to get the Diamondback Socks pattern and knit it. The diamond motif is Kirsten Hall’s own invention, and it’s not mine to give away. Even if I could give it away, I can’t explain it nearly as well as Kirsten does. I will use Kirsten’s terminology in describing what I did, assuming that the knitter knows what I’m talking about. So knit the pattern, learn the motif, and get a nice pair of socks out of the exercise. I followed all of Kirsten’s instructions for the Full Diamond and Interrupted Diamond motifs, so if anyone wants to make a sweater similar to mine, please follow her instructions for Round 1 and Round 2, placing markers according to her instructions, and apply them to the procedure I used to devise my pullover.
I used my first sleeve as my stitch and row gauge. Based on the six socks I had already knit, I made an educated guess about numbers that would produce a comfortable sleeve. For the cuff, I cast on 72 stitches on U.S. size 1 needles and knitted 24 rows in knit 1, purl 1 ribbing. The plan was to build the sleeve around four diamond motifs and a stockinette shaping panel that would grow until the sleeve was a comfortable circumference. I switched to U.S. size 2 needles and knitted the initial tier, four Diamond Peak motifs, to form the peaked shape of the diamonds from the flat base of the ribbing. The Diamond Peak increases the stitch count by two stitches per motif, from 18 to 20, so at the end of the first tier, I had 80 stitches.
I started the stockinette shaping panel at the next tier, Tier 2. All of the sleeve shaping is done on the even-numbered tiers as Interrupted Diamonds, since the diamonds on the odd-numbered tiers are worked back and forth on top of themselves without crossing over and knitting the stitches that form the shaping panels. To form the start of the shaping panel, I knitted to the end of the plain round (Round 2) and lifted up the bar between the last stitch of the round and the first stitch of the next round, twisted it, and knit into the front and back of this lifted increase to create two new stitches, which would be the base of the shaping panel. The shaping panel was 24 stitches wide at the point at which I stopped increasing, at the end of Tier 8. The shaping increases were done on Tiers 2, 4, 6, and 8, which breaks out to 6 stitches increased per tier, 2 stitches in 3 sets of increases. I did m1 increases after the first stitch of the panel and before the last stitch of the panel, 6 rows apart, starting in the plain knitting round (Round 2). The increases were done on Round 2, row 5, and row 11.

When my sleeve was 12 tiers long and 104 stitches around (four 20-stitch diamonds plus 24 shaping panel stitches), I put the stitches onto waste yarn, soaked the sleeve for a half-hour, and laid it out for blocking. It fit me comfortably and the length of the diamond motifs (sleeve minus cuff) was a good length for the body of the sweater, so I knew the body length was going to be 12 diamond motifs long. The sleeve gave me two stitch gauges that I needed for designing the shape of the sweater, i.e. the diamond motif gauge and the stockinette gauge, which were 8 stitches/inch and 6 stitches/inch respectively. My plan was for the sleeve and the body to match precisely at the underarm seam, so that meant that there would be 48 stockinette stitches in the body, that is, 8 inches of width in two 4-inch side panels.
I decided that the minimum circumference around the chest would be 42 inches, and if I couldn’t get the right numbers for 42 inches and had to round up a couple of inches, that would be fine. But 42 inches would be my working number and I would get as close to that as possible. So 48 stitches for the stockinette side panels was 8 inches, and the remaining 34 inches would be diamond motifs– 34 inches times 8 stitches to the inch was 272 stitches. The motifs are 20 stitches wide, and the closest I could get to 272 stitches was 280 stitches for 14 diamond motifs. I decided that the side panels would be unshaped and that the A-line would come from a series of triangle-shaped panels that would be placed between the diamond motifs and would add about 10 inches at the hem of the garment. 10 inches times 6 stitches to the inch came to 60 stitches. I decided that I wanted 8 panels of 8 stitches because I wanted to decrease away all the shaping panel stitches, two each on tiers 2, 4, 6, and 8, so that increased my 60 stitches to 64 stitches. 280 + 64 + 48, for the cast-on at the hem, right? No, because Kirsten’s pattern starts the Diamond Peak motifs with 18 stitches per motif, and the additional 2 stitches per motif are incorporated at the end of the tier. That’s good because I wanted to start with a rolled stockinette edge, and there’s a difference in gauge between stockinette and the diamond motifs that is alleviated by the smaller number of stitches for the base of the Diamond Peaks. So the diamonds at the hem of the sweater account for 18 stitches x 14 motifs, 252 stitches, bringing 252 diamond motif stitches + 64 shaping panel stitches + 48 side panel stitches to a total of 364 stitches for the cast-on. After completing the Diamond Peaks tier, the stitch count came to 392 (280 + 64 + 48).
The next problem to work out was finding an organized and pleasing way to arrange eight shaping panels amidst 14 diamond motifs. Front and back, that breaks down to seven diamond motifs and four shaping panels per side. The sequence I devised was: side panel (24 stitches), 1 diamond (18 stitches), shaping panel (8 stitches), 2 diamonds (18 stitches x 2), shaping panel (8 stitches), 1 diamond at the center line (18 stitches), shaping panel (8 stitches), 2 diamonds (18 stitches x 2), shaping panel (8 stitches), 1 diamond (18 stitches), side panel (24 stitches), 1 diamond (18 stitches), shaping panel (8 stitches), 2 diamonds (18 stitches x 2), shaping panel (8 stitches), 1 diamond at the center line (18 stitches), shaping panel (8 stitches), 2 diamonds (18 stitches x 2), shaping panel (8 stitches), 1 diamond (18 stitches). I cast on my 364 stitches in a coordinating color and made a rolled hem by knitting 8 stockinette rounds, then a round of purl, and then placed markers demarcating the panels and diamonds at the intervals indicated above, and knit a plain row in my main color before starting the Diamond Peaks tier. I kept myself oriented by stringing together several stitch markers and pinning them onto the half-way side panel so I would know where I was in the round. It’s easy to get disoriented and try to start the next tier in the wrong place. I don’t recommend doing that. One uses bad words upon discovering that error.
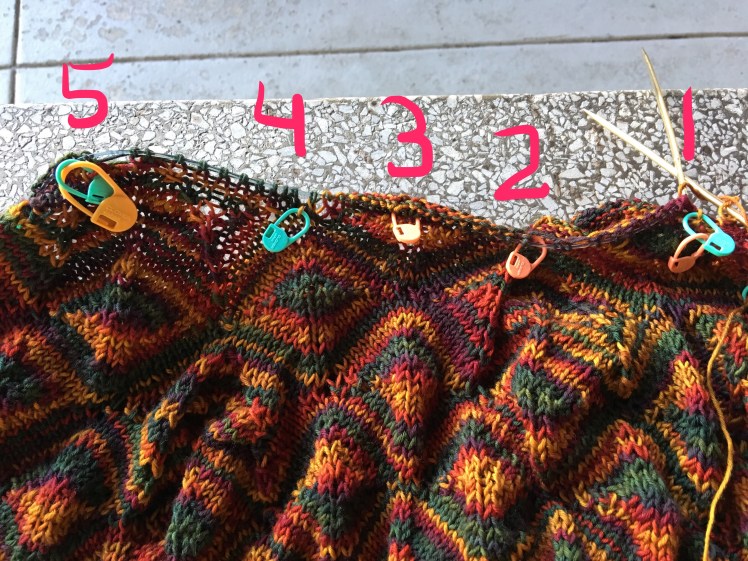
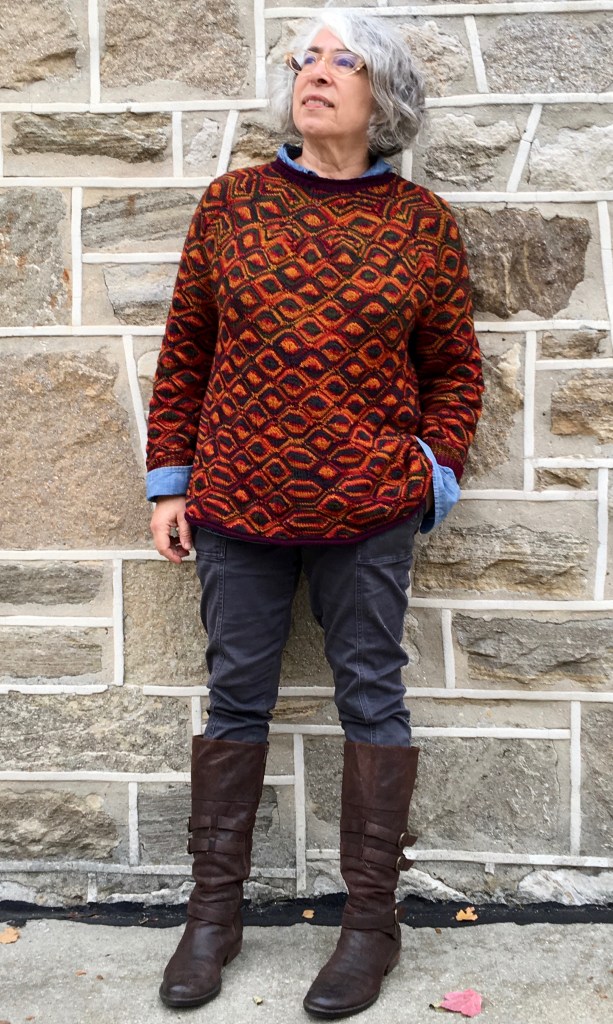
The photo below shows how I arranged four shaping panels between seven diamonds, per side, in a balanced way.

On the odd-numbered tiers, I knitted the diamonds back and forth until they were done, and knitted across the panels until I came to the next diamond and knitted it, then moved on. Similar to the sleeves, the side panels and shaping panels were built on the even-numbered tiers as Interrupted Diamonds. During the even-number Interrupted Diamond tiers, I did the decreases in the shaping panels on the final right-side row of the motif. That’s a wonky maneuver because there are a couple of contradictory operations happening in the right side decrease stitch and the adjoining pattern stitch. The pattern stitch is an increase, kfb, and it needs to eat up the right side panel stitch by covering it with a left-leaning decrease. I did that by slipping the pattern stitch knitwise, then slipping the panel stitch knitwise, and then inserting the left needle into both slipped stitches from back to front while keeping the right needle where it is and knitting the two stitches together. Keep both needles in place and put the tip of the right needle into the back loop of the stitch on top (the pattern stitch) and knit its back loop. The panel stitch is decreased while accomplishing the increase needed to form the peak required by the pattern. The left side decrease is a simple K2tog.

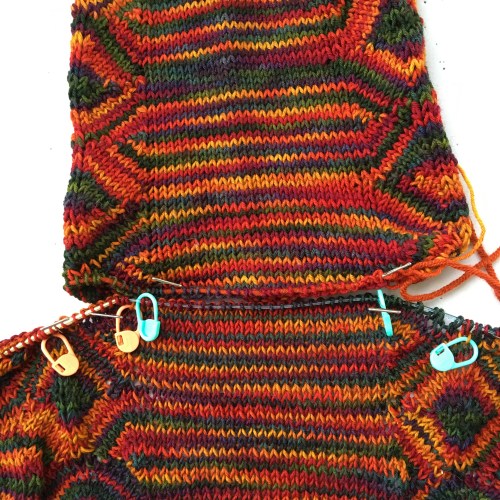
After eliminating the 64 shaping panel stitches at the end of Tier 8, the stitch count was 328. Tiers 9, 10, 11, and 12 were relatively brainless knitting, working Full Diamonds on Tiers 9 and 11 and Interrupted Diamonds, which straddled the side panels, on Tiers 10 and 12. When Tier 12 was done, I joined the sleeves to the body at the stockinette panels and grafted the 24 stitches at the side of the body together with the 24 stitches at the underarm of the sleeve. There was an extra round on top of Round 2, but it’s unnoticeable. Now there were 22 diamond motifs on the needles: 4 for the left sleeve, 7 for the front, 4 for the right sleeve, 7 for the back, 440 stitches. I had determined from my sleeve/swatch that my yoke would be 8 tiers deep, for a total of 20 tiers from neck to hem.
The first yoke tier (Tier 13) consolidated the body/sleeve join. At the second yoke tier (Tier 14) I began the short rows to form a round neckline that was higher at the back than the front. I started by knitting diamond motifs beginning at the left front shoulder raglan line, and when I got to the right back shoulder raglan line, I knitted plain from there across the back to the left back shoulder raglan line, turned, and purled back to the end of the last diamond motif I had knitted. That was like putting a Round 3 and 4 on top of the pattern’s Round 2. Those additional rows are inconspicuous, for the sharp-eyed, and absolutely unnoticeable for me. I used small fabric clamps to mark where my short rows were to be, to distinguish this part from all the other places I was marking with dozens and dozens of stitch markers. I needed every trick I could think of to keep myself oriented because it was so hard to see the short rows.
I did seven sets of short rows to form the neckline, and I placed them at different points around the back and shoulders. The first set was at the raglan line, the next was 10 stitches deeper into the back because of the offsetting of the diamonds, the third was back at the raglan line, the fourth was aligned with the second. I started the yoke decreases at the fifth yoke tier (Tier 18), and placed the remainder of the short rows at and near the raglan line at the front of the shoulders. I did the short rows by simply knitting to the end of the demarcated place and turning there, and slipping the first stitch of the next row. I closed the short-row gaps by using the shadow wraps I had been doing anyway as part of the pattern for the diamond motifs. Those maneuvers worked quite well. I really can’t see any gaps or interruptions in the knitting.
I knitted four yoke tiers, with 440 stitches on the needle, while I figured out how I was going to configure my yoke decreases, to get from 22 diamonds down to 6 at the neckline. I’m a little embarrassed to admit how long it took me to realize that the obvious solution had been had been jumping up and down and screaming at me to notice it: it was simple arithmetic. 22 – 6 is 16. I needed to decrease away 16 diamonds in four tiers, four diamonds in four tiers. Easy, even numbers. In order to accommodate the offsetting of the even- and odd-numbered tiers, I decided to put the four decrease motifs on the raglan lines for the odd-numbered tiers and on either side of the center lines for the even-numbered tiers.
I had originally thought that Kirsten’s sock pattern contained all the maneuvers I would need to create this pullover, but I was mistaken about that. My original notion of decreasing every other diamond with flat lozenge-shaped Interrupted Diamonds in between Full Diamonds turned out to be mathematically and geometrically impossible. I’m not a “micro-engineer” like Kirsten, who can figure out original, new knitting maneuvers that elegantly solve spacial problems, but I had to devise some kind of motif that would decrease 20 stitches from two 20-stitch diamonds in a way that respected the geometry of the existing motifs. I stumbled around for a while and came up with something that looked like a bit like Batman’s batwings.
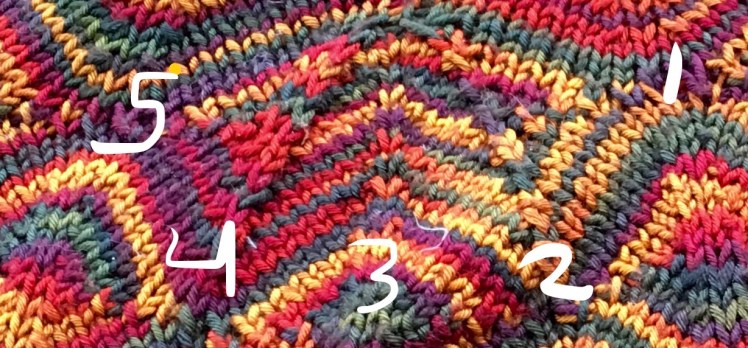
The decreases start at the peak of one diamond, go across the entire adjacent diamond that will be entirely decreased away (which I will refer to as the center diamond), and will end at the peak of the next diamond to the left. The half-diamonds to the right and left of the center diamond are worked like the right and left halves of an Interrupted Diamond. The stitches of the adjacent half-diamonds eat two stitches from the edges of the center diamond and hide them under the shaping of the Interrupted Diamond halves. The peaked shape of the center diamond is preserved by increasing two stitches, a stitch on either side of the diamond’s center spine, hence the need to decrease four stitches, two each at either edge, so that there is a net loss of two stitches per decrease row, which are the knit rows of the motif. The edge stitches of the half-diamonds will slant into the two stitches of the center diamond that the half-diamonds are consuming. That’s easy on the left side, where the center spine of the motif is located. There the double decrease is done with a simple K3tog. It’s not as easy on the right side, especially in the top half of the motif, where the kfb stitches need to be done in order to form the upward angle of the of the diamond peak, while simultaneously leaning into the center diamond and consuming its two edge stitches. I’ll describe the maneuvers for the decreases on the right edge of the center diamond, but first I’ll recap with before-and-after photos that show the structure of this yoke decrease motif.
The marked numbers refer to the stitches on the markers below the numbers. This shows the knitting before the start of the yoke decrease motif. Markers 1 and 5 indicate the beginning and end of the motif. The 20 stitches between markers 2 and 4 will be decreased away by double-decreases hidden underneath the stitches of markers 2 and 4. Marker 3 indicates the center spine of the motif that is being eliminated, the center diamond. Two stitches will be increased there, one on either side of the center spine. Add 2 at the center, subtract 4 at the sides, two stitches at each side. That’s the structure of this motif.
Here’s how it looks when the motif is completed. The numbers of the mark-up correspond to the numbers on the picture above.
Markers 1 and 5 are the top extremes of the batwing shape of the motif. I knitted from marker 1 to marker 2 according to the pattern, but instead of the ssk for rows 1, 3, 5, and 7, I worked the double decrease of the right edge of the center diamond into the ssk of the half-diamond edge stitch by slipping 2 half-diamond stitches together knitwise, k2tog from the center diamond, and slipping the half-diamond stitches over the decreased center diamond stitch. Then I knitted up to the spine stitch of the center diamond and lifted the bar between the stitch I had just knitted and the spine stitch, twisted it around so that it leaned to the right, and knitted it. I knitted the spine stitch, and lifted the bar between it and the next stitch and knitted its back loop so that it leaned to the left. I knitted up to the last two stitches of the center diamond and did a k3tog so that the spine stitch of the left half-diamond covered the two decreased stitches of the left edge of the center diamond. The rest of the left-hand diamond is knitted like the left half of an Interrupted Diamond. I discovered that it was always prudent, after knitting the decreases in the center diamond, to make sure that the stitch count had indeed been decreased by 2.
On rows 9, 11, 13, and 15, I worked out a different maneuver to decrease the two stitches at the right edge of the center diamond, because the left edge stitch of the right-hand half-diamond is a kfb. The way I managed these contradictory operations, i.e. the simultaneous increase in the kfb and the double-decrease, was to slip the half-diamond edge stitch knitwise, then slip 2 center diamond stitches together knitwise. Keeping the right needle in place, I inserted the left needle from the back to the front into the 3 stitches, and knitted through them from the front loop, then knitted through the back loop of only the first slipped stitch. I couldn’t continue doing the center spine increase within the eight knit-side rows of the pattern. I would have needed 10 knit-side rows in order to make the numbers work out, so I stopped doing the increases on row 13, when I had 8 center diamond stitches left, and just did the double decreases at the sides on rows 13 and 15.
It’s really easy to get disoriented doing this yoked pullover in the round, so I had to use a great many stitch markers to signal where I was in the work and what I should be doing. I put little fabric clamps into the knitting at the places where I wanted to work the neck shaping short-rows, and I demarcated the start and end of the decrease motifs using chains of stitch markers, as shown in the first of the marked-up photos of the yoke decrease motif above. The rest of the many, many markers I used helped me to maintain the proper stitch count within the individual diamond motifs. Staying oriented was crucial to preserving my sanity.
So there are four decrease tiers in the yoke. The first decrease tier, Tier 17, started at the left front raglan line, and straddled 20 stitches past the start of the round. I knitted those plain, knowing that these stitches would be part of the last decrease motif of the tier. From there, I knitted five plain diamonds until I reached the diamond peak that would be the start of the decrease motif, whose center point lay on the raglan line. Then I knitted the short row for the neck shaping from the starting point of the decrease motif to the corresponding point on the right front. When I came back to the start of the short rows after the purl row, I slipped the stitch at the end of the short row I had just knitted and embarked on the decrease motif. After the decrease motif, there were two diamonds that I knitted in the usual way before getting to the start of the next decrease motif at the back raglan line of the same shoulder, the right one. Then there were five diamonds before I got to the back left shoulder decrease motif, knitted it, then two plain diamonds, then the final decrease motif, which was centered over the left front shoulder line.
Now I had gone from 22 diamonds to stitches for 18 diamonds (360 stitches). Stitches for four of those diamonds would be decreased from diamonds at either side of the centers of the front and back, two per side. I demarcated 40 stitches at the left of the center line for the first decrease motif and another 40 stitches at the right of the center line. The two decrease motifs were side-by-side. The decrease motifs were similarly positioned on the back. I knitted a plain diamond at the start of the second yoke tier (Tier 18), then the two decrease motifs, then another plain diamond, which brought me to the start of the next neck shaping short row. The end of the short row was at the corresponding point of the other shoulder. The short-row holes would be closed by doing shadow wraps in the offset motifs on the next tier. From the start of this second decrease tier, the motif sequence was: plain diamond, two decrease motifs, five plain diamonds, two decrease motifs, four diamonds, resulting in 280 stitches.
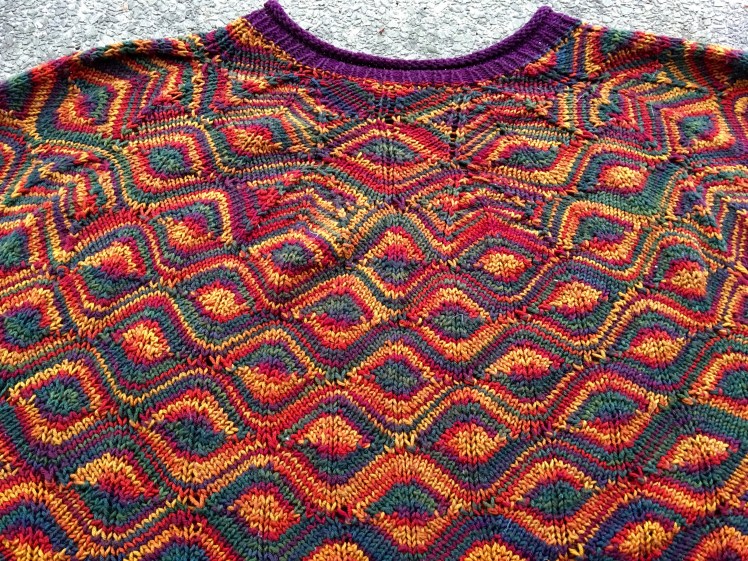
The third decrease tier (Tier 19) starts with a 10-stitch jog. Then three plain diamonds, do the neck shaping short-rows, two side-by-side decrease motifs, three plain diamonds, two decrease motifs, 200 stitches. I decided not to do any neck shaping for the final decrease tier (Tier 20). Another knitter might decide a bit more depth in the neck would be good and would do the short-rows. For this final decrease tier, there’s a 30-stitch jog after the end of the previous decrease tier. The sequence is one decrease motif, one plain diamond, two decrease motifs, one plain diamond, one decrease motif, resulting in 120 stitches. To finish the diamond shapes, I did 6 Diamond Valley motifs, which flattened the peaks and reduced the stitch count by 2 stitches per motif for a stitch count of 108 stitches at the neckline. I knitted 8 rows of k1, p1 ribbing in my contrasting color and then another 8 rows of stockinette for a rolled edge. Bind off, tuck in the ends, block, and wear. And wear. And wear. I hate to take it off!

The elements of the Diamondback Sock pattern can be combined and adapted to fit all kinds of sizes, bodies, and personal styles. If you prefer a straight up-and-down shape, omit the shaping panels and give it a ribbed hem. If you want shaping at the waist, decrease the side panels by the number of stitches that give you the waist measurement you want, and then increase them again, if you want a bit of an hourglass shape. If you want to use my instructions as a basis for something that fits you, you can use Interrupted Diamond panels to adapt the numbers to get the size you’re looking for. Just make sure you get an accurate stitch gauge for the diamonds and for stockinette or whatever stitch you’re using for the non-diamond stitch pattern, because they’re probably going to be different from each other. If you don’t want to go through the contortions I went through for the yoke decrease motif, you could make fewer Full Diamonds and more Interrupted Diamonds, with stockinette panels that are as big or small as you want them to be, and do the decreases from a flat shape that can be decreased without having to preserve the diamonds’ geometry in order to avoid lumps. This doesn’t have to be a pullover either. You can make a cardigan and easily get flat side edges for button bands by doing half-diamonds on the even-numbered tiers. If you’d like to consult with me on how to adapt this design, ask me in the comments section, or PM me on Ravelry.

What a fab jumper, the diamonds work really well. 😊
LikeLike
Thanks so much!
LikeLiked by 1 person
As usual Abby a masterpiece what a gorgeous jumper
LikeLike
Thank you, Monica!
LikeLike
Wow!! Very impressive sweater construction.
LikeLike
This brings to mind Jazz players who were trained in Classical, Abstract artists who were trained in Fine Art. How inspiring, and thank you for so generously writing it all out for others.
LikeLike
I’m glad it was interesting to you!
LikeLike
It’s really a gorgeous sweater, and it looks great on you.
LikeLike
Thanks, Mandy!
LikeLike