
When my daughters’ birthdays came around at the end of November and December, it was an awkward time for me to embark on the elaborate, full-grown sweaters that I usually make them for their birthdays. My abstemious younger daughter said that she didn’t really need a sweater anyway, since I have already made her so many, but she could use a nice warm headband to warm her ears. That didn’t seem like much of a birthday present, but I had an idea that I wanted to try out on the LK150 knitting machine that I had recently installed in my knitting room, a two-layered plated and tuck stitch fabric. Small items like ear warmer headbands, and for my older daughter leg warmers, would be great swatches for the technique, as well as enabling me to dispatch the birthday presents on time and without a lot of effort.
I had varying amounts of sport weight alpaca yarn in a wide range of natural, undyed colors. I had used this yarn a couple of years ago on my Brother KH965i standard gauge electronic knitting machine, and it was a little too thick for that machine, but much worse, it shed lots of fluff into the electronic brain of the machine and made it skip stitches in stranded patterning. But now that I have the plastic medium gauge machine that doesn’t have an electronic brain, I can use that alpaca yarn with joyful abandon any time I want to. So I chose two contrasting colors and loaded one color in the A feeder and the other in the B feeder, set the tension dial as loose as it would go, cast on enough needles to make a strip of fabric wide enough to cover the ears when folded lengthwise in half, and began plating and tucking. The plating produced a fabric that showed one color on one side and the other color on the other side, and the tucking produced a different texture on each side. The knit side showed a bubble effect, and the purl side showed smocked diamonds. It took a couple of tries to get it to work, but pretty soon I had the length I needed for a headband with a double turban twist.
When the light is just right, you can see the quilted texture of the knit side.

Folding the headband and sewing down the layers required a learning curve. First you lay it out flat and twist it in the middle.

Then you fold both sides of the twist lengthwise and interconnect each end into each other, as if the two ends were a forward-facing C and a backward-facing C, with one end of each C fitting into the curve of the other C in an alternating four-layer sandwich. Then very quickly you pin all four layers together before they wiggle away, and you sew all four layers together before they can escape. Now the headband is inside-out, so you turn it outside-in and seam the edges together.

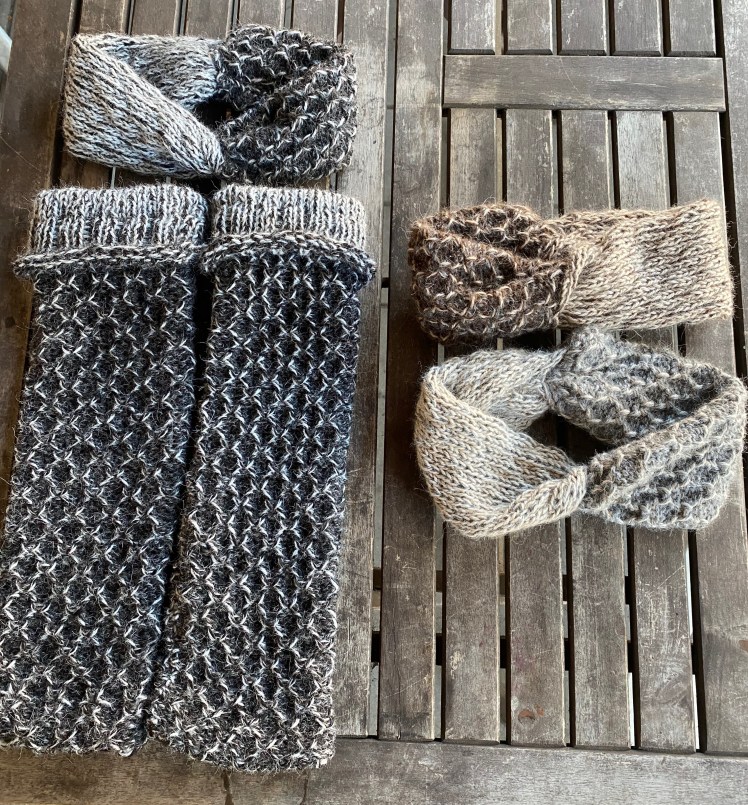
I made legwarmers for my older daughter, a slightly longer and wider piece of fabric with a few inches of ribbing at the top, sewn into a long tube, as well as a headband earwarmer, and the younger daughter got two earwarmers so that she’ll have a spare. The headbands also work well as small cowls when pulled down around the neck. I felt a little bad about the sparseness of these gifts, but I made each of them substantial garments not that long after their birthdays and still in time for very cold weather in their respective locations. Most importantly, these small items were proof-of-concept for the plated tuck stitch fabric I wanted to knit as a jacket for my younger daughter. They gave me stitch and row gauge numbers (4.1 stitches per inch, 6.6 rows per inch, knitted on T9).
I envisioned a boxy, buttoned cardigan, dropped shoulders, shawl collar, pockets, long enough to cover the pelvic bones, ribbed hem. I decided that the purl side, with the smocked diamond texture, would be the facing side for the garment. I wasn’t sure how much yarn I would need, so I wound two full skeins of contrasting undyed alpaca, medium brown and tan, and calculated the numbers for the width and length of the back. The dominant color would be the darker of the two colors, so I loaded the brown into the B feeder, because that feeder puts the yarn on the purl side, and the lighter tan into the A feeder for the knit side bubble texture, and e-wrapped the two yarns onto the needles for 10 rows of ribbing, by re-forming purl stitches into knit stitches after the 10 rows were knit. Except that it didn’t want to knit. I couldn’t get the cast-on stitches to tension properly, and my yarn was getting wound around the underside of the carriage and making loops that stopped the carriage in its tracks. Suddenly I understood why the knitting videos were always telling me to start by knitting waste yarn and a row of ravel cord, then start the real knitting.
So I knitted up a few inches of waste yarn and a very loose row of ravel cord, and when I started the real knitting with weights hanging from the waste yarn, all was forgiven and my plated fabric knitted right up. I laddered every third stitch in the first 10 rows in order to re-form them as knit stitches for the ribbing, then started the 3×1 tuck stitches. When I had a few more inches of length in the piece, I no longer needed the knitted waste yarn to support the weights, so I started to pull out the ravel cord, only to realize that my ribbing was going to unravel, since I had failed to do a closed cast-on over the ravel cord row. The videos I saw on using ravel cord tended to skip over the part where you cast on, I guess because it seems so self-evident and there’s no real trick to it. I asked Tanya for advice and she sent me a video of someone doing a crocheted cast-on over ravel cord. Noted for future parts of the jacket. For now, I stuck a locking stitch marker into the stitches that were in danger of disintegrating and kept the waste knitting in place until I could get the piece off the machine and could bind off the bottom stitches of the hem by hand.
Somewhere toward the shoulder shaping on the back piece, I noticed that my two big cakes of yarn were getting smaller at an alarming rate. I’d been hoping to get an entire jacket out of these two skeins, but that was clearly an unrealistic hope. Now I was just hoping that I’d be able to yarn-chicken my way through the back and two fronts without having to design my way out of the shortfall. When I got the back off the machine and had caught the hem stitches onto a circular handknitting needle to bind them off, I weighed the piece and then what remained on the cakes, and saw that I would be able to just barely get the two fronts out of that yarn. But I was going to have to use different yarn for the pockets, which were going to be strips knitted into the front pieces, with the surrounding stitches on hold while I knitted a strip twice the finished length of the pocket, whose sides would be seamed together into a bag. That was going to use up a lot of yarn. I looked around my stash and found some big cakes in close but distinctly different colors from the ones I was using for the body, and decided to use them for the pockets and sleeves.
I still didn’t want any nasty surprises coming too late in the process for emergency design solutions. Just to make sure I wasn’t stuck at the final corner of the second front without enough of the original two colors to finish the piece, I found some small cakes of yarn that were close to those two colors and used them for the ribbing. This time I hung up the piece of waste yarn knitting on my needles, knitted the ravel cord, and tried the crochet cast-on that I had seen in a video, pushing the cast-on stitches up against the butts of the needles and tight against the ravel cord. It knitted up well, but it would have benefited from making the cast-on a lot looser.

I knitted the first front according to the numbers I had calculated for the body length, with a stop for the pocket loops, then up to the base of the neck, then the neck and shoulder shaping. But when I took it off the machine and checked it for fit, the neck hole was too high and tight, and I wanted to have room for a big warm shawl collar. I recalculated, frogged (rip-it, rip-it), and reknit it. I weighed the first front and the remaining yarn. Whew, I was going to have enough to last for the second side.
Now I had my numbers for the second front. I took care to make the crochet cast-on looser this time, and the knitting went along swimmingly until I got up to the row where I needed to start the neck shaping, mirrored from the first front. That was when I realized I had failed to mirror the placement of the pocket for the second front and it was closer to the button side than to the seam side, as the first pocket was. Once again, frog (rip-it, rip-it) and reknit.
I sewed the shoulder seams together and calculated the width and length of the sleeves, with a bit of concern for whether the colors I had chosen for the pockets would last through the length of both sleeves. Before I began knitting, I weighed each cake and thought about the design solution that would get both sleeves knitted in color combinations that looked intentional. Whatever I did on the first sleeve had to be done on the second sleeve. One possible design feature that I decided against was to use the knit side of the fabric as the facing side and to make a design element of the subtle quilted texture of the knit side of the fabric, which only appears when the light hits it in a certain way. The texture was just a little too subtle, and using the light side as the facing side was much more contrast than I wanted. The only place where I wanted the contrast was at the cuffs, which were supposed to extend about three inches longer than the distance from the shoulder seam to my daughter’s wrist in order to be folded upward. The bottom six inches of the sleeve would be where I would place stripes of yarn substitutions if I needed to supplement the yarn I had chosen.
I took the sleeve off the machine when I had knitted the length and shape I had calculated. Why was it so short? Had I miscalculated? Was my gauge wrong? Actually, it was. I had tightened the tension when I knitted the pockets for the second front and forgot to loosen it again for the remainder of the piece. It was OK for the second front, or OK enough that I wasn’t going to frog. But it did impact the sleeve, which, on top of the tension, was at least 20 rows too short. I weighed the sleeve and the remaining yarn, and I had enough yarn to lengthen the sleeve and make a second sleeve, so I recalculated, frogged, and reknitted. I think I managed to knit the second sleeve without having to frog, but who knows. It seems I frogged pretty much every part of this garment at least once.
I knew I was going to do a lot of frogging for the final part, the shawl collar, since I lacked an understanding of the geometry and numbers for the shape and fit that I was looking for. I was just going to have to grope my way through trial and error. But I still needed to knit button bands and buttonholes, which I also didn’t know how to do. I looked at a couple of videos demonstrating different techniques, but I decided that the method that best suited this garment was one by Diana Sullivan for a ribbed button band and buttonhole done without using a ribber attachment. It was very nice looking, and I used her method to make the button band, minus the hole, on the button side of the jacket. I adapted the basic method for the plated fabric I was making with the two yarns, using the purl side as the facing side, and when I reconstructed the knit stitch, the light yarn came to the front in a very pleasing textural effect. But I wondered if I could find a way to make a better buttonhole than the single-stitch yarnover Diana used. I wanted to see if I could bind off a couple of stitches at intervals on one pass, and cast on those stitches on the return pass to finish and close the hole. But I made a tangled mess that looked awful, and the life lesson was that if Diana did a yarnover buttonhole, she had a good reason for doing it. I reinforced the buttonholes by hand in the finishing.

Finally I could procrastinate no longer. I wanted the collar to fit into the shape of the round neck I had made on the back and fronts on the inside of the collar, and fold over and form the same shape on the outside edge. This was my starting premise: where I decreased to make the neck on the garment pieces, I increased for the collar, times two, one set of increases for the edge that would be sewn into the hold and the other set of increases to enable the outer edge of the collar to have the same curve as the inner edge. Where I had straight edges at the top of the neck on the fronts and at the back across the neck, I used the number of straight rows on the fronts and calculated the stitches:rows ratio to get the number of rows at the back of the neck. I knitted those numbers, although I forgot to knit the plain rows on the second half of the collar, so I frogged back to where I had made the mistake, and reknit. But the corrected version was still wrong. It was too short, it would fit like a garrote.
I recalculated, taking a different approach. A comfortable neck hole is about 20″ around. I was short by about four inches, so I added four inches of rows to my plan. I kept the shaping for the initial and ending rows, because they retained the roundness of the Peter Pan collar that I was going for. I got this set of numbers to work, but I saved the frogging until I could get a side-by-side comparison of the two finished collars, since I had enough of the yarn to finish the version that I could put onto the jacket and keep it there.

Finished, sewn in, with an i-cord edging.


Only after I finished the collar and sewed it in did I realize that it was almost the size of a hood.


I had more moments of concern before I could call this thing done. The collar wouldn’t lie flat, even after I had added I-cord edging. The button band curled, despite it being a knit-purl fabric. What about the curl at the back edge of the collar? Would the garment fit with the easy and elegant positive ease I had envisioned? The answer to these and many more questions: wet-blocking. Wet-blocking is the knitting equivalent of the number 42. It’s the answer to everything. And the answer to these specific questions was that wet-blocking made everything lie flat in its intended place and the fit was exactly what I had envisioned.


The range of colors I used for the various parts of this jacket reminded me of the coffee menu at Starbucks. That was a design element done by necessity rather than as a planned choice. When I first planned the jacket, I assumed that a huge skein of the medium brown and a huge skein of the light brown would cover the back, fronts, ribbings, pockets, and sleeves, and that I would use a contrasting pair of colors for the collar just for the fun of it. I didn’t understand how much yarn plated tuck stitch gobbles up until I found out the hard way. I had other skeins and cakes in various other natural colors, enough to finish the garment, and I could have mixed things up by making the pockets, ribbings, and sleeves into color-block reverses of the darker brown main color. I didn’t want to though. I didn’t want to chop up the body parts with that much contrast in this circumstance. The differences in the colors were clear enough not to look accidental, but I didn’t want them hijacking the way the eye moved over the composition and becoming the only story. So I chose a lower-contrast grouping to keep the eye’s focus on the button plackets, the pockets, and the collar, rather than making the sleeves scream out “look at me!” I wanted the jacket to have a unified visual composition that supported my goal of perfect functionality and comfort.

Love this. I think that using all the different browns made the jacket very special.
LikeLiked by 1 person
Thank you! The different browns add eye movement and engagement to the composition, but I didn’t want such stark contrasts that the eye got stuck on any one part of it.
LikeLiked by 1 person
Well, you succeeded
LikeLiked by 1 person
It’s always interesting and nice to read your blog, I love your creativity and imagination.
What an adventure your project was but in the end you must be proud of it because it’s beautiful!
LikeLiked by 1 person
Thank you, Mariagioia! I am proud of it. At the end of a long learning process, I got the jacket to be something easy and comfortable to wear, and completely functional.
LikeLike
“perfect functionality and comfort”….you’ve done it beautifully !
LikeLiked by 1 person
I really appreciate your saying so!
LikeLike
Love it
LikeLike
Thank you!!!
LikeLike
Amazing, as usual!
LikeLiked by 1 person
Thanks so much!
LikeLike
That is some high-level engineering and design. I do love the sculptural look of tuck stitch and slip stitch fabrics, and yours is an elegant combination of texture and subtle neutral color. Well done! Your daughter looks great in the ensemble.
LikeLiked by 1 person
Thanks so much, Gretchen! I appreciate your detailed analysis!
LikeLike
G
LikeLike