
I spent the winter and spring of 2021 working on machine-knit entrelac projects, beginning with a yoked, entrelac sweater that grew to dress length, and ending with a series of socks, whose project name on Ravelry was “An Exhaustion of Entrelac Socks“, a collective noun that I coined to express how I felt about entrelac by the conclusion of the sock series. But that urge to entrelac began stirring in me early this year, and January 2024 Swatchathon had an experiment that combined a Stitchworld slipped-stitch pattern with entrelac for a summer top that I never made. Now that I had gotten past the trauma of too much entrelac in 2021, I picked up on the entrelac zeitgeist and began faving entrelac sweaters that were appearing on Ravelry. An important event that was sparking my imagination was that I had just sorted through my ancient stash from my First Knitting Era in the 1980’s and 90’s, thrown away the moth-eaten skeins, and organized the survivors by color, weight, and fiber into vacuum storage bags. With my ancient stash freshly in mind, I began visualizing the varying quantities of these leftovers in an entrelac sweater.
I keep an LK150 knitting machine at my younger daughter’s house in Madison, Wisconsin, and we were planning a trip there at the end of May. So I selected yarn of different colors and weights ranging from heavy fingering to light worsted from my recently revisited ancient stash, as well as newer yarns, in order make an entrelac sweater on the LK150 during the visit. I spent the first couple of days of the visit refreshing my memory of how to make the various entrelac shapes, with a lot of help from YouTube videos by Diana Sullivan and Roberta Rose Meads. I was curious about how really big entrelac diamonds with stripes of different random colors might look, so I swatched three diamonds at 20 stitches for the base of each diamond and played with the shapes and the yarn. It was educational but not aesthetically pleasing. That’s what swatches are about, to show you what to do and what not to do.
I took a closer look at Lindsay Degen’s ‘Lil ‘Lac pattern. It’s an expensive pattern, as patterns go, and not everyone who used the pattern was totally pleased with it. But there were a number of finished projects that showed that the concept could work, the numbers worked for my gauge, and I was going to disregard all of the instructions that applied to hand knitting anyway. I could have worked out the numbers for myself, but I didn’t see a reason to begrudge the designer $12 for having already worked out the numbers for a design that I was obviously influenced by.
The pattern has two sizes, one based on 16 10-stitch entrelac squares, for an estimated circumference of 48″, and the other based on 20 squares, for an estimated circumference of 60″. I couldn’t predict the actual finished dimensions of my work, and I would vastly prefer a lot of positive ease to not quite enough, so I went with the larger size. I got off to a bit of a rough start. My machine didn’t really like the yarn I used for my base triangles, and I messed up the shaping of one of the first triangles I made and didn’t notice until I got to the point where I needed to connect the beginning and end of the base row to start the first row of full squares. By then I had fought too hard to get there to want to scrap the whole thing and start over, so I decided to live with the messed up triangle. Also I was having trouble with the white acrylic worsted I was using as scrap to hold the live stitches. Some of that was user error and some of that was because it was coming out of a bullet shape rather than a cake, and I was having trouble tensioning it. After working out those initial problems, I made a design decision to use up my small amounts of yarn, even if there wasn’t enough to get all the way around the row. When that happened, I found a similar hue, visibly lighter or darker was fine, and finished the row with a slightly different color. By the time I had to pack up and leave Madison, I had five color sequences, and it didn’t look like much of anything. I took it off the machine and stuffed everything into a bag and into the closet of my daughter’s guest room.

When we came back for another visit in October, I brought more yarn with me. This time, I was able to make much faster progress. I think I made the body a color sequence longer than the pattern called for, but I really wasn’t paying that much attention to the pattern yet. I did heed the pattern’s guidance for how deep to make the division between front and back where the dropped-shoulder sleeves would go, as well as how to shape the neckline. Now I had to figure out how to make half-triangles with vertical edges for the sleeve seams from the left side and the right side, which required different maneuvers. The pattern’s instructions didn’t make a lot of sense to me, and I didn’t bother trying to find the videos for the entrelac shape variants on the internet, although I think that Roberta Rose Meads might have some useful nuggets tucked away in her machine-knit entrelac series. But I thought her method was awkward and precarious and I found it tedious to wade through the videos until she said something I could use, so I thought it would be less confusing and frustrating to figure it out for myself.
With the reverse side of the knitting facing me, I looked at the shape of the diamonds at the right side end of the fabric and saw that I needed to build a slanting shape from the live stitches that were being held on scrap yarn to the left of the new knitting. The right side of the new entrelac shape needed to grow straight upward while the left side would grow diagonally by picking up the lives stitches from the previous entrelac diamond. That meant I picked up the nearest live stitch, knitted two rows, and picked up each of the 10 stitches and knitted two rows, except for the last live stitch, where I knitted one row so that the yarn would be on the left side and I could make the next entrelac diamond the usual way. That gave me 10 stitches slanting diagonally on the left, a straight vertical line on the right, and a triangle base slanting diagonally on the right, growing out of the live stitches from the previous diamond that I had knitted one at a time. Then I pulled out the waste yarn and knitted my new live stitches with it.
When I got to the left side of the knitting, where I needed to make the sleeve slit at the other end of that side, I was building the new shape from the side stitches of the previous diamond. I picked up my 10 stitches and started knitting each pair of rows as normal, but from the second pair of rows to the end, I decreased the stitch where the slit needed to be by moving the end stitch onto its neighbor with a transfer tool, until I was down to just one stitch. While I was groping my way through the side triangles, I didn’t realized that the process of creating triangles with a vertical edge could be reduced to a fairly simple principle: when you’re building up from live stitches, knit the pair of rows one live stitch at a time until you get them all onto the machine. When you’re building up from picked-up side stitches, decrease a side stitch for every pair of rows.
I followed the pattern’s recipe for the neck shaping, which consisted of two triangles with straight horizontal edges for the base of the neck, a regular unattached diamond at either end of the flat triangles to form the curve of the neck hole, and a quarter triangle on top of the diamonds, with a vertical side edge and a horizontal top edge, to finish off the neck hole shape. The triangle with the flat horizontal edge was very simple to make, because it is formed like a regular diamond, by picking up stitches from the side edge of the previous diamond and joining the new knitting to the live stitches of the adjoining diamond from the previous row. But you decapitate what would have been a diamond by decreasing a stitch at the start of each pair of rows to get the flat horizontal edge.
The final right-angled quarter triangles were a bit of a challenge to work out. The one that was built on picked up stitches wasn’t too difficult, because it combined the vertical edge bind-off I described in the paragraph before last with the horizontal edge bind-off I described in the last paragraph. But the right-angled quarter triangle based on the live stitches completely eluded me. I just couldn’t visualize how to do it, and I came up with something weird that gave me an extra flap of fabric, which I disappeared by folding the extra fabric down into the shoulder seam and picking up neck ribbing from the edge as if nothing unusual had happened. Now that I’m looking at the finished neck, I can’t for the life of me figure out what I did. I think I must have started the quarter-triangle from the wrong starting point and just got disoriented. So I have no advice to share here about how to make that shape. Next time I do something like this, the geometry will probably be self-evident and I will wonder how I didn’t see it in the first place.

But as of now, I can’t even figure out which direction I was working from and just can’t reverse-engineer what I did.
I followed the pattern’s method for making the sleeves. The pattern says to pick up 10 stitches from each side triangle that formed the front-back division of the garment using the same color yarn as each side triangle, to form first-row base triangles. I’m not explaining how to do that, because there are good videos online that are much clearer than I can be. I recommend Diana Sullivan’s videos. I had to play yarn chicken for some of the colors to get the base triangles to match the side triangles, but I won that game, and I like the uninterrupted way the top of the sleeves flow out of the adjoining edges of the body.

Now that I’m done, I realize it would have been a lot simpler and would have had the same effect if I had just made complete squares the usual way at the side slits and and left the stitches live, on scrap yarn, and knitted the sleeve downward from there. I thought about doing different color sequences for each sleeve, but I decided to keep the color arrangement for the two sleeves pretty much the same, although I switched to similar colors when I ran out of the original color. I like the balance that the similar sleeves give to the composition, but I also was really ready to be done with this thing and didn’t want to rummage around for different colors.
The pattern has a super-simple and rather ingenious way method for cinching in the cuffs, which I knitted by hand. The sleeves are six diamonds around. You knit the final round of diamonds the way you knit all the rest of the the other diamond sequences, then put the live stitches onto a circular needle, 60 stitches, and knit the cuff. There are gaps between the diamonds, embrace them as a feature.

The pattern annoyed me by calling for the Italian tubular bind-off that I had attempted, found inscrutable, and angrily rejected as the bind-off for my Fortuna’s Wheel Trousers. Then I came to a disturbing realization about my aging self. I dread having to learn something new, and I resist new techniques and fall back on the same techniques I always use. I don’t want to be the kind of old dog that can’t be taught new tricks. I use January Swatchathon to force myself to try new things and to retain plasticity in my brain, but I needed to bind off my ribbings now. So I sat down with instructions and a video for Italian tubular bind-off while my brain was working as well as it ever does, without the excuse I’d had previously of feeling unwell from a covid shot, and explanation of the process was still inscrutable.
I realized I wasn’t going to get it from the instructions and videos because they don’t think the way I do, and I went over to Lovelyarns with my knitting. Fortunately for me, Melissa was having a quiet spell at that moment, and I made her read the steps to me out loud and supervise my movements, over and over again, until I grasped the holistic structure of how each step in the operation connected with the shape of the knit or purl stitch that was being bound off. That’s how my brain works, I don’t understand anything until I understand everything. Once I understood that the movements that brought the yarn to the front of the purl stitch repeated the structure of the purl stitch, and the movements that brought the yarn to the back of the knit stitch repeated the structure of the knit stitch, I was liberated from the instructions and could see what I needed to do based on the structure of the knitting rather than disembodied steps. My tubular bind-off went off-sequence a lot while I was figuring it out, but I’m not making a big deal out of barely noticeable imperfection.
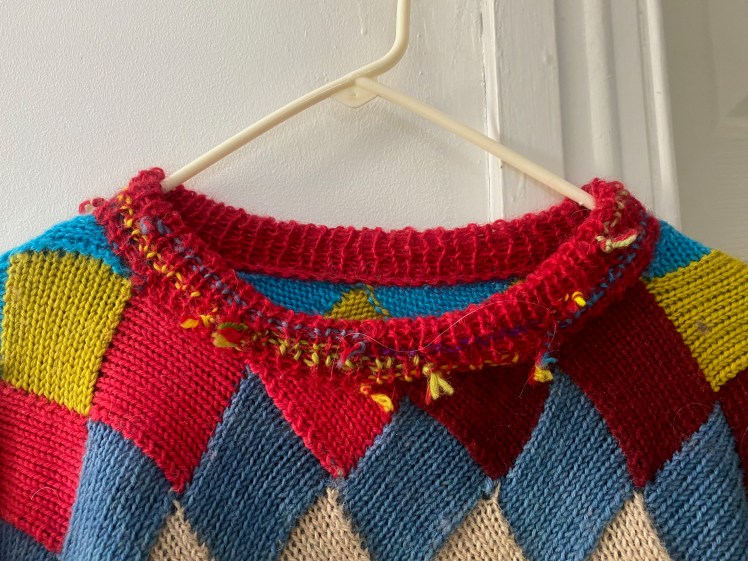
The inside of my work had very long ends because I was using leftover yarns and often didn’t have enough of a particular color to finish an entire color sequence or even a whole diamond, so I left the remainder of the yarn dangling where I joined the new color. I decided to use those long dangling ends in the ribbing for the neck and bottom edge in a way inspired by the Danish Instagram knitter Lærke Bagger’s Alone Together sweaters. In these sweaters, she breaks her main color yarn and ties it together with short lengths of other yarns. Sometimes she leaves the knots on the inside and sometimes she brings them to the facing side as a design element. I’ve been wanting to play with Lærke’s ideas ever since I became aware of her, and the tangle of ends inside my work gave me the opportunity.
I chose to go with the transgressiveness of the visible knots option in my ribbing. Visible knots are an ingrained taboo among knitters. They communicate not only sloppiness of technique but even slovenliness of thinking and perhaps character. But what happens to the viewer’s reaction when the knots appear intentionally as an element in a skillfully executed whole piece of work? Does the viewer find it amusing to upend their expectations of something that has always been a negative thing and start to see it as decoration? Or will they see it as a blight on otherwise nice work? It’s a personality test, I think, indicating generational cohort, place of origin, receptiveness to the unfamiliar, maybe even political inclinations. With my especially long dangling ends, I knitted them over five stitches, carrying the main color over this 5-stitch patch, and knitted the scrap yarn piece for as many rows as it took to use it up, kind of an intarsia in the round. I think this might be my own embellishment, not borrowed from Lærke. Someday I will dedicate an entire sweater to spicing up plain stockinette with Lærke Bagger short ends, knots, and whatever other ways to use disparate leftovers she might inspire.
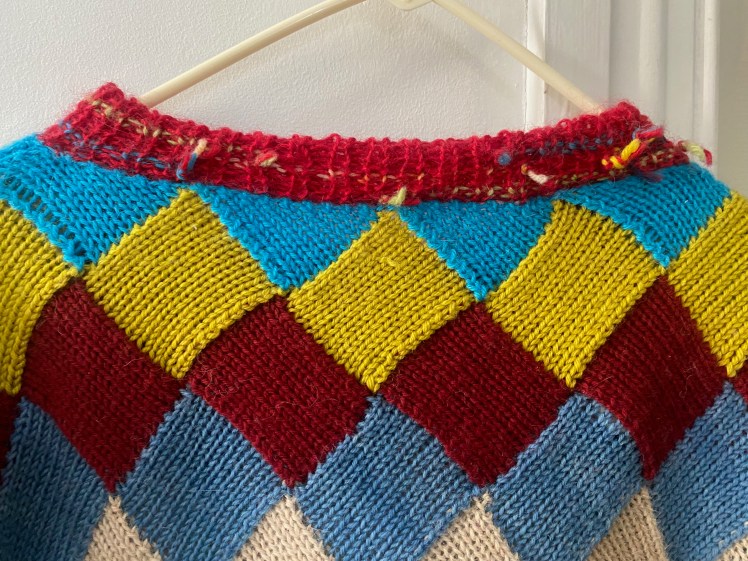


And here’s the whole sweater.

Although it took an intermittent six months from start to finish for this project, I don’t feel burned out on entrelac, thanks to the fun of making this pullover. The Degen pattern has given me a model to adapt for the next project, which I’m already thinking about. It’s inspired by a project one of my Ravelry friends is making, consisting of 6-stitch squares in a variety of undyed creams, beiges, and browns. And now I’m thinking, what numbers would I need for 7-stitch squares in the dimensions I want? What tension should I use for leftovers of my undyed alpaca yarn? My Degen ‘Lil ‘Lac pullover will help me find the answers. January Swatchathon will give me the numbers.


Stunning. Your posts are a joy. Happy Holidays.
On Tue, Dec 17, 2024 at 8:07 AM The Interior of My Brain: A Knitting and
LikeLiked by 1 person
Thank you so much! Have a wonderful holiday season!
LikeLike
Once again I am in love with your ideas, your colour and how you just defy conventional “style”.
It’s so much fun!!
thanks for sharing. 👍🏼
LikeLiked by 1 person
Thank you so much!
LikeLike
Your Blog makes my brain hurt and my eyes pop out but in the very best way!!!
LikeLiked by 1 person
Thank you? Hurts so good? I don’t mean to inflict pain!
LikeLike
“Disembodied steps” – that’s what *kills* me about so many peoples’ instructions (about so many processes). Thanks for finding the right phrase.
I love your entrelac pullover, so fun and so wearable. Here’s to many more!
LikeLiked by 1 person
Thanks, Gretchen! I really appreciate your comment!
LikeLike
I have to “ditto” the brain hurt. My knitted hat is off to you, this is an amazing accomplishment. I can’t quite wrap my brain around how entrelac becomes a sweater, but the answer in your case is clearly “beautifully”! And, I LOVE the knotty ribs! (Hmmmm, makes me think of “naughty ribs”, sort of apropos of this time of year, and who doesn’t like a little bit of naughty? 😉 )
LikeLiked by 1 person
You know, Tanya, I actually just groped my way through all the maneuvers, so if my explanations don’t make sense, it’s probably because my understanding of what I was doing lasted only for as long as it took to do it. Thanks for all the nice words!
LikeLike