
There was grief throughout Knittingdom when Pom Pom Quarterly shut down as a print periodical last winter. Their patterns were flawed but the designs were beautiful, modeled on diverse people of all sizes, genders, and ethnicities, with great photography printed on the highest quality paper. It was all too expensive to sustain. But they went out in style with the final issue, all inspired by weaving patterns. They had me at the cover, a pants and pullover set in an op-art checkerboard, called Fortuna’s Wheel. The moment the final issue arrived at Lovelyarns, I bought not only the book and but yarn for the entire outfit without even thinking about it because I was instantly smitten.
I wasn’t the only one who was smitten. It seemed like only minutes after the book was available for purchase before the WIPs (works in progress) for the sweater began appearing in my Ravelry friends activity, and then the FOs (finished objects), and they all looked great. Most of the earliest versions retained the pattern’s black and white color combination, because black and white in op-art really can’t be beat. But there were some memorable exceptions, like the charcoal and light blue multi made by my Ravelry friend who is known only as earthperson, no capitalisation, and the black and white version with randomly placed rectangles of colored duplicate stitch made by my Italian genius friend Mariagioia. There were many fewer versions of the pants, but they looked good on the knitters’ entire range of body types and sizes, including a pregnant woman whose pants fit her beautifully into her second trimester. I decided to start my Fortuna’s Wheel knitting with the pants.
The yarn I bought back in January, which I swatched for the January 2024 Swatchathon, was a basic, inexpensive worsted-weight non-superwash wool in a leaf green for both the pants and the pullover and a forest green for the pants and a jade green for the pullover. When I swatched the chart back in January, I noticed that the dark rectangles were to be knitted in reverse stockinette, but that seemed like an unnecessary and awkward extra bit of effort, so I knitted my swatch entirely in plain stockinette. However, checkerboard patterns in plain stockinette always gap between color changes occurring in a straight vertical line, no matter how perfect your tension and how even your stranding is, and perfect tension and even stranding tends to be something I can do without a problem. Sometimes blocking helps with that, but never completely and sometimes not at all. But I found that alternating purl with knit in stranded knitting actually wasn’t an awkward operation when I started knitting the corrugated ribbing for the waistband. My knitting style was able to achieve the knit-purl patterning quite comfortably.

I knit continental and carry both yarns on the left hand. I decided to put the light yarn in the dominant position, so that its floats were carried below the dark yarn. First I loaded the light yarn over my left index finger and tensioned it between the index and middle fingers, then put the dark yarn over my index finger and the next two fingers and tensioned it between the ring finger and the pinkie. This positioned the light yarn to be knit with the stranding underneath the floats of the dark yarn, and it also made the dark yarn more easily accessible for purling, with the aid of my thumb to move the yarn over the needle when it pointed toward me for purl stitching. I haven’t seen other knitters use their left thumb the way I do, but I haven’t seen every knitter in the world, so perhaps other people purl the way I do. People make a big deal about knitting continental or knitting English and all the individual variations within the decision to carry the yarn on the left hand or the right hand, but the only thing that matters is the knitting itself. I find knitting English to be really awkward and it even pains me to watch people knitting that way, but I admit that the fastest knitters knit English. I just don’t know how they do it.
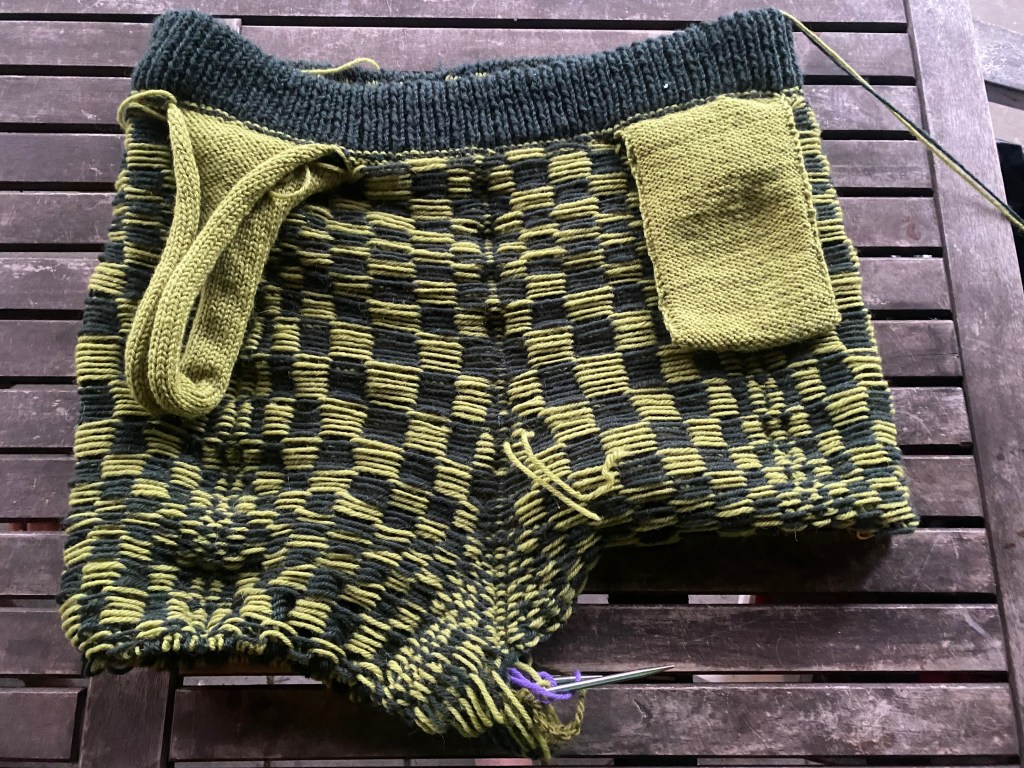
The pants are knitted top down, starting with a crocheted provisional cast-on, with the first row of stitches knitted into the bumps of the crocheted chain. You knit a 1×1 ribbing in the dark color for a while, then do the corrugated 2-color ribbing until you have knitted enough to fold it over and join it with the loops of the stitches that were knitted into the crocheted chain, at which point you pull out the crocheted chain. While I knitted the the waistband, my other task was to figure out my most important modification to the pattern: pockets. The lack of pockets is the only reason I don’t wear my Gearbox Pants all the time, because I couldn’t figure out where the pockets should go. I wasn’t going to make the same mistake for these pants.
I asked myself, did I want to separate the stranding at the midway point between the front and the back to do wrong-side stranding for a slit into which I could place side pockets vertically? Or go several inches down from the waistband at the front and interrupt the stranding to knit in horizontal pockets? The answer to both questions was, no thanks, that doesn’t seem like fun. I went for expedience and decided to put the pockets into the plain row just beneath the waistband, at the top of the pelvic bone. I knitted the pockets the simplest way imaginable, by knitting up to the edge of the pocket stitches, putting the pocket stitches onto a different needle, and knitting a little sack that exactly fit my cell phone. I finished the completed sack with a row of garter stitch, then knitted over to the other side where the stitches for the second pocket began. I hand-knitted the first pocket. It took a long time and was a tedious process. Now that I knew how many rows I needed the pocket sack to be, I went over to Lovelyarns and used Melissa’s bulky knitting machine. That took me 15 minutes. Recently I acquired a knitting machine that can knit worsted weight yarn, so in the future I don’t have to run to Melissa’s to borrow her machine for tasks like this.
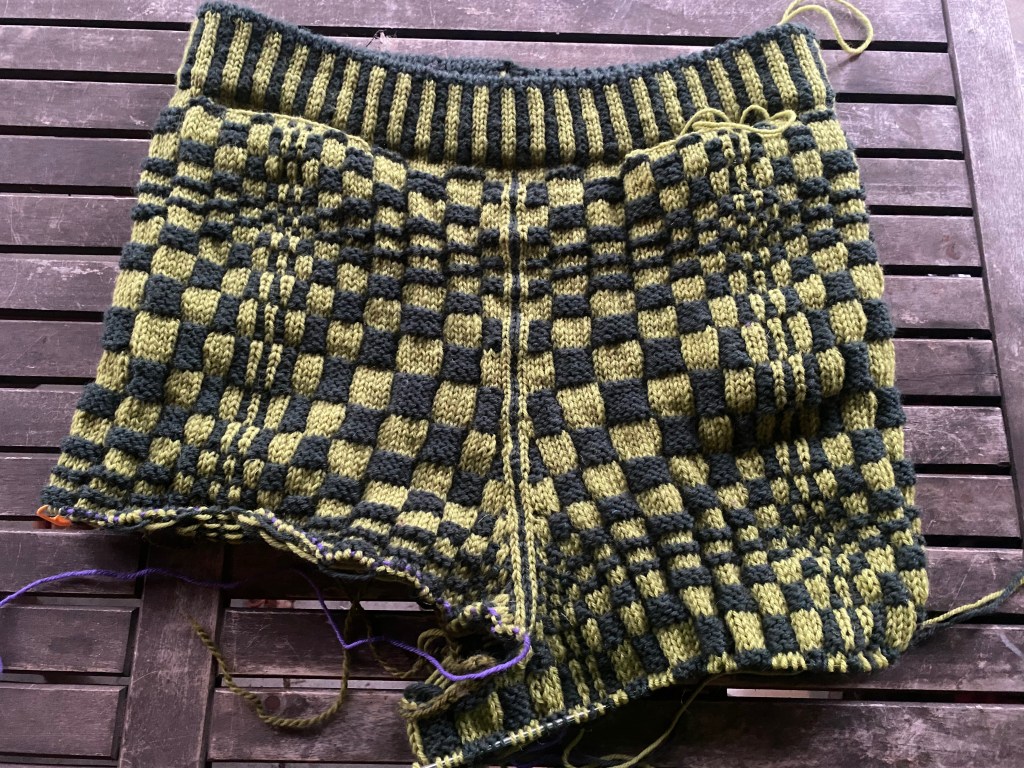
Next, I started the stranded pattern, and once the sequence was established, it turned into really enjoyable almost-brainless knitting. The grid had done most of the counting for me, except for the number of rows needed to shape the 3D op-art illusion, and I needed to follow the chart to shape the crotch. Once I had some inches of stranded fabric, I appreciated the design decision to purl the dark stitches and knit the light stitches. The texture doesn’t show up well in photographs, but it looks wonderful in real life and it fills in the gaps that result from stranding two colors on a grid entirely in stockinette. So bravo to the designer.
In fact, I thought that I was going to get through this entire Pom Pom pattern, with sizes to fit every conceivable human shape, without the math errors I have come to expect from Pom Pom. Well, almost. For the size I was knitting, size 5, the number of stitches the pattern called for to make the division at the crotch for the legs resulted in two extra stitches at the front and at the back, per leg. That number of stitches wouldn’t fit into the established grid. I spent some anxious time going over and over the instructions and my knitting in order to figure out if this discrepancy was user error or designer error. I handed the work over to my spare brain, Melissa, to make the call, and she concluded that it was the designer, not me. Fortunately, the fix was very easy, just a double decrease at either end of the crotch stitches, which had the extra bonus of closing the holes that result from joining new knitting to old knitting at a division in the structure of the knitting.
After sorting out the crotch/legs divide, it was all delightful semi-brainless autopilot knitting through two repeats of the chart. I made a mistake on the first leg that I didn’t catch until five inches later, but I decided that if it took me five inches to see it, probably no one else would see it, so it wasn’t worth ripping out five inches for something that didn’t disrupt the structure of the garment or the optical effect of the patterning. I suppressed my perfectionist impulses and carried on. I was careful to do the same thing on the other leg in the same place, and so far no one has come up to me to point out the mistake. Since I am a short person, I needed to be aware of how long the legs were getting, because dragging the cuffs on the sidewalk is not a great thing to do to a handknitted fabric. I abbreviated the corrugated ribbing at the cuffs by a few rows. Also, the pattern calls for an Italian tubular bind-off, and I was trying to comprehend the instructions for that while I was knocked out by my usual reaction to a covid shot. I gave up and just did a regular bind-off. A lot of designers are really in love with the Italian tubular bind-off, and I just don’t see why it’s worth the trouble. Melissa says it’s because it gives the work a machine-knit finish, (something I don’t do in my own machine knitting), but I don’t understand how that is an advantage in a piece of knitting that is obviously knit by hand, especially since I really don’t like the flat, two-dimensional look that infects a lot of machine knitting and try to avoid it. Well, OK, designers like what they like. Maybe someday when I have some brain cells to rub together, I’ll expend the effort to try to learn Italian tubular bind-off. January Swatchathon is coming.
The last thing I did was to insert the waistband elastic into the channel that started off the pattern. The instructions recommend cutting the elastic to size and closing the waistband around the elastic when knitting the stitches of the provisional cast-on together with the last row of the waistband. I didn’t do that, because I wanted to use 2-inch-wide elastic, and I didn’t have it yet. Also I wasn’t yet sure about how long the elastic needed to be, and I wanted to try the finished pants on before I did the cut. The disadvantage was that now it was a lot harder to get the elastic through a channel that was only slightly wider than the width of the elastic. But I happened luckily to find some huge paper clips lying around that were thick and about four inches long, so I attached one end of the paper clip to a safety pin and poked the safety pin through the end of the elastic, then worked the paper clip through the channel dragging the elastic behind it. To get the right length for the elastic, I put it around my waist and found the point where it was tight enough without being too tight, marked that place with a T-pin, and added a couple of inches for sewing the ends together after it was inside the waistband. The waistband is secure and comfortable.
This is my second pair of hand-knitted pants, and I’m interested in applying what I’m learning about their construction to machine-knit pants. The crotch shaping in the Gearbox Pants was cleverly and invisibly incorporated into the stranded patterning. It’s a lot easier to do that in hand knitting than machine knitting, because that would require moving around all the stitches on the machine every time you need to increase or decrease stitches in the middle of the fabric. But the shaping for the Fortuna’s Wheel Trousers is done at the side edges of the pieces, and it’s easy to increase and decrease at the sides when knitting on a machine. The yarn I want to use for machine-knit pants is thinner and has a smaller gauge than the worsted weight yarn I used for these pants, but I ought to be able to use the same shaping in thinner yarn and still get pants that fit, because these pants are really big on me.
The pants have been done for some weeks now, and I have had a chance to wear them and see how they function in real life. The pockets do what they were planned to do, which is to hold my big iPhone and keys without dragging the pants down and off my body. This is thanks to the tension of the elastic and the placement of the pockets up at the waistband. The bad thing about the pocket placement is that if I put my hands into the pockets, it looks as if I have stuck my hands into the waistband and down my pants, not the look I’m going for. The important thing is that I can move around in the world with my keys and phone at hand and my pants securely on my body. That’s what matters.
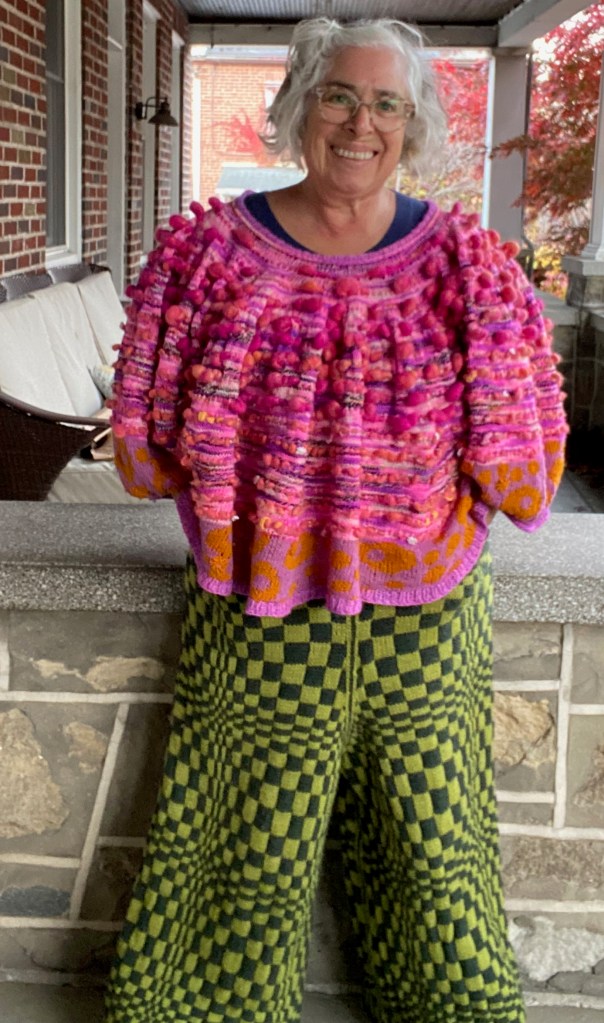
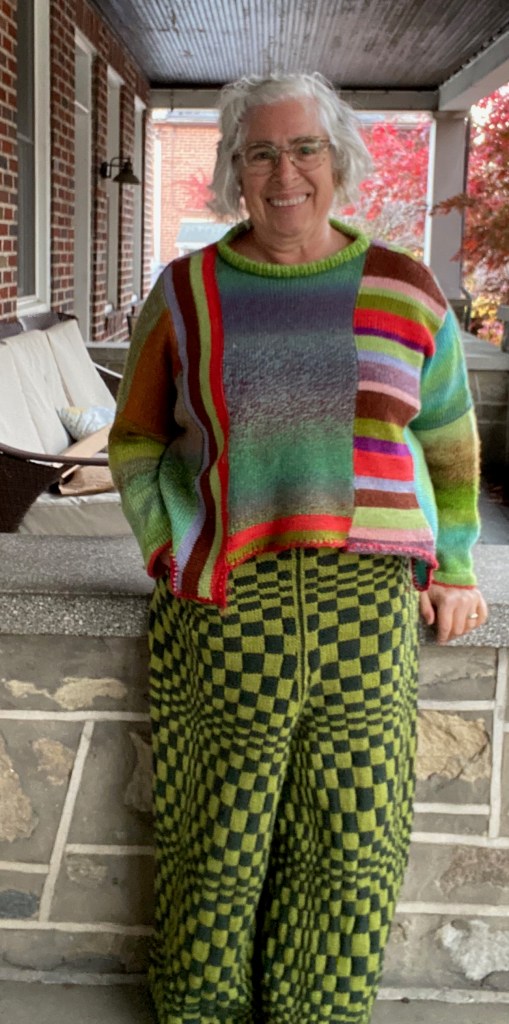
Besides the pockets, the other success about these pants is how well they pair with so many garments that are already in my collection. Clearly I don’t have a problem with lots of color and with combining contrasting patterning.
I love the pants with my knitted dresses. Too bad that When Will This Sweater Be A Crime is going to be an active work of political art for a long time to come.

This other dress was also inspired by political rage, the Supreme Court hearings for Brett Kavanaugh and the public destruction of Christine Blasey Ford.

Paired with Zebra Kurt, in Chicago with my younger daughter and my husband, the Sunday before the 2024 election, the last time I wasn’t filled with political rage.

Same-ish outfit, better display of the pants and sweater, worse state of mind.

But I can’t do my part to make it as difficult as possible for authoritarians to take over my country if I’m feeling demoralized and too depressed even to paste a big old cheesy smile on my face when I’m concocting crazy outfits with my fabulous sweaters. So I took some more pictures and this time the brave smiles weren’t totally fake.


OOO! This pattern might work as a reasonable facsimile of one I’ve been looking for! I’ll see if I can brave it! https://www.ravelry.com/discuss/pattern-detectives/4337849/1-25#8
Love reading your blog and seeing your projects!!
LikeLiked by 1 person
Thanks, Kathy! Ooh, you got to see an Eras Tour concert? That must have been incredible. You could probably graph something like what you’re looking for. It might work as intarsia for the big parts and stranded for the smaller patterning. But not a simple project.
LikeLike
Nope, just the movie and a million grainy streams from all over the world!
LikeLiked by 1 person
Me too. An actual concert sounds like a lot.
LikeLike
OOO! This pattern might be a reasonable facsimile of one I’ve been looking for. I might have to brave it!
https://www.ravelry.com/discuss/pattern-detectives/4337849/1-25#8
Love reading your process and seeing your work!!
xoKathyxo
LikeLike
The pants are fabulous with every top you’ve modeled. Brava!
LikeLiked by 2 people
Thanks so much, Gretchen!!!
LikeLike