
My annual January Swatchathon is as close as I get to making New Year’s resolutions, because it’s when I try out different techniques and combinations to see if the idea I’m playing with is something I want to turn into a finished object, and I set a goal for the coming year. This year’s goal is to make things I intended to make last year. I bought Junko Okamoto’s Ogawa pattern in January 2023 with the intention of making it during the summer or fall of that year. 2023 had other plans for me, but I decided that I had plans for 2024.
Ogawa is one of Junko’s less popular designs, but as soon as I saw it, I knew it was just my style. It looks like an oversized knitted rib sweatshirt, but it’s actually crochet. It looks a lot simpler than it really is, because Junko has done some interesting shaping tricks with the neck and hem that don’t really show up in her photos. The first thing I noticed when I started my swatch back in January was that Junko used unfamiliar terminology and abbreviations in her instructions, not U.S., not UK, Japanese maybe? Eventually I figured out that the stitch was a half-double through the back loop, in U.S. terminology. I used the 8 mm hook Junko called for and three strands of sport weight alpaca yarn, and got a larger gauge than what was specified. Not a problem, I would factor that into which size I chose to make. I chose her numbers for the short version, because my gauge would make it about five inches longer. People are always telling me that crochet is fast work, but not so for me. This stitch was a slow go, fully two months of awkward manipulation of a large hook through a stitch structure full of obstacles. When you’re poking a big clunky hook loaded with three strands of yarn through the back loop of a three-stranded stitch, the other parts of the three-stranded stitch get in the way, and it takes multiple tries to get it right. Or maybe it’s just me. I’m not a great crocheter.
And I’m not great at following instructions either. I hadn’t yet internalized the structure of the crocheted ribbing, so I lost track of which row I was on according to the instructions. The shoulder shaping is done at a regular interval, but I got confused about when I was supposed to do it, so I just eyeballed it and tried to do it a time or two again on my way toward the neck shaping at more or less the same number of ridges between the increases. I looked at Junko’s measurements for the width of the shoulder, and crocheted to the width I wanted, and then I realized I had three more ridges of neck shaping before I got to the actual neck hole. Once I finally grasped that rather important detail of the sweater’s construction, I decided that frogging was going to be more trouble than it was worth, because I had been working a gradient fade into the fabric by hand. I was crocheting three different strands of natural alpaca colors and replacing one of them every so often with a different color. I thought at the time that disassembling the changing colors was going to be tricky, although now I don’t think it would have been that bad. Whatever my logic was, I forged ahead with a width that was much wider than I had originally planned.
I was also flummoxed by Junko’s directions for the short-row curve at the hem because it abbreviated the number of ridges across the bottom hem, making it not as wide as the rest of the body. I had a misunderstanding that the hem needed to fit around the circumference of the hips because I had failed to understand that there was a split between the front and back that would give back the inches that the curve at the hem was taking away. This misunderstanding is another reason why the sweater is so wide, because I wanted to make sure that the hem would be big enough to get all the way around me.
A third reason why the garment is so wide is that the actual neck opening is seven ridges wide, which was probably just right at Junko’s gauge, but my gauge was larger and probably loosening up the more I did the stitch. That added several more ridges of excess width. If I had six fewer ridges per side, right and left, I would have made the size I originally thought I was going to make. I also had a neck opening that stretched from shoulder point to shoulder point and was very much deeper than the crew neck that I wanted. I wasn’t panicking about that, because I was confident that the neck band would tighten the neck opening.
Between Junko’s terminology and my inability to keep track of where I was in the pattern, I quickly jettisoned the specifics of the instructions and just did something Ogawa-like. I did take care to do on the right side the reverse of what I did on the left side so that it was symmetrical, even if it was wrong according to the instructions. Also I had trouble keeping a consistent stitch count. One of my difficulties with crochet is that it’s very easy for me to add or lose stitches without noticing where or how I did it, unlike in knitting, whose stitch structure makes unplanned increases and decreases jump out as anomalies. I think that the most likely place for me to have lost my stitches probably was at the end of the row, or maybe I did something I shouldn’t have done on the return row after the short-row shaping. Anyway, I did a stitch count when I was approaching the point on the left side where I needed to mirror the shaping on the right side, and discovered that I was several stitches short. I was several ridges away from where I needed to do the short row shaping at the hem, so I snuck in an extra stitch in the bottom half of each of those several ridges so that the left side wasn’t conspicuously shorter than the right side. I can’t find those extra stitches now, so that must have been a good save. The lesson is, crochet needs constant counting. Stitch markers help. Also, it’s not a bad idea to understand the way the pattern wants the garment to be constructed sometime before you’re halfway through it. My problem is that I usually can’t understand other people’s thought process until I am halfway through it.
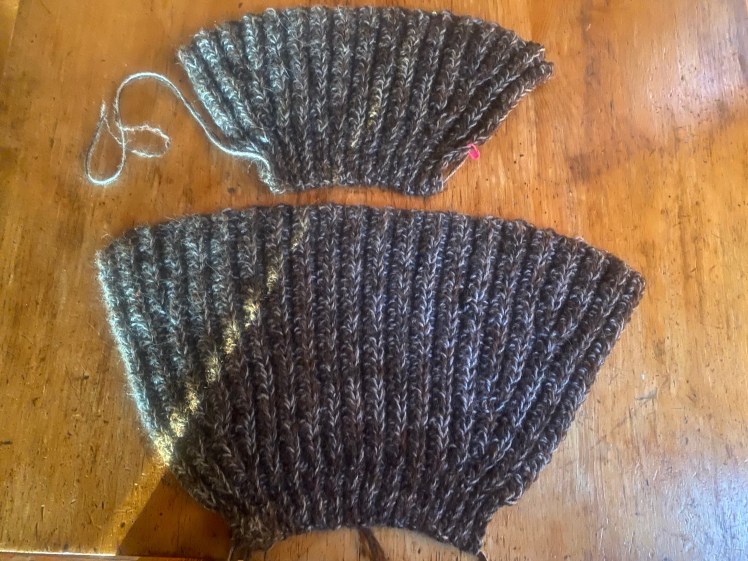
For the back piece, I made a design decision that disguised my imprecision further, which was to make the back several inches longer than the front, enough to be perceived as a conscious style element. I added the stitches for the additional length to my cast-on chain, and when I did the short-row shaping for the curve at the hem, I lined it up with the place on the front where I had done those short rows. The extra length was below that point. By now I wasn’t even looking at the pattern, although I did consult the diagram for the back neck shaping. I did the shoulder shaping in more or less the same place where I did it on the front piece, made the same number of ridges at the various places where I needed to shape the piece, and used the front as my pattern.
When I finished the back, I immediately seamed the shoulders and slipped it on over my head. The neck opening was so huge that it fell off my body. I couldn’t wait until the end to make the neck band because it was bothering me so much, so I went back to the pattern and tried to follow the instructions, which said to make an 11-stitch chain and work single crochet stitches (U.S. terminology) into the back of every stitch while joining every other row into the edge stitches of the neck opening. I labored over this awkward operation for two or three hours and got maybe five ridges done, a couple of inches of ribbing. I couldn’t cinch that huge neckline in enough no matter how far apart I put the joining stitches, and I had ugly gaps at the join.

Even more concerning was the burning ache the ribbing stitch had started inflicting on my right index finger, going from hurting occasionally, to frequently, to almost constantly. Crochet purity was not worth permanent damage to my right hand, so I ripped out my ugly, floppy, sloppy, ill-fitting crocheted ribbing and grabbed a knitting needle. An hour later, I had tamed that huge opening with a smooth, firm neckline that fit and preserved my hands to fight another day.

Now that I had my neckline under control, I needed to see just how enormous this monster really was on my body, so I sewed up the side seams after aligning the short rows at the hems and sewing to where I expected the sleeves to fit in. The width of the body landed a couple of inches below my elbows, so I was only going to need about seven inches of sleeve. Once again, I returned to the pattern. I didn’t even bother attempting to decode Junko’s written instructions, but she did have a diagram showing where and how far apart the short rows should be placed, so I followed that diagram with the minimum number of stitches that would preserve the placement of the short rows according to Junko’s scheme. I made two sleeves the same way, then sewed one on and tried it on. The sleeve was so wide that I had to take out almost all of the side seaming just to fit the top of the sleeve into the seam, and the cuff came almost down to my knees. Clearly I was going to have to frog this mess and devise my own sleeve.
With a heavy sigh and a worried thought about that burning pain between the first and second knuckles of my right index finger, I frogged one of the sleeves and calculated the number of stitches I was going to need for a 7-inch sleeve, 23 plus one turning stitch. The good thing about having done so much crocheting loosely based on this pattern was that by now I had internalized how Junko’s short-row shaping worked and could apply the concept to my own needs. Instead of three short rows at either side of the sleeve seam, I had two, the first at the halfway point of the loose ribbing (half-double crochet through the back loop, U.S. terminology) and the second just before the tight ribbing at the cuff (single crochet through the back loop, U.S.).
I got that sleeve done in three hours and the next one done the next day. I was almost able to make both sleeves using the yarn frogged from one sleeve, but I had to frog the second sleeve to get the final several ridges. The pain in my index finger did not get worse. Now I have a usable sweater.


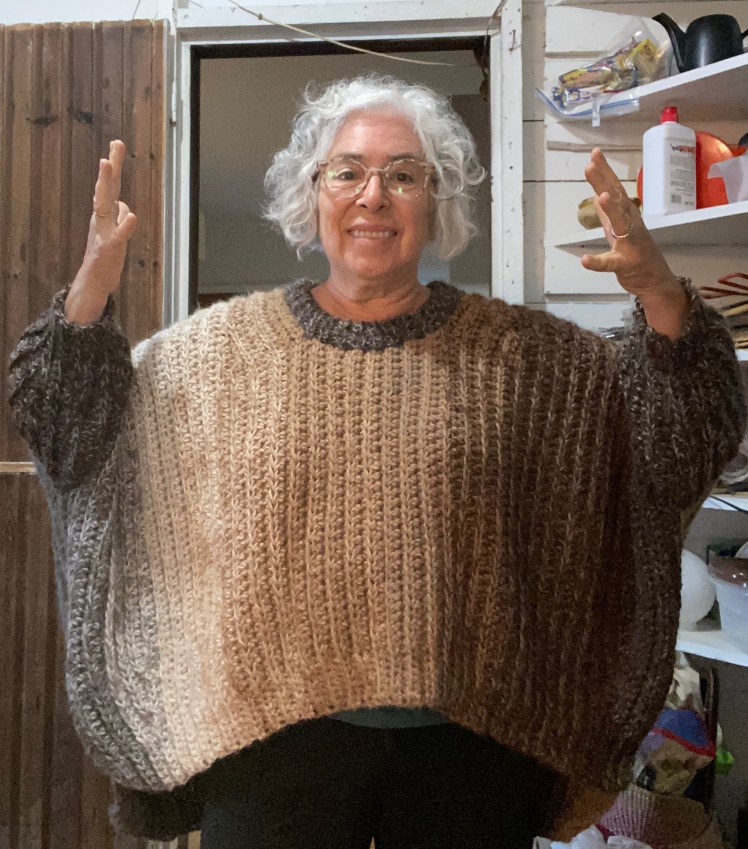

But is it actually a sweater? I think I have made another poncho with sleeves. It’s a lovely thing to wear when there’s a bit of a nip in the air, as there is as I write this in August at our family’s cottage in the woods next to Lake Michigan. I wish I could have made the neckline a bit tighter, but I’m satisfied with the fact that it’s usable as it is. I really like the look and function of the uneven split hemline, which is just long enough in the front while covering the small of my back and beyond on the back side, and the gradient fade of all my natural alpaca yarn colors makes me so happy. Also I think I have figured out Junko’s instructions and have finally learned the valuable skill of counting crocheted ridges and stitches accurately. I’m tempted to get yarn that will get Junko’s gauge, and make another version of the pattern that actually follows the pattern and is two-thirds the size of this highly improvised version. After my finger heals completely.
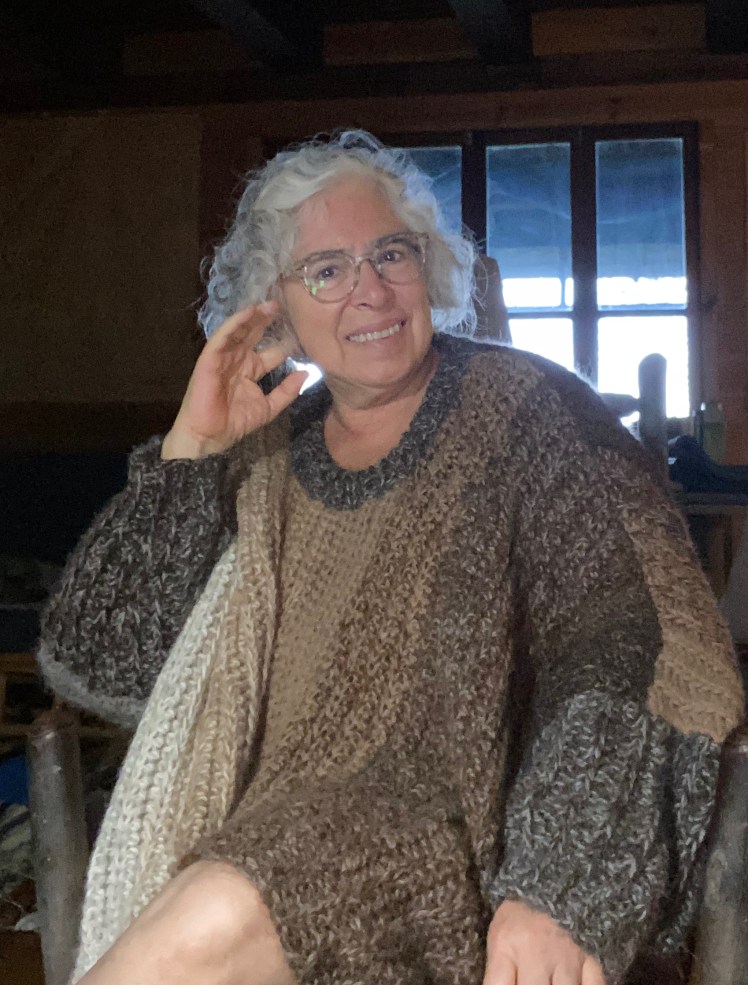

All-in-all, this garment is really the perfect vehicle for displaying that absolutely stunning yarn, and what an amazing job you did with creating the gradient. It really is a runway-worthy piece, in my opinion. And wearing it must be like being wrapped up in a cozy cloud. I think if I put that on I would never want to do a thing, except lounge around in the glorious puff.
My favorite line: “My problem is that I usually can’t understand other people’s thought process until I am halfway through it.” Oh, so, so true!! If only we could just plug into each other’s thought processes and understand them. But I adore what you came up with.
LikeLiked by 1 person
Thank you, Tanya! Once again your comment is making me glow!
LikeLike
would it have been possible to take it in at the side seams the cut off the extra material? I did that once with a sweater disaster. It was like steeking both sides all the way down. I lost a lot of yarn, but I had a sweater that mostly fit.
i’ve always been impressed with your fortitude and inventiveness.
LikeLike