
I’m not the first to have noticed that the limitations of my skills and equipment stimulate designs that get around those limitations or turn them into design features. Necessity is the mother of invention, after all. Or is it “mother is the invention of necessity”? Or “invention is the necessity of mother”? Whatever, last spring I ran into a sweater design that I fancied, a very oversized striped stockinette garment with a loose V-ish neckline in colors that reminded me of my plant-dyed yarn. It was a hand-knitting pattern, but I don’t hand-knit stockinette because it’s too boring. Stockinette is the reason I have the knitting machine. But the maximum capacity of my standard gauge knitting machine is 200 needles that can only knit thin yarn, which makes a piece of fabric about 24″ across. Two such pieces would be 48″ around, and the garment I wanted would be at least 54″ around. Hence the need to find a way to incorporate additional fabric into the composition.
When I took Diana Sullivan’s “Strings To Things” online workshop last winter, I wasn’t interested in any of the actual things she was teaching us to make, and a lot of her techniques went over my head, but I came away from it with a couple of techniques that were news I could use. One was short-row sock heels and toes, which I later used to exhaustion in my machine-knit entrelac socks, and the other was the sew-as-you-go method of joining an already-knitted piece of fabric to knitting that is in progress. This was something I had not done outside of Diana’s mukluks pattern that joined several triangular layers enclosing the foot. In my rendition, I produced lumpy foot-bags. But I understood the concept and was ready to attempt a different application. I was going to use sew-as-you go to extend my machine’s 200-needle limit by knitting the garment in panels to get the size I wanted.
I wasn’t ready to start knitting immediately. I had other knitting on the machine that needed to be finished first, and after a long pandemic winter (and fall and summer and spring), I was going to travel in June and a lot of July. While I completed these priorities, I did the visualizing for my next plan. There would be wide front and back panels knitted on 180 needles in 10-row stripes of plant-dyed colors arranged without a rota, knitted straight up to the shoulder shaping for dropped shoulders, 240 rows from hem to the end of the shoulder shaping at the neck. The additional body width would come from 36-stitch panels at the sides, connecting front and back up to the armpits at row 180. Then 37 stitches would be picked up from the edges of the front and back panels up to the start of the shoulder shaping to make the sleeves, which would be 110 stitches (36 + 37 + 37) at their widest. After picking up the stitches from the edges of the body pieces, I would reset the row counter to zero. The sleeves would be knitted top-down, and the shaping of the sleeves would start at row 42. From there, two stitches would be decreased every six rows until there were 74 stitches at the wrist. This would put the sleeve seam on the top of the arm. I saved the thinking about the neckline for later, but I decided the neck would be 60 stitches and the shoulder shaping would be done on the remaining 60 stitches on either side.
There was a logistical reason for all of the numbers. The choice of 180 needles for the front and back pieces was because it was wide but left 10 needles empty at either end of the machine so that I wouldn’t accidentally push the carriage off the machine at the end of the row. The 36-stitch side cables gave me the additional width I wanted in the body while being about a third of the 110 stitches I wanted for the maximum width of the sleeves. The 10-row stripes were an easy way to keep track of my row count and helped me to align the stripes accurately when joining the panels. At the shoulders and neck, 60 + 60 + 60 are easy numbers for me to work with. The shoulder shaping was done in short rows of 8 and 7, repeated four times: 8+7=15 x 4 = 60. I guess I just like numbers that end in zero and are divisible by 3. It doesn’t always work out that way, but if I can have numbers that end in zero and are divisible by 3, my brain doesn’t have to work quite so hard.
Meanwhile, as I said, I was traveling during those optimistic five minutes when we were vaccinated and thought everyone else would also get vaccinated so we all could put this pandemic behind us. We went to the airport and got on an airplane to Minneapolis (masked, of course), where our daughter had finished her medical residency and needed our help moving her to Madison, Wisconsin, to start her grown-up doctor job at a private practice there. While I was in Minneapolis, I took a nice walk along Portland Avenue to get to StevenBe’s really excellent yarn store. Steven loves the neon colors, and I do too. There were five skeins of a Madeline Tosh multi in neon marker colors with black, and they left the store with me as my souvenir of my final visit to Minneapolis, with a plan forming in my head to see how the pooling would arrange itself in panels of various widths.
But first I had to knit the first paneled sweater, the one with stripes in plant-dyed colors, to see if my construction method and numbers would work. Now I really did have to figure out what I was going to do with the neckline. To be honest, I don’t think I ever really did figure out exactly what I was doing with that neckline, although necklines happened, three times in fact. I did come up with a simple formula for the loose but not deep neckline shape that I wanted, which was a cross between a V neck and a U neck. Doing short rows on a 60-stitch neckline, on each side, left and right, I started off short-rowing 3 stitches at the center (for a base of 6 stitches for the U part of the neck), then 2 stitches twice, then 1 stitch until I ran out of stitches, then straight up for however many rows up to the top of the neck, while also doing the short rows for the shoulder shaping. I did a little bit of shaping on the back of the neck too, so that it wouldn’t fold over the way it tends to do when the back of the neckline is straight across without shaping. That was also a theoretically simple formula, two sets of 3-stitch short rows over the right-most and left-most stitches of the 60-stitch neckline. In the ideal world, all of the short-rowing, front and back, would be completed two rows short of the 240 rows I had planned for the total length of the garment, so that the wraps could be tidily sealed in place by the final two rows. You wouldn’t think that should be such a difficult thing to figure, but in the three sweaters I made using this formula, sometimes I stumbled into doing it accurately and sometimes I missed.

When we got home from moving our daughter to Madison, I started knitting the prototype. Compared to the entrelac socks, it was a quick and easy knit. Arranging my plant-dyed colors in non-repeating sequences was a fun color exercise, and it was easy to align the stripes in the sew-as-you-go operation. All that requires is sticking the transfer tool in the loose loop of the edge of the already-knitted piece, rather than the knot, where the transfer tool doesn’t want to fight its way into, and stick it onto the needle at the edge of the new knitting. That alone will keep the two pieces in pretty good alignment. The join was smooth, although I did have a slight jog in the striping when I first tried it. I made a tiny correction the next time, which resulted in a perfectly aligned join. I had a little trouble with the back of the neckline so that the shoulder side was higher than the neck side, and maybe I didn’t figure it out, but if I didn’t, it doesn’t show, and I have since forgotten exactly what the problem was. I do remember the mistake I made for the front of the neckline. I had some straight rows at the top of the neck shaping after I had gotten rid of all the stitches in the center of the body, but when I did the final couple of rows after the shaping to seal the short rows, it didn’t occur to me to pick up extra stitches at the straight edge before I knitted those rows, so the neck bunched up at the top corners until I squeezed in a few more stitches by hand when I knitted the ribbing around the neck. Now only I and whoever reads this will ever know there was once a problem.
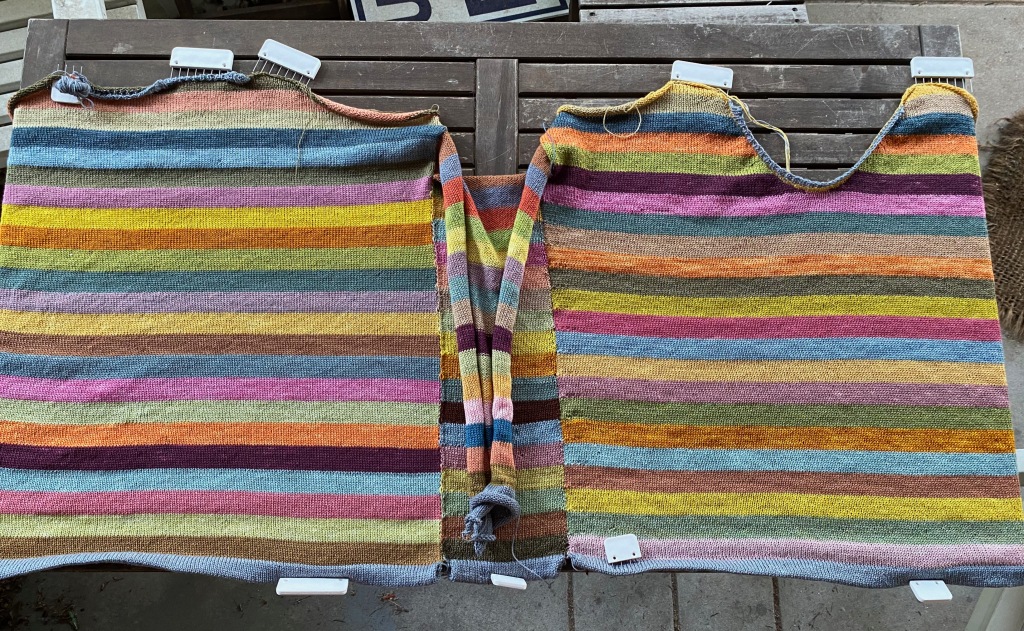
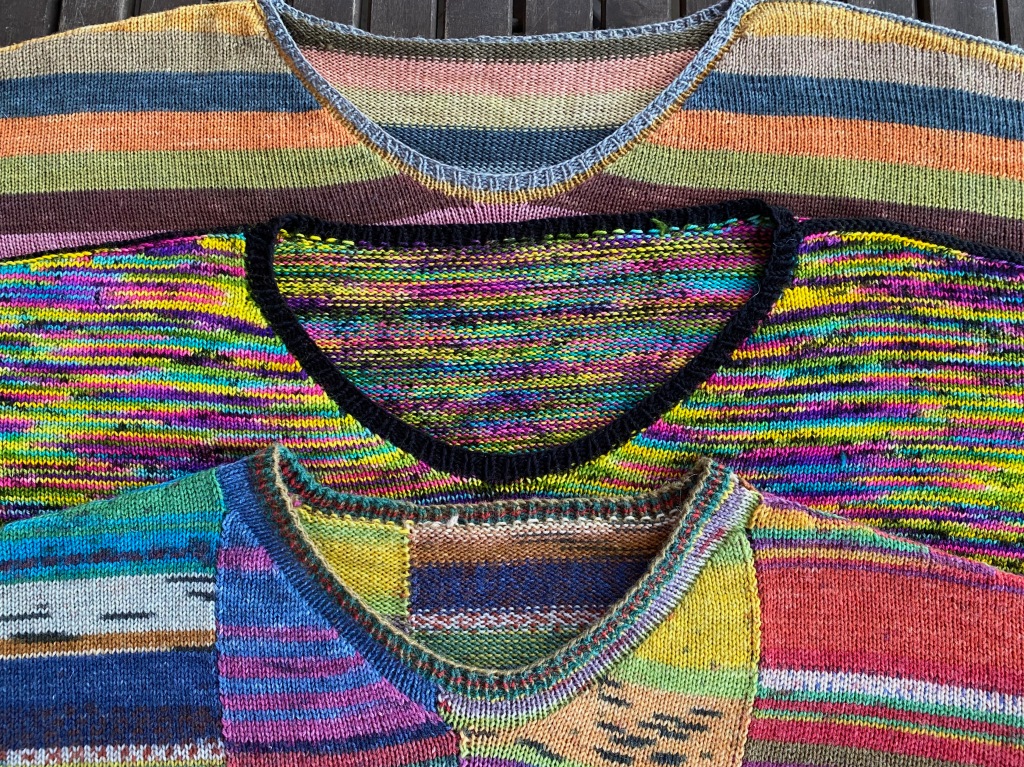
This paneled construction method meant that the only seaming that had to be done was the join at the shoulders straight down the top of the sleeve to the wrists. Since the seam would be very visible, I made it a design element by picking up stitches from the two edges of the shoulders and sleeves, knitting them together, and binding off, using the same yarn I used for the other edges. I took a lot of care to make sure that the stripes aligned exactly by making sure that I had the same number of picked-up stitches on both sides of every stripe, at the standard stitch:row ratio of 3:4, which for 10-row stripes meant that some stripes had seven picked-up stitches and others had eight. It was painstaking, but this was one of those places where precision matters. It doesn’t always, but here it does matter.


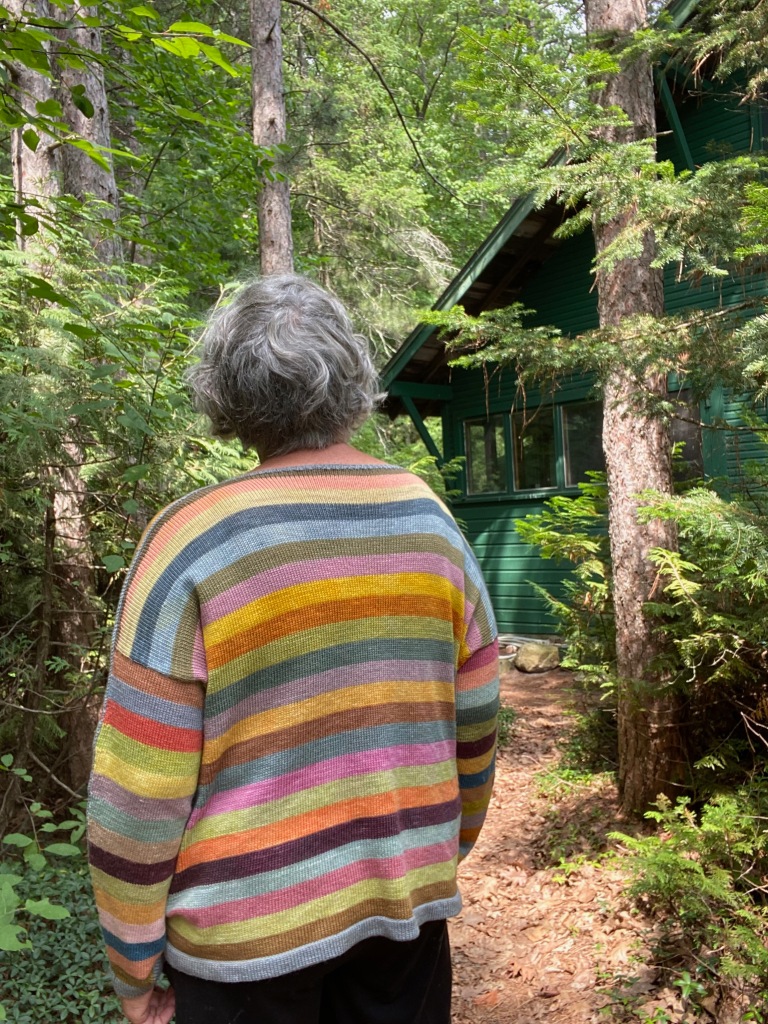
I was satisfied enough with the resulting garment to use the numbers as the basis for two more variations, although now that I have worn the sweaters a bit, I kind of wish that I had gone for some intentional asymmetry at the back by making the back about four inches longer than the front. I’m finding myself tugging at the hem to rearrange it in ways more flattering to my aging figure. Maybe if I don’t mention it, no one will notice… oh wait, I just did. Anyway, it’s a note for future variations.
The second sweater, the one made from the black and neon knitting tourism yarn, knitted up really fast because I just used all of the numbers from the first sweater, same construction method, no color changes until the yarn was gone. I just placed stitch markers at the beginning and end of every 20th row as a guide for evenly joining the panels, the nice thing being that if they didn’t align perfectly, no one would ever see the difference. I had hopes that the yarn would pool in big argyles but it mostly did the narrow stripes that weakly coalesce into a shallow and faintly detectable diamond shape that can only be seen from a distance. The exception was the right side panel, where the colors stacked into angles of clear groupings of the component colors traveling up the body and reached a climax after I added the stitches for the sleeve. There I got a purple diamond at the armpit and and hot pink triangles at the shoulder, which formed a diamond when I seamed them together. That was a surprise! And an unexpected reward, after I had gone through all kinds of misery winding the yarn.
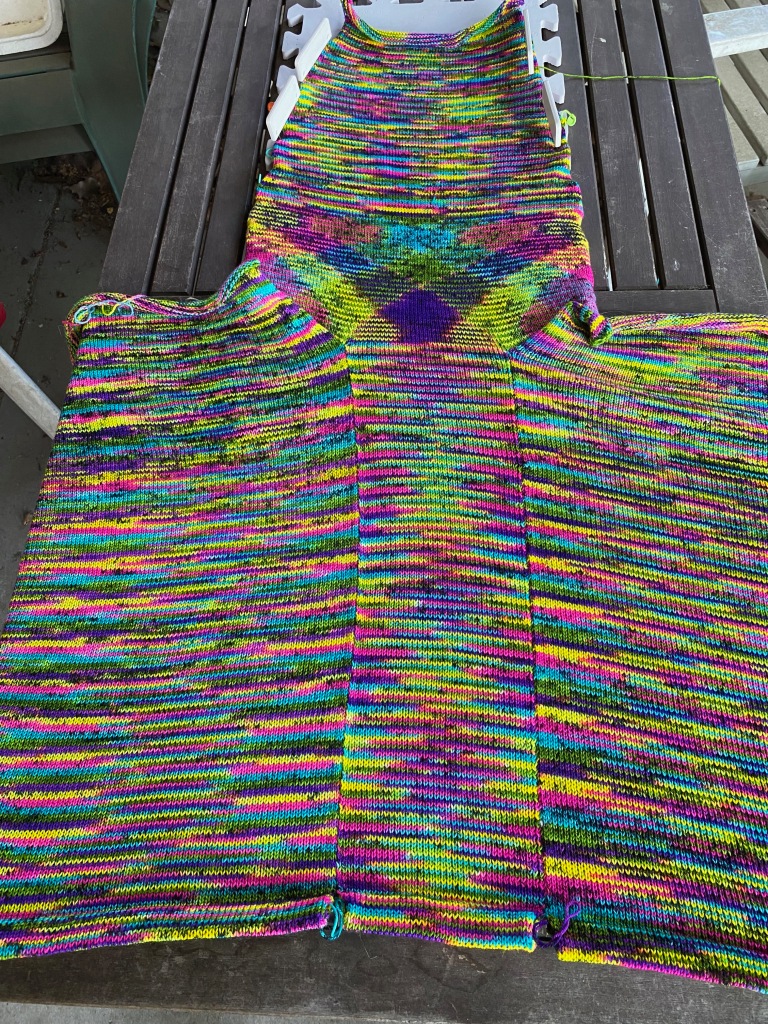
It was my own stupid fault, I was biting off the knots of the cotton string that held the skein together, and I knew as soon as my teeth went through the fiber that it was the wrong fiber. It was wool, not cotton, the very wool I had to wind. Then I couldn’t find the two ends that I had accidentally bit off, and when I tried to wind the end that I hoped was the right place to start, it wasn’t the right place to start, and after a couple of turns of the ball winder, I had yarn barf. Yarn barf is knitter jargon, but it’s such an evocative term that I don’t think I have to explain it. It’s a good thing I actually enjoy detangling yarn barf, because that’s what I did for the next couple of hours. In the process of turning yarn barf into yarn cake, I had to wind, unwind, and rewind the yarn. But the unexpected reward of the exercise was the way the yarn pooled. Apparently all the winding and rewinding stretched the yarn and changed the pooling count so that the colors grouped together when I had 110 stitches on the needles. Stupidity rewarded!


While version #2 was in progress, I began thinking about using the same numbers and paneling method for a third version, but dividing the panels into more panels, using a collection of printed yarn in the colors of paintings by Friedensreich Hundertwasser that was burning a hole in my stash. What if I knitted the front and back in four pieces each, divided along the line where the component parts of the shoulder and neck shaping started and ended? That is, the left front shoulder, the left back shoulder, the right front shoulder, and the right back shoulder would all be 60-stitch panels ending in short rows of four sequences of eight stitches and seven stitches to shape the slope of the shoulders. The left side short-rowing for the U/V neckline would be another panel, the right side would be another panel, the left side of the back of the neck would be another panel and the right side of the back of the neck would be… well, you get the idea. Each panel would connect to its neighbor as it was being knitted, knitting the panels for the front as a single piece and the panels for the back as a single piece, and connecting the two pieces when knitting the side panel and then the sleeves.
Then I had a clever idea for the side panels/sleeves. Instead of knitting them as a single panel with the sleeve shaping on the top of the sleeve, I decided to knit the side panel as I had before, but when I got to the row where I would have picked up sleeve stitches from the top five inches of the front and back edges, I would put all of the sleeve shaping into the side panel piece and taper it into a triangle, which would shape the sleeve from the bottom sides of the arm. After I had decreased the panel into nothingness, then I would pick up the sleeve stitches from the front and join this new panel to the triangle shape, knitting straight down to the wrist. Then the sleeve stitches would be picked up from the back, and that piece would also be knitted straight down, joined on both sides with the front of the sleeve and the bottom triangle. Simple, right? Not simple? A picture or three will help.
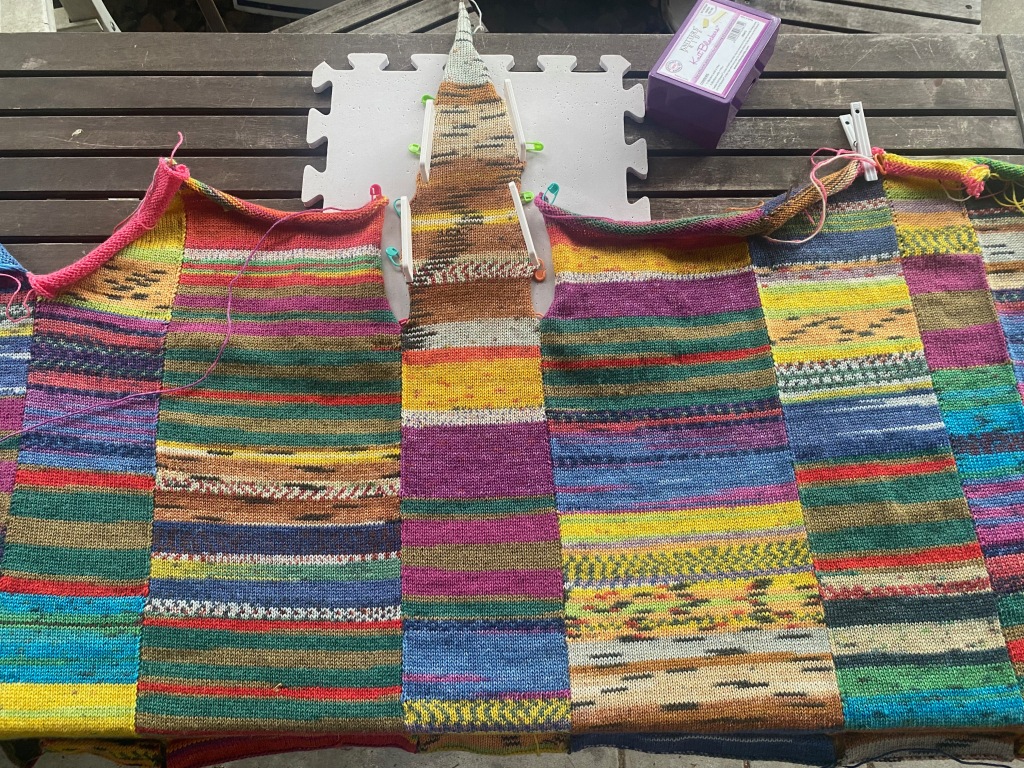


I had six different colorways of the Hundertwasser printed yarn and two self-striping yarns, which I arranged as the whim struck me and without a lot of thought, except to make sure not to place similar color sequences next to each other and to use the striped yarn in every panel. The point of this printed yarn is to be as colorful and varied in its patterning as possible in order to make plain knitting look complicated, so I just let the yarn make the design decisions within the space I gave it to play. I was busy enough keeping my numbers and spacial concepts straight as I dissected the garment shape into narrow strips and assembled them into a coherent garment. This time I wanted to place the U/V neck a little higher up on the front for a less drafty neck. Somehow that didn’t end up quite where I’d expected it to be, because I undershot and started the neck shaping a little too soon, and then on the back of the neck, I overcompensated and ended up with the back of the neck a couple of rows higher than the place at the seam where front and back met. I still don’t understand what my miscalculation was. But I just ripped out those two extra rows at the back of the neck and made it all work in the hand finishing.


I had thought that three sweaters would be enough for this post, but I kept on thinking about more variations on the paneled sew-as-you-go construction. What would happen if I made angled panels with increases and decreases along the edges where the edge stitch of the knitted piece goes onto the edge needle of the piece being knitted? So I made a swatch that also serves as a pair of socks. Yes. I can do something with this idea. There will be more panels to discuss in the future.


I love these pictures, especially the v-neck sweaters with the black outlining. And your models ROCK!! Great job.
LikeLike
Thanks, Nancy! I’m looking to 100% of us being together soon!
LikeLike
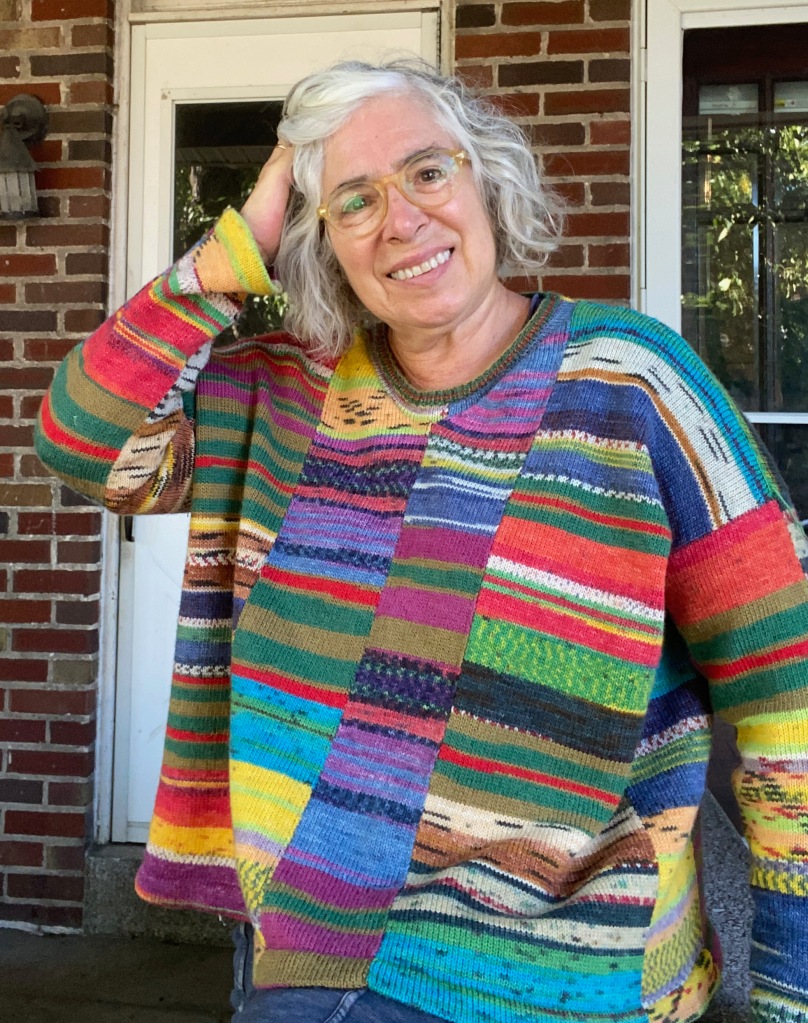
I enjoy the detailed explanations of your design and engineering process, instructive even to those with little experience of machine-knitting. I *love* the results. The stripey seam at the top of the sleeve is a great look – I’d like a contrasting stripe there even on an otherwise solid-colored sweater. I also like the U-or-is-it-a-V neckline, and I love the Three Sweater Muses portrait. Well done!
LikeLike
Thanks so much! Three Sweater Muses, I like that turn of phrase!
LikeLike
Absolutely fabulous. I’ve been looking for inspiration and you have provided it!
LikeLike
I’m so happy to hear that! Are you thinking about making a paneled sweater or something else?
LikeLike
I saw your beautiful creations on Ravelry and came here to read about your process. I love your work and the way you work!
LikeLike
Thank you so much! I’m so happy that my work and process are interesting to you!
LikeLike