
One of my life goals, for what remains of my life, is to knit down my excessive stash of Wollmeise yarns. I don’t hope to have knitted every bit of it, but I do hope to use up enough that my ripe corpse doesn’t have to be excavated from beneath an avalanche of Wollmeise lace. And sometimes, in fact sort of often, I subvert that life goal with impulse purchases from Lovelyarns, the wonderful LYS (local yarn store) that is my home away from home. (Have to support the LYS, right? Sometimes one has to pay rent for the home away from home!)
So one day I’m heading out of the store to go home and cook dinner when my feet stop in front of the bottom shelf where some colors in Cascade’s super-dooper chunky bulky Magnum yarn base are sitting next to each other, and my feet won’t budge from there because the colors are having a relationship and I have to understand it. The colors were rust, plum, a brown-tinged light gray, greeny-browny-yellowy ochre, and pure hot pink. I start seeing stripes in a big dumb sweater in a 2-stitches-per-inch gauge that should take about five minutes to knit. OK, a week. So home I go with a big bag of five massive skeins. And once again another project with a previous impulse purchase is postponed.
This was going to be a very different kind of knitting than what I usually do. The heaviest yarn I’ve used in years is DK weight, other than the yarn I used a couple of months ago to make warm things to get my daughter through her first Minnesota winter, and most of my hand knitting is done on U.S. size 0 (2mm) or size 1 (2.25mm) needles. I began envisioning my big dumb sweater as something roomy, maybe oversized, in a rota of stripes, with raglan sleeves and a stand-up collar. Then I sat down and knitted my swatch on size 13 needles at a gauge of 2 stitches/inch and slightly less than 3 rows/inch, and the swatch was so thick and solid that I immediately realized that the body I was envisioning inside this big dumb sweater was my 20-something-year-old daughter’s, not my own. I was going to look like the abominable snowman in an oversized pullover made in this yarn. But it would be great in a coat.

I had just taken a flight across the Atlantic, and the in-flight entertainment included the pilot of “The Marvelous Mrs. Maisel”. The show was all right, but what I really liked was the coat Mrs. Maisel threw over her shoulders to hop in a cab with a brisket in hopes of bribing the owner of the comedy club where her unfunny husband was trying to catch a break, so that the unfunny husband might get a better time slot. I think my mother had a coat like that in the early 1960’s. I don’t really remember the details of Mrs. Maisel’s coat, except that it was swingy and A-lined and three-quarter-length. My imagination filled in the rest of the details based on the yarn in that big bag. Fairly close-fitting up at the armpits and above. Raglan sleeves. Big box pleat at the back. A-line at the front. Stripes in the same rota as the swatch, up to the join of the sleeves to the body, then whatever I feel like to finish. The main color, the weird green. Hem, button bands, cuffs, collar in seed stitch, all in green. Big fold-up cuffs, big collar. Faux seam stitches between front and back and demarcating the decreases for the A-line decreases on the front. I watched a Purl Soho video that demonstrated how to make a box pleat, which is done by knitting twice as many stitches as the desired depth of the pleat, then folding the pleat stitches, knitting them together with the body stitches in a 3-needle fold, and repeating the process on the other side.
I sat down with my calculator and worked out my numbers.
Gauge: 2 stitches/inch, 20 rows/7 inches. 20 rows = a 5-color stripe sequence.
Bust: 44″ x 2 stitches/inch = 88 stitches.
Box pleat: 10 stitches top layer, 10 stitches bottom layer on one side x 2 for the other side = 40 stitches.
Front A-line: 10 stitches on each side = 20.
Faux seam: 1 per side = 2.
Total number of stitches at cast-on = 150.
Armpit to hem: 21″, five 20-row color sequences = 60 rows.
A-line decreases: 6 rows apart, starting row 7. (More on that below.)
I cast on 150 stitches in the weird green, then turned the knitting and began a seed stitch hem, that is, K1P1 on the first row and the reverse on the next, for 32 stitches. Then a purl stitch for the faux seam, 32 stitches in seed stitch, 20 stitches in purl for the inside of the pleat, 32 seed stitches, one purl stitch for the faux seam, 32 stitches in seed stitch. I knitted four rows of seed stitch, with the faux seam stitches and the facing side of the pleat in reverse stockinette, then changed to the next color in the rota, rust. On the third row of the rust, row 7, I did my first pair of A-line decreases so that each decrease leaned into the faux seam stitch, SSK for the first side and K2tog for the second side. I did these decreases every six rows thereafter. My original thought had been to decrease 10 stitches on either side, but I ended up doing only 9 sets of decreases because doing 10 would have required a 61st row or disrupting my rate of decrease, and I didn’t want to do either. Besides, that extra inch of ease meant that it would be easier to layer substantial sweaters underneath the coat.
I knitted my rota, green, rust, plum, gray, pink, four rows each until I got to row 32, the top of the second plum stripe. Then I installed pockets, which consisted of squares that I had knitted separately in pink, 13 stitches wide, 22 rows deep. I placed them on the fronts between stitch 11 and 25, binding off those 14 stitches on the face of the fronts and replacing the bound-off stitches with the live stitches of the pockets. After that minor interruption, I knitted the remaining 28 rows according to the rota, and it went like the wind, thanks to my enormous gauge. It was also really heavy and unwieldy to carry around, and I was using up yarn at a voracious rate. I bought second skeins of each of the five colors. In fact, I bought a third skein of the green, since that was going to be the color of the fold-up cuffs, collar, and button bands, all knitted in seed stitch, which is a yarn glutton.
Having reached the armpits, it was time to work out the numbers for the sleeves. I needed my sleeves to have plenty of room for layers underneath, so I calculated 13″ at the cuff and 16″ at the upper arm, plus 1 stitch for a faux seam. The length would be 12 stripes, that is 12 x 4 = 48 rows. The three inches of width between cuff and upper arm would require increases of 6 stitches in three increase rows, which I placed on rows 6, 20, and 30. I admit I didn’t really preplan that, but it looks and fits fine. The style of the coat wanted French cuffs, big, heavy cuffs that folded upward, with the split on the outside of the wrist. The cuff was 27 stitches of seed stitch for 14 rows, knit back and forth, slipping the first stitch and purling the last, then breaking the yarn. Then I started the sleeve proper, which was knitted in the round, and repositioned the faux seam stitch on stitch 14 of the cuff.
Here are the numbers.
Cuff: Cast on 27 stitches. 14 rows seed stitch. Break yarn.
Sleeve: Start rota at gray, knitting in the round. Place faux seam stitch on stitch 14 of cuff. Start knitting in the round (counting that as row 1). Increase one stitch on both sides of faux seam on rows 6, 20, and 30, for a total of 33 stitches. Follow rota for 48 rows.
To join the sleeves to the body, I aligned the faux seam stitch of each sleeve to the faux seam stitch on each side side of the body and grafted together six stitches on either side of the sleeve to the corresponding stitches of the body (13 stitches), using Kitchener stitch.
Stitch count:
Sleeves: 33 – 13 = 20 x 2 = 40
Body: Fronts 23 + 23 + back 22 + 22 + box pleat 40 + faux seam stitch 2 = 132 – two sets of underarm stitches 26 = 106
Total number of sleeve and body stitches on needle: 40 + 106 = 146
Now I had 146 stitches on the needle for the yoke, and at this point, I abandoned the color rota and striped as whim dictated. I was waiting for a skein of gray to come in the mail, but it hadn’t arrived at the moment when I might have used it, so there was no gray in the yoke. I knitted two rows plain before starting the raglan decreases that eliminated two stitches at each raglan line, left front, left back, right back, right front (2 x 4 = 8 stitches), every other row. The mathematically easier method for doing the decreases would have been to decrease one on either side of the raglan, with the two decreases leaning into each other with an SSK on the right side and a K2tog on the left side, but that would have produced an opening between the two decreases that would look sloppy and be weak and open to the elements. Instead, I did a raised double decrease: slip two stitches together knitwise, knit the next stitch, pass the two slipped stitches together over the knitted stitch. That required choosing a stitch from either the sleeve or the body to serve as the center stitch for the double decrease. I had two stitches more on the front than on the back, so I chose body stitches to be the center stitch for the front raglans and sleeve stitches for the back stitches.
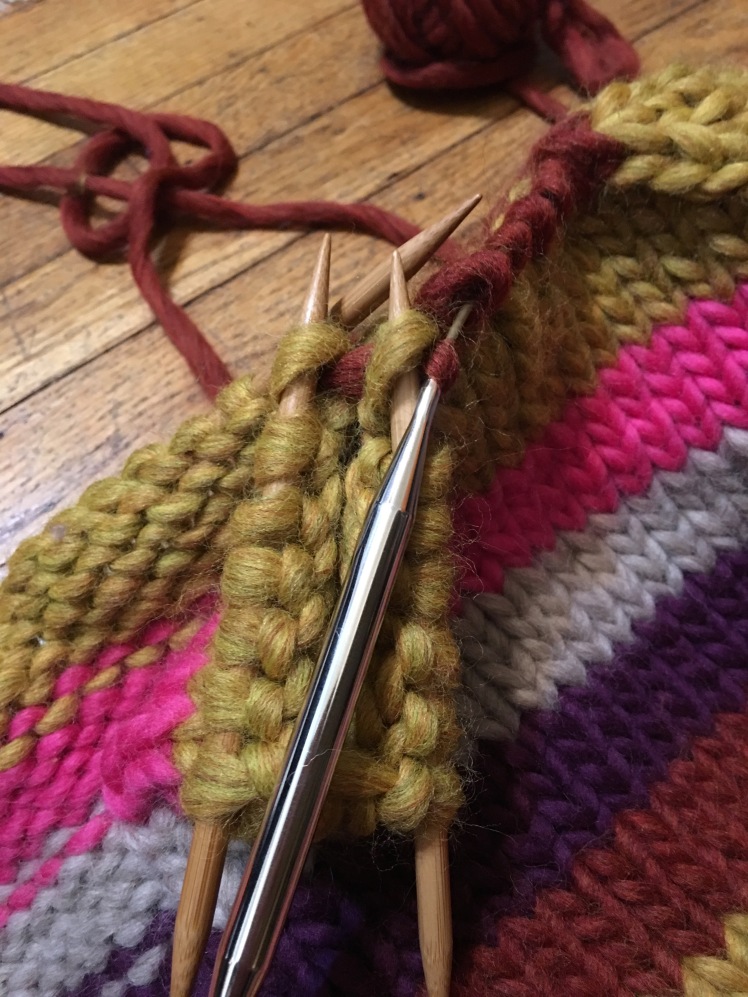
Six rows after joining the sleeves to the body, it was finally time to close the box pleat. The start of the three layers that I was about to knit together was 30 stitches from the center of the back. From that -30 point, 10 stitches went onto one needle, the next 10 stitches went onto another needle, and the final 10 stitches (the reverse stockinette stitches went onto a third needle. I aligned the three needles, and using a fourth needle, I knitted through all three stitches one after the other, then did the same thing in reverse on the other side.

At row 22 (counting from the body/sleeve join), I started the neck shaping. I had only four sleeve stitches left, that is, two rows before the raglan was complete, so if I was going to shape the neck, I couldn’t put it off any longer. I bound off five stitches across the fronts, and then I started doing some jiggery-pokery with the remaining front stitches, sleeves, and back to shape the neck and raise the back of the neckline. I did a short row on row 22 across the back from one back raglan to the other, with a wrap-and-turn at each raglan edge, and on the next row I hid the wrap under the double decrease at the two back raglan edges. At the front raglan edges, I stopped doing the double decrease and just did a single decrease that ate up the sleeve stitch and placed what had been the center stitch on top, to continue the raglan line. At the front neck edges, the decrease of the remaining front stitch was part of the neck shaping. When I had decreased away all of the sleeve stitches and the raglan lines met in a point, I bound off all remaining stitches.
The collar was next. I picked up 31 stitches and knitted two rows, then increased a stitch every two stitches on the third row for a total of 47 stitches. On the next row, I began knitting seed stitch, slipping the first stitch and purling the last. After 13 rows of seed stitch, I bound off.
All that remained to knit were the button bands. I had the perfect buttons sitting in a bag for 30 years, awaiting their moment, clear light green plastic that look like lumps of sparkly raw crystal. I don’t remember when and where I got them, but there were six of them when I needed them, although I did discover when I was trying to sew them onto the button band that the buttonholes were somehow sealed and needed to be drilled open. That seemed like a cruel practical trick. But first I had to knit the button bands. I picked up 63 stitches along the front edges of the coat, that is, three stitches for every four rows, then knitted six rows of seed stitch and bound off. The buttonholes were simple yarnover-K2tog holes placed 10 stitches apart, six times.

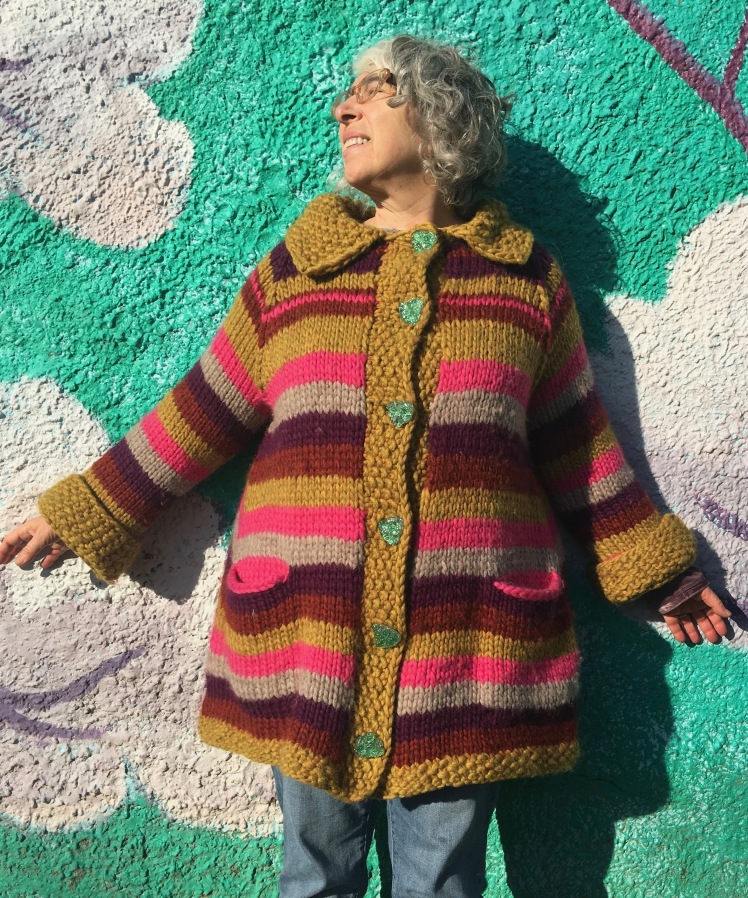
The knitting completed (in only 16 days, record time!), now it was time to panic. I tried on this huge unwieldy piece of knitting, and it felt tighter than I liked at the shoulders and the box pleat stuck out like a deformity. The entire coat looked like a brilliant mistake when it was on my body. But panicking at the next-to-last moment is part of my regular routine when I’m almost done with a garment, and my rational side knows that it’s not over until it’s over. I tacked down the fold line of one of the pleats by basting into the sides of the stitch at the apex of the fold, and that seemed to help define the fold a little better. As for the fit at the shoulders, it wasn’t time to despair until after the garment had dried after a full wet block, so into the drink the coat went. I put in a little bit of Wollmeise wash, but it was too unwieldy to rinse it out, so I squeezed out what water I could and staggered outside with the heavy, waterlogged mess and laid it out on mesh to dry on the front porch. It took a week before it was merely damp and not constantly dripping and could be brought inside to finish drying without wetting the floor like an unhousebroken puppy. I was starting to worry it would mold before it could dry. I arranged it carefully on a mesh, with particular care to arrange the pleat precisely, so that the air could circulate on all sides, and trained a fan on it. With the warmer indoor temperatures and the constant air circulation, the coat was completely dry and mold-free within a day and a half.
It fit a lot better after the wet blocking, and the residue of Wollmeise wash that I didn’t rinse away made the yarn feel so soft and smooth. I wove in the ends that were visible from the outside, didn’t bother with the ones on the inside, and sewed on the buttons (after sticking a nail into the blocked holes and turning it until I had drilled an opening I could stick a needle and thread into). I basted down the fold lines at the pleat and the cuffs, and ta-da! There was my coat! It looked fine! It keeps me warm for walks in temperatures down to freezing if there isn’t much wind, and it’s what I reach for when it’s cold in the house. It weighs slightly less than four pounds. I’ve been wearing it for almost a month, and the yarn pills, for the information of anyone who might wish to do something similar with Cascade Magnum. It has also stretched a bit lengthwise. Pilling and all, it gets me lots of unsolicited compliments from strangers.


As for the amount of yarn I needed, I used a full skein of the gray, a skein and change each of the rust and plum, a skein and a third of the pink, and two and a half skeins of the weird green. I bought an extra skein of the gray, which I ended up not needing, so I now have a full skein of the gray, almost-full skeins of the rust and plum, 2/3 of a pink skein, and half of a green skein. That’s enough for the big dumb striped sweater I was originally planning. The possessor of the body I was designing it for, before reality hit me about my own body, is eagerly accepting the offer of the big dumb sweater.

It’s fab. And for the record, I too love Mrs. Maisel’s coats.
LikeLike
Thank you so much! Mrs. Maisel’s costuming is very inspiring.
LikeLike
I love it!!! Funny, it reminded me of one of my very first knitting projects. In high school I decided I should knit a wrap sweater with a shawl collar (sort of like a bathrobe). I used rust colored Aunt Lydia’s rug yarn (it was the early 70s). I wore that sweater through HS and college and into the early 80s. Layered over a hooded sweatshirt (why yes, I was a fashion statement) it kept me warm in all but the coldest winter days.
Yours is much, much better!
LikeLiked by 1 person
It’s been cold in the house, since your weather got lost and landed in the lower 48, and I’ve been wearing my coat indoors, as a bathrobe!
LikeLike
I adore your Marvellous Maisel Coat as much as I adore the tv series. So sumptiously warm and cosy your coat is.
LikeLike
Thank you so much! It really is the coziest garment I own.
LikeLike