
As I keep saying, I find plain stockinette tedious to hand knit, which is why I have a knitting machine. All the while I was handknitting my Kurt, a pattern by Japanese designer Junko Okamoto for an oversized pullover of modular patchwork squares, I laboriously handknitted one stockinette square after an other and daydreamed about doing it on the machine, except that my machine won’t knit the heavy yarn I was using.

I kept thinking about the dull, dingy ugly duckling plant-dyed colors of heavy laceweight yarn sitting at the bottom of the storage bag off in the corner of my machine-knitting room and visualizing them in a machine-knitted version of the handknitting pattern. A lot of these colors were experiments with random unidentified plants I came across during my walks that gave me pale, murky yellows and greens, or the pallid colors that resulted from my experiments with fermenting hibiscus blossoms that I found lying on the sidewalk that looked excitingly like vivid pinks and greens while while they were in the bath but quickly faded to pink-toned or purplish-toned or greenish-toned beige. Or the fermented pokeberry that started life as a royal purple and quickly faded to brown. Or the avocado dye that gave pinks and oranges to people who weren’t me, maybe deigning to offer me a pinkish or orangish tone in their brown if I put them in the right light. Or the third exhaust baths of black bean soaking water modified with lemon juice or white vinegar that provided just enough purplish or pinkish tinge to make the color not white. After my initial excitement about whatever color they appeared to be back when I dyed these colors four or five years ago, they got passed over when I learned how to get more vivid colors that weren’t quite so fugitive. But I never forgot them. Someday they would have their moment.
There certainly are colors that thrill my heart and others that don’t, especially when I see them without other colors to contextualize them. Everyone can like what they like and not like what they don’t like. But the fact is that color is entirely contextual, and the color one loves in isolation might lose its glow when it’s used next to other colors that interact badly with it. Whereas the color that came off as dull in the abstract can be the one that redeems the color composition. So I tell anyone who might want to listen to me, don’t hate any color or think that it can never be good for you.
I reached into the farthest corners of my storage bag and looked for my old, dingy yarn cakes in shades of tan, yellow, and purplish and pinkish shades of gray. There’s also a clear, light pink, which I added because it’s pokeberry dyed in a vinegar bath and I’m interested in finding out if it will fade to beige. I tried for a rough gradient, but I didn’t really achieve it, and that was all right. I chose 13 of my ugly duckling colors, not that there’s any special significance to the number 13. The patchwork consists of 32 squares, with the first row of four squares connected to each other from right to left and the next row of four built on top of the first row from left to right up to the back shoulder, then downward toward the front hem, and this sequence repeats four times. I chose an uneven number for my rota so that the rota would restart at a different place from where it began and would end at a different place in the rota from the beginning of the sweater. I wanted a certain degree of apparent randomness without the color arrangement being completely arbitrary. The contrast colors were blues and greens, and I don’t consider them ugly duckling colors at all.
When these colors are next to each other, they aren’t ugly at all.

They’re beautiful, in fact. Sitting next to brighter colors, they look like mud, but when they are grouped with colors that share their brownish undertone, the hue of each cake stands out distinctly separate from each other cake. Each color speaks with its own clear voice. It’s such a difference from the way each of these skeins seemed to be when I first dyed them, drab disappointments. But when they’re with like-minded companions, they’re like introverts who have found their tribe: they have a lot to say.
I wanted this second version of Kurt to be about the same size as my handknitted Kurt, so I was going to have to change the numbers in the pattern to accommodate the much lighter-weight yarn. I decided to double the numbers for the second size, which meant that each square was going to be 48 stitches wide and 64 rows high, a 3:4 ratio. The contrast stripe in the pattern was six rows, so in my machine knit version, it would be 12 rows, and therefore each square would have 52 rows of main color and 12 rows of contrast color. The garment is built by turning the square you just knitted onto its side and picking up the stitches for the new square either from the side of the just-knitted square or from the edge of the corresponding square on the row below, depending on the direction of the just-knitted square. The new square connects to it with a modular join as you knit the new square. My machine-knit version required a different joining method than the one you use in the hand-knit version.
The handknitting pattern doesn’t explain this explicitly, but when you finish each square, you don’t bind off. You leave the stitches on a needle. Knitting up from the picked-up edge, the stitch at the edge next to the previously knit square is knit together with one or two of the stitches on the needle to do the join. This is a really awkward operation on the knitting machine, so I bound off the top row of each square and did the modular join using the same “sew-as-you-go” paneling method that I’ve been using for every garment I’ve made for most of the last year. This is where the 3:4 ratio I mentioned in the previous paragraph is important.
Each square was 48 stitches wide. There were a couple of squares that knitted up from a simple cast-on, but most of the squares knitted up from stitches picked up from the edge of the previously knitted square, which was 64 rows. 48 is 3/4 of 64, so I picked up three stitches from the edge stitch of every four rows. In order to connect the square in progress to the 48 bound-off stitches of the previous square, the math went in the opposite direction, because I needed to knit 64 rows while evenly joining the 48 stitches of the bound-off edge to the new knitting. The math worked a lot like the handknitting pattern, but it was a little easier on the machine, because the knitting machine has a row counter. The easiest way to get 64 rows out of 48 stitches, I found, was to attach the first bound-off loop at the intersection of the new and old squares, onto the edge needle on the first row (row 0 on the stitch counter), knit the row, knit back, then attach the next bound-off loop to the needle on row 2, knit, and knit back. At row 4, skip the loop of the next bound-off stitch, attach the loop after that one, knit back and forth, pick up the next loop at row 6 and knit back and forth. Every time the row counter is at a number divisible by 4, skip the loop and repeat the sequence up to row 64, and bind off.

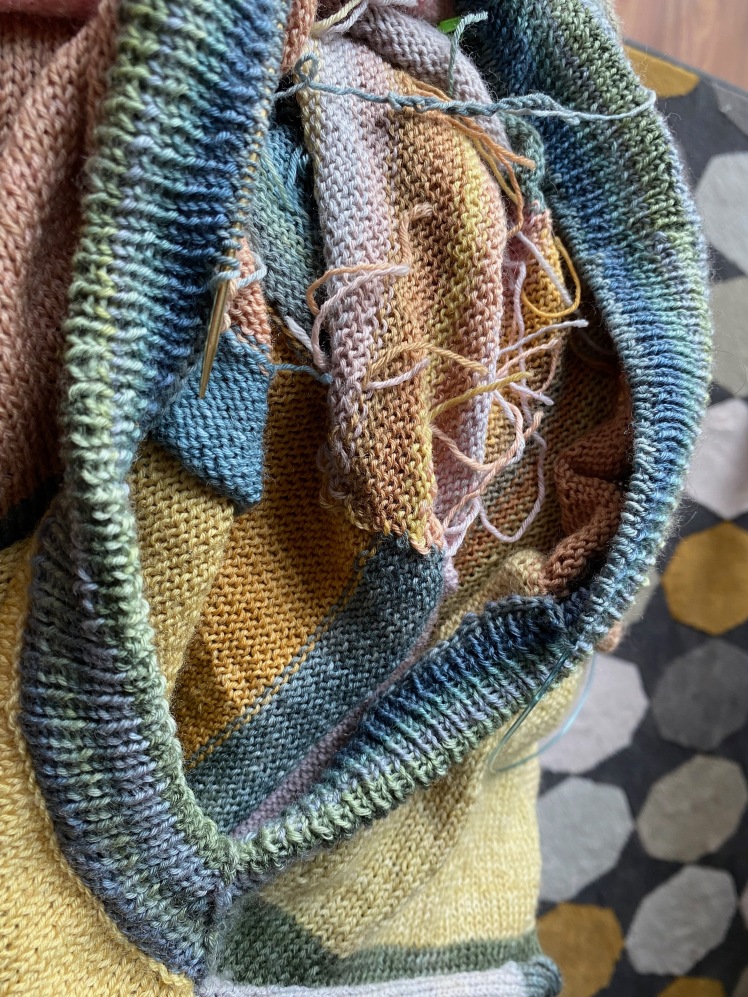
This photo might help to illustrate how I constructed the patchwork squares. At the top left of the photo, I have picked up stitches from the side edge of the greenish-beige square. That square was built vertically from the side edge of the gray-pink square below it, and the new square would be knit sideways, connecting with the top green edge of the yellowish square draped over the gate pegs at the top right of the photo, using the sew-as-you-go method that I’ve described above and in previous blog posts. Using the transfer tool, I would put the loop of the bound-off stitch at the corner of the intersection onto the edge needle, knit back and forth, place the loop of the next bound-off stitch onto the edge stitch, knit back and forth, skip the next loop, and repeat that sequence for 64 rows, then bind off. I would be using the same blue-green yarn that I used as the contrast color for the greenish-beige square whose edge was the base for the square I was about to knit. The path of the contrast color was built on the idea that if the contrast color ended a square, it would start the next square. If the main color ended a square, it would start the next square. Color changes were at row 12 or row 52.
One of the design features that I love the most about the original pattern is the V-neck at the front and back of the garment. At first I thought that the very deep V opening would make the garment too loose and drafty at the neck and would make the sweater uncomfortable to wear, and maybe it is a bit drafty, but it’s unexpectedly perfect for me. I wanted to do it again for this much lighter-weight version of the pattern. The V-neck is created by simply not joining the center squares on the fourth row of the back and the top two rows of the front. You can see the V on the back in the photo above. The clear light pink is the first half of the V on the back and the green-tan square is the other half.
Here’s the back, off the needles.

And here’s the front. I thought I was adhering to a 13-color rota, but somehow I got off count and some other colors snuck in. It’s supposed to start with the green-beige and end with the pink as color #13, but now I’m counting more colors than 13. Oh well.
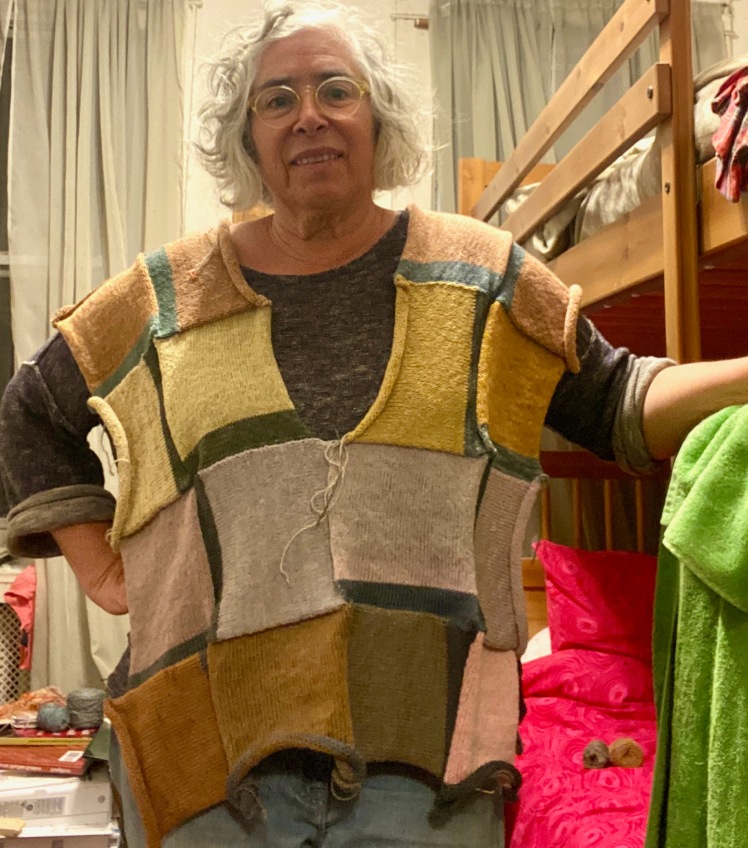
So here the modular patchwork is done and it’s on my body like a sandwich sign. The front and back need to be joined with a panel at either side, and that side panel keeps on going from the hem to the armpit to the sleeve cuff. In the handknitting pattern, you pick up stitches all the way around the side edges from hem to shoulder and back down the other side. Then you cast on stitches for the panel at the hem and knit upward, joining the picked-up stitches to the panel by knitting a picked-up stitch together with the panel stitch at the end of the row. When you get to the top of the second row of squares, then you start knitting the sleeve in the round down to the cuff, using a series of decreases that delineates the side panel all the way down the sleeve. It’s a lot easier to do that on a circular handknitting needle than on a flat bed knitting machine, so I thought of a different way, which offered new design opportunities.
My solution was to knit the sleeve first, that is, the top face of the sleeve, and knit the side panel/underside of the sleeve second, joining the two sides with a sew-as-you-go construction. I cut down the size of the sleeve a little bit by placing the armpit halfway up the third row rather than at the bottom of the third row.

Using the 3:4 ratio for picking up stitches from the side pieces, the full squares were 48 picked-up stitches and the half squares were 24 stitches, so 48 + 48 + 24 + 24 = 144 stitches at the widest part of the sleeve up at the shoulder. I decided that the side panel was going to be 36 stitches wide. There would be no decreases in that panel, so it would be the same 36 stitches throughout the sleeve down to the cuff. The top part of the sleeve would be decreased down to 36 stitches, which would require me to decrease from 144 stitches to 36 stitches, 108 stitches decreased. I would decrease two stitches on every decrease row, 54 decrease rows. If I decreased every three rows, the sleeve length would be 162 rows (54 x 3), which was the length I was looking for.
Since I was doing the sleeves in two parts, I had two opportunities to play with colors. The tops of the sleeves would be random narrow stripes of the blue/green contrast colors, the sides and bottoms of the sleeves would be random narrow stripes of the pinks, beiges, and yellows of the main colors. I think the striations look like sedimentary rocks made of different kinds of materials.

After I had completed the sleeves and the side panels, I was done with the machine knitting, but not done with the project. There was a lot of ribbing that needed to be done, and I was going to do it by hand. Ribbing can be done on knitting machines, and I did it a couple of times when I was still brand-new to machine knitting, but I found it stressful and haven’t done it since. I’m not sure how I would have machine-knitted the number of stitches I needed to rib in the hem and the decreases and increases I needed for the self-enclosing neck ribbing, although probably more knowledgeable machine knitters could figure it out. Also I needed a travel project at that point. I packed up my blue/green cakes and knitted little blue and green sedimentary rock compositions while I was away on my trip. I’m especially enamored of the way the handknitting pattern finishes the neck, which picks up stitches from the edges of the neckline squares, decreases two stitches every row with a raised center stitch at the V until the ribbing is wide enough, then increases two stitches every row at the V with a left-leaning and a right-leaning increase on either side of the center stitch. When there are as many decrease rows as increase rows, you poke the needle into the picked-up stitch and bind off the lifted loop together with the ribbed stitch to close the ribbing. I recalculated my numbers (more than twice the number for the handknitted version) and ribbed and ribbed and ribbed. It was a ton of work but completely worth it.
You’d think I’d be done by now. But I wasn’t quite yet. You might have noticed in some of the pictures of the front of the sweater that there’s a square that has a stripe of a slightly different color than the rest of the square. Yes, I lost at yarn chicken eight rows before the contrast color and had to substitute a similar color that wasn’t quite the same. I could have leaned into the ambiguity of whether or not that was a planned effect, but I made a different design decision.

I decided that what it needed was some embroidery. I wanted to make a design feature of that barely visible line between the two colors and then use that horizontal line to emphasize the existing design features of the garment, the patchwork squares and the wandering path of the contrast color. So I backstitched two parallel horizontal lines along the top edge of the new color and two parallel vertical lines down from the edge of the contrast color of the square above it.

I’m very happy with the effect the embroidered embellishment has on the garment as a composition.

I love Junko Okamoto’s Kurt design. When I finished the handknitted version in heavy yarns, it became the sweater I put on at the end of December and didn’t take off again all winter long and a good chunk of the spring. This machine-knit version of the original pattern shows the light and airy side of its personality. I’m looking forward to wearing it on any beach I might find myself on, wading in the water with wrinkled white cotton pants rolled up my calves. Let the sun do its worst to these muted colors, these colors will adapt. The flashier colors I have dyed from plant materials haven’t always held up well against light and time, but I think that these colors will fade like madras, which gains character as it ages and fades.
As I sit here, I’m wearing my beautiful, pristine, machine-knit Kurt and sipping coffee. So far, so good, but eventually I will dribble coffee and tea on it, and the dribbles will leave stains that won’t come out. My yarn was old and not always in the best shape when I knitted it, and the fibers will break and there will be holes. But I have a master plan for the dribbles, spots, and holes and all the things that happen when you’re living a full life: embroidery. I will embroider squares on top of my dribbles and holes. Little squares. Big squares. Squares on top of squares. Every spot and hole, a new square. It will be a growing work of art that develops as it lives.


This is such a great explanation of the steps you took . I love both versions, but the machine knit one appeals the most. What a wonderful work of art!
LikeLiked by 1 person
Thanks so much for your kind comment!!
LikeLike
One of my favorites of your creations. A great palette to begin with – you’re right, “awkward” colors just need the right company to transform from ugly duckling to swan – and lots of good, serendipitous discoveries along the way. Thanks for showing us the process.
LikeLike
Thanks, Gretchen, your reactions always make me feel good!
LikeLike
I love it! Especially your discussion about colour. The description of your machine knit garment is fascinating. And as usual, your garments are both gorgeous. Well done!
LikeLike
Thanks, Pat! So nice of you to say so!
LikeLike