
A couple of years ago I designed and made a pullover for myself based on a very complicated Japanese stitch pattern composed of lacy leaves, bobbles, and diagonal lines meeting up in a gathered stitch. There were so many moving parts in the stitch pattern that I couldn’t figure out how to work increases and decreases into it for sleeve shaping and a raglan yoke, so I punted and constructed the garment as a rectangle, with dropped shoulders and unshaped three-quarter length sleeves and shoulder shaping in stockinette wedges (blog post here).
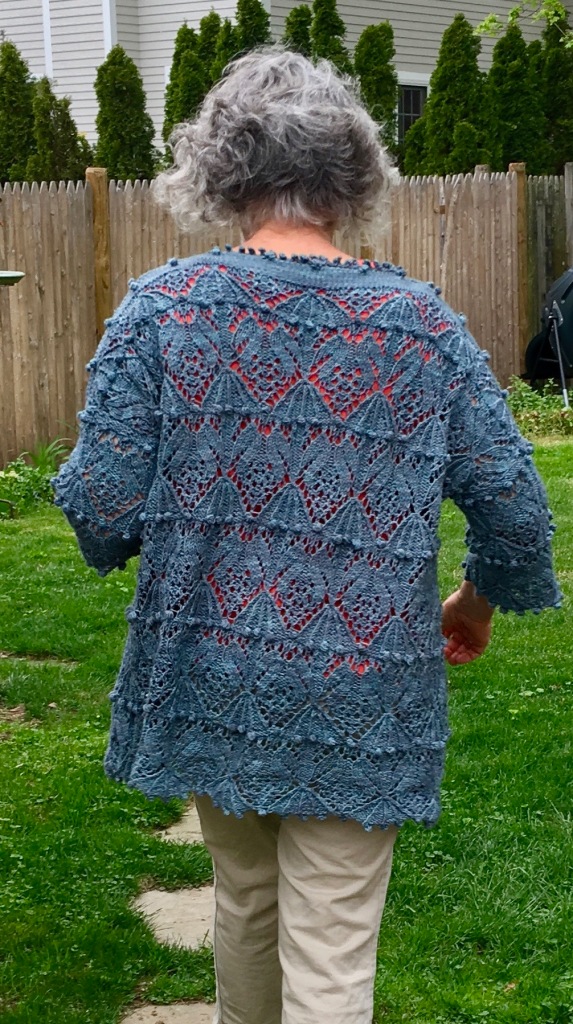
I always wished I could have figured out how to manipulate the chart for that stitch pattern so that I could have made it as a raglan with sleeves that tapered to the wrists. So when I saw the Stjernesluddgenser pullover by Sigrid Marie Blom, which was based on a simplified version of the Japanese stitch pattern in a raglan construction and had long sleeves that gradually widened from the cuffs, I bought it and knitted it with the idea that I would learn an approach to modifying complex stitch patterns in a way that would accommodate the increases and decreases needed for shaping while preserving the essential elements of the stitch patterns.

I did learn how the designer used the diagonal lines of the bobbled columns as the path of the raglan decreases, which were worked into four knit stitches at each junction of the body and sleeve sections, and how to use the yarnovers in the basic stitch patterns as places where increases could be organically incorporated to shape the sleeve smoothly. I’m still not sure how I would have dealt with the lace leaves in the Japanese stitch pattern, but there’s probably a way for the resourceful and motivated designer. Originally I thought that finding ways to shape complex stitch patterns would be what this blog post would be about, but that turned out not to be the subject. The subject actually is amputation. Of course there’s a story, which my photos will tell more efficiently than my words.
Where did things go sideways? Or more literally, length-ways? The pattern hasn’t been knitted very often, and the pictures in the pattern all show the sweater flat or on a hanger, not modeled. The pattern pictures suggested a somewhat short garment hitting at the hip bones, with sleeves several inches longer than the body. There are a few modeled project pictures in Ravelry worn by slender young women, but there aren’t very many pictures and the project notes are not detailed. The pattern itself doesn’t offer much of a size range, just a small size, 41.75″ around, and a medium size of 47″ around, whose difference in size is achieved mostly by using size U.S. 11 needles for the small size and U.S. 13 for the larger size. The designer specifies Aran weight or super bulky yarn with a fairly high content of alpaca, so I asked Melissa (my close friend and owner of Lovelyarns, my very, very local yarn shop) to find me something equivalent. She suggested Snuggle Solids by The Alpaca Yarn Co., a local dyer in Pennsylvania, and it is categorized as a bulky yarn. These designations aren’t especially informative, in my opinion. The more precise indicator of bulk is wraps-per-inch, WPI. The yarns the designer recommended ranged from 5-6 wpi to 8 wpi, and the Snuggle yarn’s wpi is 7, so I was right in the range. I swatched first with the size 13 needles, but I’m a loose knitter and 13’s gave me a floppy fabric, so I went down to 11’s. I admit I wasn’t very concerned with matching gauge precisely, just as long as my garment was a minimum of 47″ around, and I was quite confident that the number of stitches on the needle and the bulk of the yarn I was using would end up larger.
So I’m knitting, knitting, knitting, enjoying the accuracy of the charts and the clarity of the written instructions. The numbers were all correct. It was slow work, even though there weren’t that many stitches on the needle, because bobbles are time-consuming. The pattern offered the option of small bobbles or big bobbles, and I chose the big bobbles. They looked good, but also my printout didn’t completely print the instructions for the small bobbles and I didn’t feel like going to the PDF and learning the method the designer recommended for her small bobbles. Those big bobbles used yarn at a voracious rate. By the time I got to the armpits, I had used up two-thirds of the yarn I bought for the project. Fortunately, Melissa had had the foresight to set aside the remainder of the bag in case I needed it, and I did need it. The yarn usage continued at a mad pace in the sleeves. They had very long cuffs, to be worn folded up, and the 1×1 ribbing fed into the stitch pattern through strategically positioned yarnovers that gradually widened the sleeves at several points in the first chart.
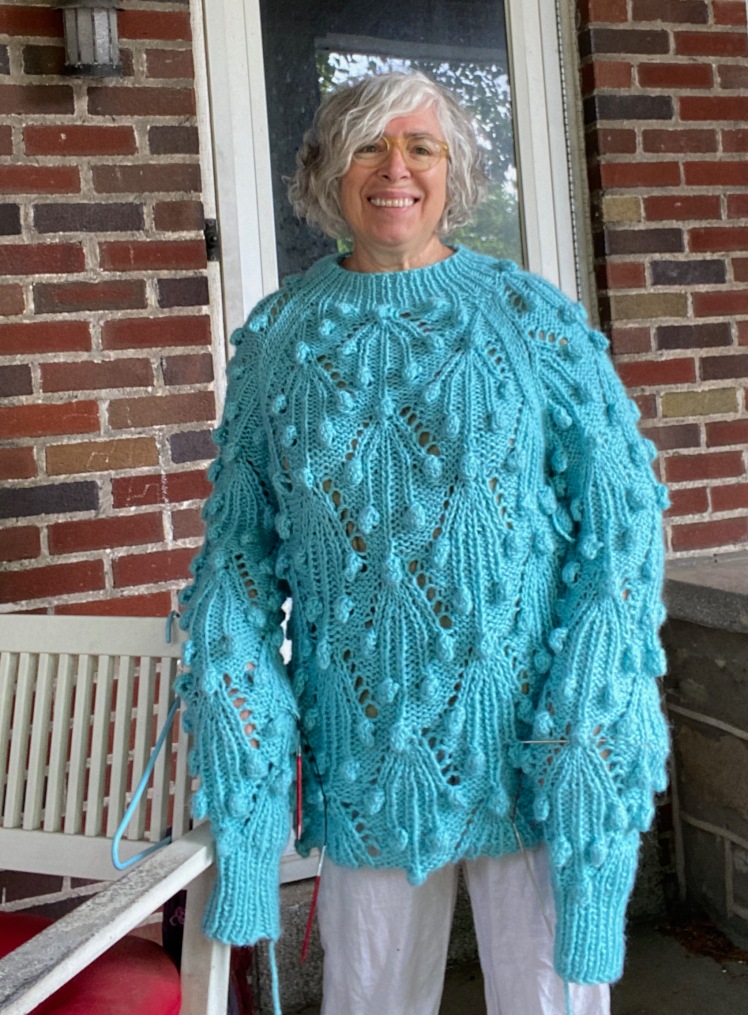
But I began to see a problem when I came to the end of the first chart: the sleeve already covered my arm up above the elbow, with two more charts to go. I pressed on with the pattern as written, hoping for the best but not at all sure it was going to happen. In my hopeful imagination, maybe in the end the sweater would grow width-wise, rather than length-wise. And balloon sleeves are a style. Or if worst came to worst, I could give the sweater to one of my relatively tall, long-armed daughters. I persevered because the designer seemed to have a plan for the yoke that I wasn’t ready to second-guess, so I knitted and knitted. The sweater got heavier and heavier, weighed down way past the intended hip bone length, down to tunic length. But at least the charts, instructions, and numbers all worked. Sadly, in the end, the sweater didn’t. The ribbing in the cuffs wasn’t tight enough to keep the sleeves from falling off my wrists, and then they brushed up against my knees.
I considered three remedies. The cheap’n’easy option was to tighten the cuffs with elastic thread worked into the ribbing so that the cuffs would stay on my wrists. The second option was surgery, because the sleeve was at least one chart too long, which would mean cutting off the first chart, reknitting the cuffs, and grafting the cuffs to what remained of the sleeves. The third option, which Melissa advocated, was to frog (knitter jargon, rip-it, rip-it) down to the body and rip out the final chart of the sleeves, then reknit the yoke, modifying the chart as needed. Time for a cost-benefit analysis of the pros and cons of each remedy.
Option 1, elasticized cuffs: pros, it’s quick and avoids the peril of cutting and the agony of frogging, reknitting, and recalculating the yoke chart. Cons, the elastic would have to be pretty tight to prevent the weight of the sleeves from pulling them down past my hands and down to my knees, and tight things around my wrists drive me crazy. Also the sleeves were enormous and unwieldy enough to be almost crippling. I don’t like my sleeves to cripple me, so I rejected that option.

Option 2, shortening the sleeve by cutting off the excess length at the top of the first chart: pros, it eliminates the excess weight and bulk of the sleeves and can be done relatively quickly. I would also reknit the cuffs on much smaller needles in order to make the cuffs stay in place without the annoying feeling of elastic, then graft the severed sleeves to the cuffs. Cons, amputation is serious business, and if you undertake it, you’d better know what you’re doing. Also it would sacrifice the elegant way the designer segued from 1X1 ribbing into the stitch pattern and would require me to bunch up the stitches that had been added in the course of the first chart so that they would fit into the number of stitches in the cuffs. Then the stitches of the cut edge would have to be Kitchenered together with the reknit cuff, an awkward operation. One option would have been to reknit the cuffs downward from the cut edge, but the look of upside-down stitches bothers me, which is one of the reason I avoid top-down constructions. My knitting, my quirks, my choice.
Option 3, frogging: pros, taking out the final chart would preserve the segue from cuff to stitch pattern; no amputation or Kitchener required; shortening the body if I wanted to. Melissa said that’s what she would do, but she’s a fast knitter who has been known to frog entire sweaters, redesign them, and reknit them with nary a qualm. Cons, frogging half of the knitting, including a perfectly knitted yoke, redesigning it, and reknitting it, with many, many qualms. Redesigning the chart probably wouldn’t have been all that difficult because, having knitted it once, I thoroughly understood the structure of the stitch pattern and its interaction with the raglan decreases, and I could have taken the theory and reapplied it to a slightly different number and configuration of stitches. But it had taken me three weeks to knit the yoke the first time, and reknitting would take another three weeks, and the only thing that really needed correction was the sleeves. The sweater would have looked good six to eight inches shorter and hitting at the hip bones instead of the thighs, but not three-extra-weeks-of-knitting better.
I have been known to frog, but it’s my remedy of last resort and I do it only when it’s faster to frog than to reach down into the knitting and repair the problem from laddered stitches, or when the problem is so fundamental that localized fixes can’t help. When Melissa pointed out to me that frogging really was no big deal, I told her, “well, you’re a frogger, I’m a cutter”, and we had a good laugh. The surgical option might not be everyone’s go-to remedy but I chose it because the problem was strictly the excessive length of the sleeves, while the yoke was perfect and the body length was livable, and because cutting makes sense when it’s done correctly, and I am good at Kitchener joins.
My approach to the task was to thread a circular needle through the stitches of the row that I wanted to join to the reknit cuff in order to prevent them from raveling until I could graft them to the stitches of the cuff. That row was the first row of the designer’s second chart. During the first chart, which I was about to surgically remove, three sets of four yarnovers had been added to widen the sleeve in an even taper. Those 12 extra stitches were going to have to be stuffed into the stitches of the cuff as unobtrusively as possible, and doing so would alter the shape of the sleeve from an even taper to a balloon sleeve. Getting the needle into the stitches of the correct row was not a straightforward operation, because the yarnovers and decreased stitches that created the stitch pattern skewed the line of the row and tended to direct the needle into a stitch above the stitch that needed to be held by the needle. I had Melissa double-check my needle placement, then I had her put a stitch marker in the stitch at the beginning of the row two rows below, to mark where I would cut and unravel. Two heads are better than one when it comes to amputation.
So Melissa placed the marker and I cut the stitch next to it, at the end of the previous row, with ostentatious calmness, because I am the master of my domain. Then I detached the excess knitting from the part of the sleeve that I wanted to keep and wound the excess yarn so that I could use it to reknit the cuff on much smaller needles.

While I was reknitting the cuff, I plotted out how I was going to incorporate the additional stitches in the patterning of the sleeve so as to preserve as much as possible of the designer’s orderly transition. The stitch pattern had areas of K1 P1 that could be easily aligned with the K1 P1 of the ribbing. On the row above the one that would now be the first row of the patterning, there were two bobbles, and underneath them three stitches had been decreased to one. I put those three stitches onto a marker so that I could group them together as a single stitch when grafting the cuff to the sleeve, and since there were two bobbles, I did that twice. That took care of four of the 12 stitches I needed to get rid of, so I had to find eight other places where I could double up the stitches and work them into the knit-purl cuff ribbing in a way that, if it fell short of a perfect organic integration, at least didn’t stick out like a sore thumb.

When the ribbed cuff was long enough, I unraveled the couple of rows underneath the needle that was holding my stitches and discovered a couple of places where I had missed the intended stitches. It wasn’t a big deal. I repaired the stitch as needed and put the needle into the right stitch. Such things are not disasters if one understands the structure of the stitches, and at this point in my knitting experience, I’ll forget my name before I forget how a new knit stitch is built by the yarn coming from behind and up in front of the stitch right below it, and a new purl stitch is built by the yarn coming from the front and through to the back of the stitch below. I double-checked the placement of my markers so that the knit-purl parts of the stitch pattern aligned with the knit-purl ribbing and so that the doubled-up stitches on the sleeve were spaced properly for the knit-purl alternation. Then I used the yarn I had just unraveled and started kitchenering. I wasn’t 100% accurate about getting the right parts of the stitches to align in the knit-purl pattern I was trying to achieve, since the sleeve stitches were offset to the cuff stitches, but guess what? I don’t care. This can trigger someone else’s OCD, but not mine. Partial amputation and only a few hours of work gave me a functioning sleeve with an attractive balloon style that mostly covers the graft, and the only way anyone is going to know what happened is if I brag about it.


I’m bragging because it was the right decision and it came out really well. But my purpose in recounting this process isn’t to impress the world with my virtuosity, but to illustrate how this came to be a right decision and what skills are needed to get a good result. Basically it comes down to understanding the structure of the stitches and how to replicate it with a different kind of needle, the kind with a hole at one end. I’m kicking myself now for failing to take pictures demonstrating the way I applied Kitchener stitch to the knit-purl pattern and incorporated the extra stitches in the sleeves into the grafting. But I’m not kicking myself very hard because there are excellent online resources whose illustrations are infinitely better than what I can juggle with my phone camera in one hand and the knitting in the other. I can refer you to the TECHknitting blog, here and here, on how to cut off excess knitting and how to do Kitchener stitch, respectively, and to an excellent article in Interweave about how to Kitchener in pattern.
The one thing I can’t understand is how my sweater got so much larger than the size the pattern indicated, when I used similar yarn to the yarn the designer recommended and the needles for the smaller size. I can understand it being somewhat larger, sure, I even wanted that, but how did my sweater get 9 inches longer in the body and 15 inches longer in the sleeves than the measurements in the pattern? Alpaca stretches, and the large bobbles add a lot of weight, but the designer recommended alpaca and offered the option of large, heavy bobbles, so presumably she factored the stretch into her numbers. The only other factor that was under my control is the gauge of my swatch, which might have been much larger than the pattern called for, and might have clued me in that I needed to use much smaller needles than the sizes she recommended. This is Knitting Wisdom 101: make a swatch and measure it. Otherwise partial amputation might be required.

This post made me chuckle several times. Thanks for writing about your unique experience.
LikeLiked by 1 person
I am pleased that it was amusing! Thanks for commenting!
LikeLiked by 1 person
I lol’d. The end result looks great, though.
LikeLiked by 1 person
Thanks, Mandy!
LikeLike
Crazy sweater journey. I am happy to be reading about it and not living it. Honestly, regarding the first sweater, I would have declared victory and moved on to a stockinette something-or-other. You have a great mind for these adventure. Nicely done.
LikeLiked by 1 person
I had already spent weeks knitting this monster, and bought skein after skein to feed the beast. I needed to salvage it— desperate times, desperate measures.
LikeLiked by 1 person
Agreed. When you invest that much time, energy and coin, it would be a shame. Besides, you truly have the brain for it. You have a gift.
LikeLiked by 1 person
Thank you!
LikeLiked by 1 person