
During a walk last fall, I was mulling over how to make a recently completed summer top more useful. It’s too big and long and it falls off my shoulders, but I was thinking it might work if I wore it as a tunic over a plain, simple, dark solid sweater that wasn’t too thick. Something pretty generic that I could buy at the mall. But I hate going to the mall and I don’t enjoy shopping, and I could see how a shopping trip for an apparently simple item could turn into an epic quest into the forest of frustration when I discover that my idea of a basic layering piece is not what’s in the stores. However, I have a vast stash and a knitting machine. Quest averted, right? Well, yes, in a way, but there’s always more to the story. Much more. With so many details.
As I walked, I began thinking about the details of this basic layering piece. Contrary to my reputation for bright and wild colors, when I buy ready-made clothing, I like dark muted colors. I have lots of Wollmeise fingering weight and heavy lace weight yarn in interesting neutrals, so knitting from stash would not be difficult. The shape of this garment would fit closely enough to layer under other things but not so closely as to call attention to those bits of flesh that I feel sensitive about. I had become proficient at making raglans, but if I didn’t have colors to entertain me, I was going to need to explore some new construction method to occupy my brain, and suddenly it felt like a serious deficiency in my experience as a knitter that of the many, many sweaters I have made over the decades, not one of them had seamed set-in sleeves. That had previously been sort of a point of pride, because I didn’t use other people’s patterns and applied my own ideas to construction templates that I modified at will, and had avoided seamed garments until the physical limitations of machine knitting required me to do so. So now it was time to crack the code of sleeve cap shaping.
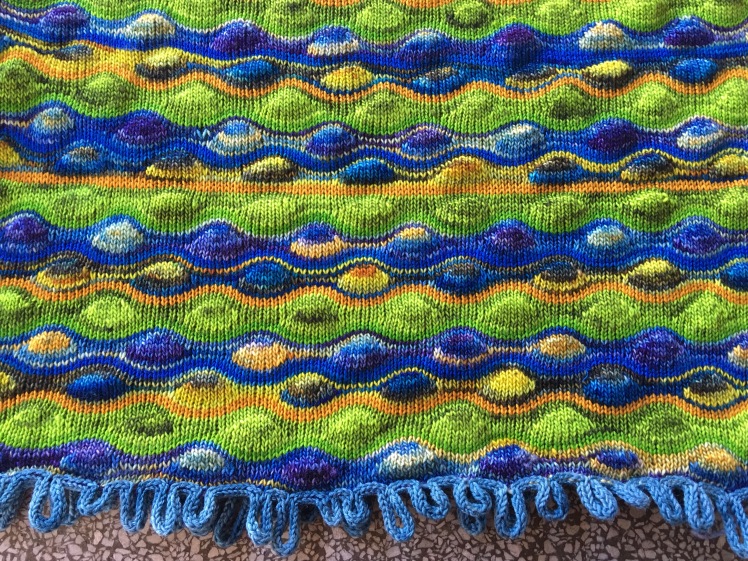
At this point I was envisioning a plain pullover in a lightweight murky dark green yarn, with set-in sleeves, a round and fairly high neckline, and a carefully calibrated shape that gave me a couple inches of ease at the bust and a bit more ease in my mid-section, where the lumpy bits are located. The first disruption to this plan came at my LYS (local yarn store), Lovelyarns, where Melissa was hosting a trunk show by Rita Mae Yarns, an indie dyer from fairly local York, Pennsylvania. Yes, I do have plenty of stash yarn, but if you love your LYS and want local dyers to continue creating unique colors, you have to buy their merchandise from time to time. So four skeins of the Sage colorway in fingering weight came home with me. (A fifth was dyed for me as an emergency measure because I ran out at the second sleeve.) The Sage colorway is a complex bluish-greeny-gray neutral with streaks of maroon-tinged greeny-gray. It has a lot to say, quietly. The yarn base also has a very pleasing firmness to it and makes a substantial fabric that I really liked, heavier than my original idea, but that’s all right.
Then I realized a truth about my designing: I am incapable of creating completely unadorned stockinette garments. Can’t do it, not even on the knitting machine. Especially since there is so much that I don’t know about machine knitting, and it seems like a waste of time just to make something to wear that doesn’t also teach me something or answer a visual question. I started thinking about hand-manipulated ways to add a textural design element. I know how to make eyelets: eyelets around the neck? But I didn’t want holes in the fabric, since my neck gets cold in the winter. I looked through my copies of Susan Guagliumi’s books on hand-manipulated stitch techniques. There are lots of brilliant ideas, but my eyes slid off the page when I tried to understand the instructions, which are written in machine-knitting jargon and abbreviations that I haven’t learned because I don’t use patterns. Someday I really have to make myself sit down and learn that stuff. But I noticed that in Susan’s explanations of bobbles, she mentioned that she had made videos of the techniques and had demonstrated them in her blog. So I went to her blog and watched her video on making basic 2- and 3-stitch popcorns about a hundred times until I understood the theory. Then I went upstairs to my knitting machine and tried it out, and realized I really didn’t understand a thing. So I butchered my first few popcorns, and reviewed the video, then butchered and reviewed, rinse and repeat, until I started to get it. Now I have a good understanding and muscle memory of Susan’s “bridging” technique, and I probably could understand the instructions in her books better if I went back to them.

I played with the technique for a while to get the mechanics down. I thought I might like the look of loosely clustered groups of popcorns in random placements, but the swatch just looked like random accidents. I love randomness, but I don’t love accidents unless I can find a way to make them look intentional. Also I wasn’t proficient enough to be able to position the popcorns where I wanted them to be, at the right distance apart from each other to have the effect I wanted, without devising a precise plan for the rows and needle numbers where I would do the popcorns, which would bring visual interest to this plain design knitted in subtly variegated neutral-colored yarn, positioned at regular intervals around the neckline. The best configuration I played with in my swatching was a 4-popcorn cluster in a diamond shape separated by a couple of rows vertically and several stitches horizontally for the offset. I gave myself a little time to let the spacial relationships take shape in my thinking before writing instructions for myself. My daily walks are the time for working out spacial relationships. It’s like my brain has gears and my legs turn the gears.
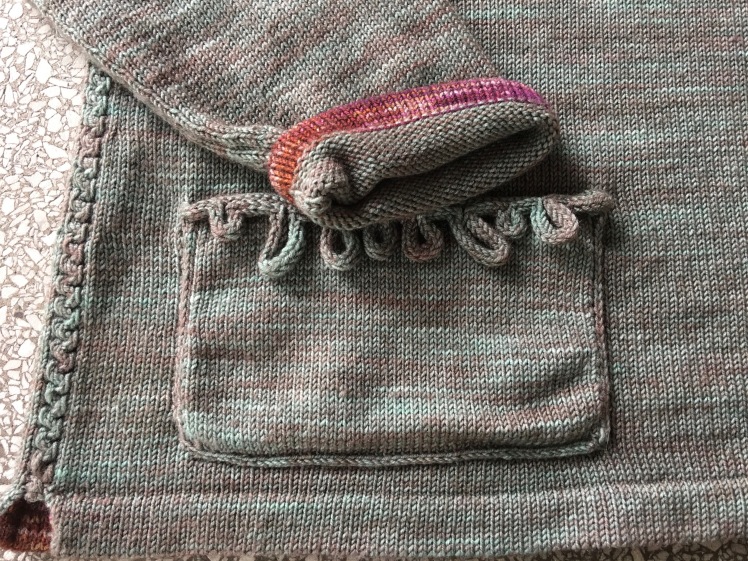
I was also working out what kind of edging the neck hole would get. I generally avoid ribbing because I don’t like the look all that much. Also because the last time I used my ribber, three years ago, the hinges that raise and lower the ribber for use with the main bed were so balky that I really feared I wouldn’t ever be able to get it out of the way so that I could knit on the main bed, and that traumatized me. I’m pretty sure that just lubricating the hinges would solve that problem, but I’ll leave that for another day. Anyway, I thought that an i-cord might be an effective finishing for the neckline. I had never done i-cord on the machine, or in hand-knitting either, because knitting the same three stitches in an unending string of stockinette is not my idea of fun. That’s why I got the knitting machine, to produce stockinette without drowning my poor little brain in the unending tedium of stockinette. So I looked up videos on machine-knitting i-cord, and dear Diana Sullivan came up. There it was, Lesson 26 of her beginner knitter series. When I actually was a beginner, I was a bit stymied by that series because the production quality of the videos was pretty bad and I couldn’t make out what she was doing. But now I had the experience to be able to see through the graininess and understand the idea quite readily. Diana also mentioned that i-cord could be used for decorative effects, like loops. Noted.
Then the next video that came up was really interesting. It was Diana again, using i-cord to join pieces of knitting with what she called a ZigZag Panel Join. It presented some spacial challenges getting the two pieces pointed in the right direction from the wrong side, but I didn’t have too much trouble joining two swatches together and getting a very exciting decorative detail for my side seams.
Now I had my design elements. I worked out the spacing for my 4-popcorn clusters and practiced them in a couple of swatches, leaving plenty of room between the clusters and the top of the knitting so that I could put i-cord loops of irregular lengths onto the top of the swatch. I joined a couple of the swatches together with the Zigzag Panel Join to learn the mechanics of making it and also to get an idea of how much width the join would add to the sides of the garment and factor that into my numbers. Also I practiced making irregular loops on the swatch to see how it looked and to gauge the clearance I was going to need between the top of the clusters and the bottom edge of the longest loops. Now it was time to do the numbers. Lots of numbers, because this garment was going to need lots of pre-planning.
I was very concerned about fit. I had tried in a recent project to find those Goldilocks numbers that gave me a garment without extra ease but with enough ease to enable it to glide tactfully over the flesh that I don’t want to talk about. I didn’t get it quite right with that sweater, although it’s wearable. But it served another valuable service by giving me something tangible and measurable to work with in getting the right numbers this time. I estimated that if the sweater I was using as a template had been 2″ larger around in the torso, I wouldn’t have that sense that I was revealing details about my contours that I preferred not to discuss. So I added 2″ to the circumference at the chest, multiplied it by my stitch gauge, divided the result in half for front and back, added an extra stitch at each side for seaming, and subtracted a couple of stitches for the width that the fancy join would bring to the party. To that sum, I added 10 stitches each to numbers for the chest measurement of the front and back, five stitches per seam decreased at 20-row intervals starting at row 60, to create a very gentle, almost unnoticeable A-line that would provide just enough of that tactful space my no-longer-nubile body craves.
Now I had enough information to knit up to the armpit for the start of the arm scythe shaping. So I did that, while thinking about the numbers I was going to have to calculate. To shape the holes for the sleeves on the front and back, I needed to decide how long it would be from the base of the armpit to the nape of the neck and the width across the back from seam to seam, and then multiply those inches by row gauge and stitch gauge respectively. I referred to Shirley Paden’s Knitwear Design Workshop for guidance on the shaping the set-in sleeves. Shirley Paden’s book is intended to be used for hand knitting, but it’s not really my style because I avoid knitting garments in pieces wherever I can, and I find Elizabeth Zimmermann’s simple formulae for yoke constructions to be easily adaptable for what I want to make. I don’t need Shirley’s exacting precision for creating seamed, conventionally shaped garments because that’s not what I do in hand knitting. But machine knitting requires a different approach to garment construction, and Shirley’s explanation of the math is as clear and precise as you can get. I calculated the difference between the number of stitches just before the armpit and the number of stitches across the back, and based on Shirley’s guidance, I figured a sequence of decreases over the two inches of height that she recommended to create the curve into which the bottom of the sleeve cap would fit. Forming that curve starts with a bind-off of about an inch and a half of stitches at the bottom of the armpit, and I bound off several fewer stitches than I normally would to make up for the additional width at the seam because of the decorative join.
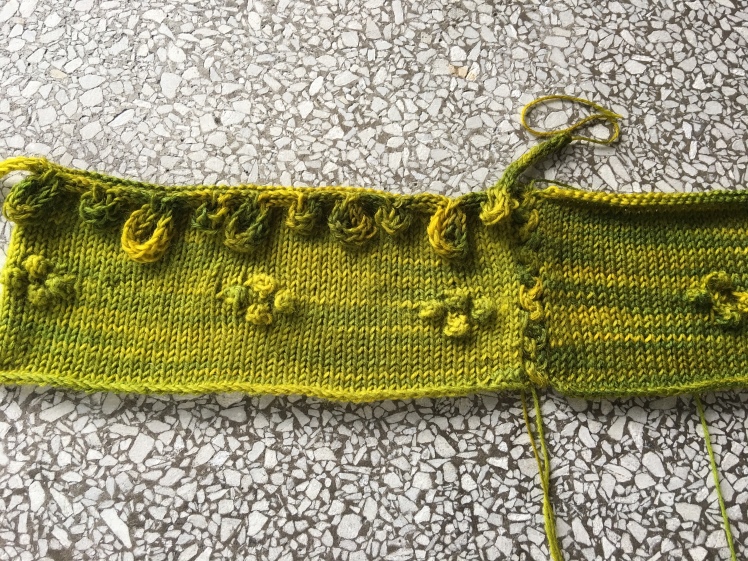
Having accomplished the armhole curve that gave me the seam-to-seam width across the back, I knitted straight up until I reached the row where I needed to start my popcorn clusters around the neckline. I calculated that I needed 16 rows of clearance between the top of the popcorns and the bind-off for the neckline in order to accommodate the irregular i-cord loops that would decorate the neckline, plus a row for the top popcorns, two rows between the top row and the two popcorns in the middle of the cluster, another two plain rows, and another row for the bottom popcorns, i.e. 6 rows for the popcorns and 16 rows for the clearance. So the popcorns started 22 rows before the neck shaping. The clusters themselves covered a total of six stitches, widthwise, two stitches for each popcorn, with the top and bottom popcorns done on the same pair of needles with three rows between them, and the two offset popcorns on the center row with two stitches between them. The clusters had 16 stitches between them. I did the back first, because that was simpler since the only shaping was the short rows for the shoulders. I positioned three clusters 16 stitches apart, plus 6 stitches for the clusters, across the flat line of the neck and one on each side several rows up and 16 stitches from the neckline.

Counting everything out directly on the needles ahead of time and jotting down the numbers in my little notebook, I plotted the placement so that the i-cord loops wouldn’t cover the clusters and so that the short rows for the shoulder shaping wouldn’t interfere with any of the component popcorns. So in a way, I do use patterns, but they’re my own patterns, written with my own idiosyncratic abbreviations and code, and it’s the reason why I can’t understand anyone else’s patterns. The front was more complicated to make than the back because the neck shaping requires a lot more short-rowing than the back does and more attention to the numbers in order to make the two sides symmetrical. Throwing in number-intensive clusters of popcorns just adds to the fun. Actually, it is fun, but it shouldn’t be done in a tired or distracted state of mind.
Once I had my front and back off the needles, I used the Diana Sullivan i-cord-based join to connect them together. The first seam was fun and easy to make because it’s pretty straightforward to do exactly what Diana demonstrates, wrong sides facing, with one piece on the right with its bottom edge headed left and the second piece on the left with the bottom edge headed right. You knit six passes of i-cord on one side on three edge stitches, and then do the same to the other side until you get up to the top of your seam. You get into a rhythm and before you know it, you’re done, easy because it’s just two dimensions. But when you are attaching the second seam, it’s now a 3-dimensional situation, and it takes some good spacial thinking or just dumb luck to get the two sides going in the right direction without turning the tube you’re trying to create into a Moebius loop. For me, it was dumb luck. I just stumbled into picking up the pieces and turning them the right way without knowing how I did it. I was mystified and amazed and totally in love with the result.

Now for the sleeves, the part I was dreading, because I had spent decades avoiding the geometry of sleeve caps. It took me several days of daily walks, trying to visualize why Shirley Paden was telling me as if it was self-evident that the sleeve cap had to be several inches shorter than the side seams of the front and back into which it was supposed to be fitted. Go ahead, laugh at my obtuseness. For several days my legs were cranking the gears in my brain as hard as they would go before I visualized how the length of the seams of the front and back had to go around the curve of the sleeve cap, and it can’t do that if the sleeve cap is as tall as the front and back are long. Once I had absorbed that spacial concept, I could do the arithmetic for the four parts of the cap shaping.
First, the armhole bind-off match, normally an exact numerical match as the armhole bind-off on the front and back, but for me it wasn’t exactly the same number, because the decorative seam join added several stitches of width, so I bound off 2 or 3 stitches more on the sleeves so that the base of the armhole on the sleeve would fit into the base of the armhole at the body. Then the calculations for the final bind-off at the top of the sleeve cap, which Shirley says is slightly less than a quarter of the upper arm width. She has a formula, I plugged in my numbers. Step 3 in the Shirley Paden method is the top slope, which decreases stitches in the final half-inch of the cap at a faster rate than the center section of the cap. Pour the numbers into a formula, stir, out comes the instructions for the last several rows. Step 4 is the one whose instructions go on for two pages. In summary, this involves a formula for calculating the total number of rows in the cap, subtracting the rows in the armhole match and the rows for the top slope, calculating the number of stitches that need to be eliminated in order to get to the stitches for the decreases in the top stitches, and doing a Magic Formula calculation to figure how many stitches to decrease on which rows. I gave a pretty thorough explanation of Magic Formula in my Trust the Numbers! post. There are a lot of calculations in devising a well-fitting sleeve cap, but that’s why God created calculators.
Sleeves attached, pockets i-corded and sewn onto the body, neckline loopety-looped. It looked really pretty. But would it fit? I made the mistake of trying it on before it was blocked and it looked a whole lot better when it wasn’t on my body. I panicked a bit even though I knew that superwash yarn, which this was, always relaxes after blocking. So I tried to calm down until the sweater was dry, and then I put it on, and it was perfect. Except that the measurement across the shoulder was too wide and the shoulder seam goes about an inch down onto my arm. But no one notices, so I’m not going to obsess about it. I have a template now for the fit I want.

Its details:

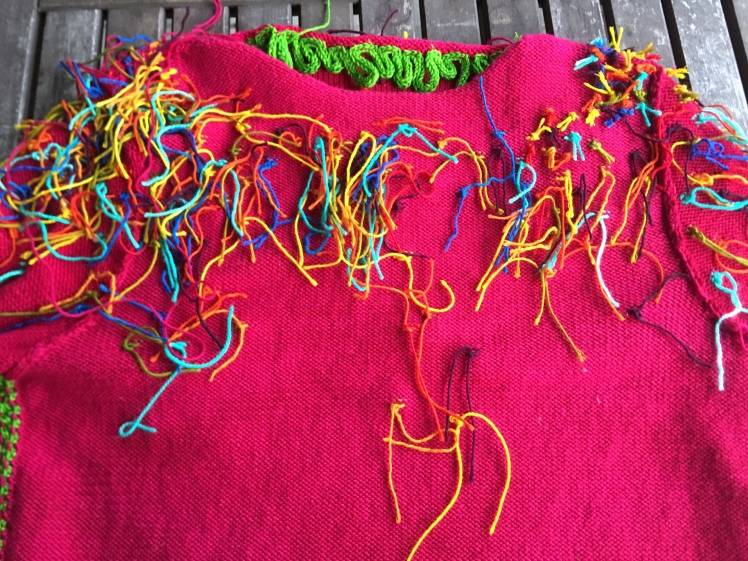
As I was working on this garment knitted in one single neutral yarn, I started thinking about how this design would look in different color schemes, with different configurations of popcorns. I wanted to see it in a pink-red with an acidic green for the zigzag seam join and the i-cord loops around the neckline and pockets, with random sprays of 2-stitch and 3-stitch popcorns in bright circus colors scattered all over the upper torso, a style and color scheme that would look good on my older daughter. This time I made the popcorns a different way, not the preplanned, bridged-needle, single-color method that I had used for the first sweater, because each popcorn was a different color from its neighbor. In a way it was simpler because I didn’t have to preplan the exact placement of each popcorn and remember to turn the row counter off while doing the carriage passes over the working needles to make the bulge of the popcorns, and turn it on again to complete the row and the row immediately on top in order to keep track of my row count. But that wear and tear on my brain was outweighed by the fact that making the popcorns the way I did, by hand-feeding the yarn into the needles and pushing the needles back by hand to form the stitches, was fiddly and time-consuming, especially when the density of the popcorns reached its peak. It took a long time to make this sweater, and a lot of thought to make the popcorns look random. Here’s a truth about randomness when it looks good: it’s not random. Every time I decided on the placement and color of a popcorn, I scanned the entire piece to decide where the popcorns were bunching up, how big I wanted that density to be, when to start breaking up the density, and how to distribute the colors to disrupt any regularity in their usage. True randomness doesn’t do that. True randomness tends to look like intentional regularity gone wrong.

And then when I finally finished the knitting and assembly, there were the ends.

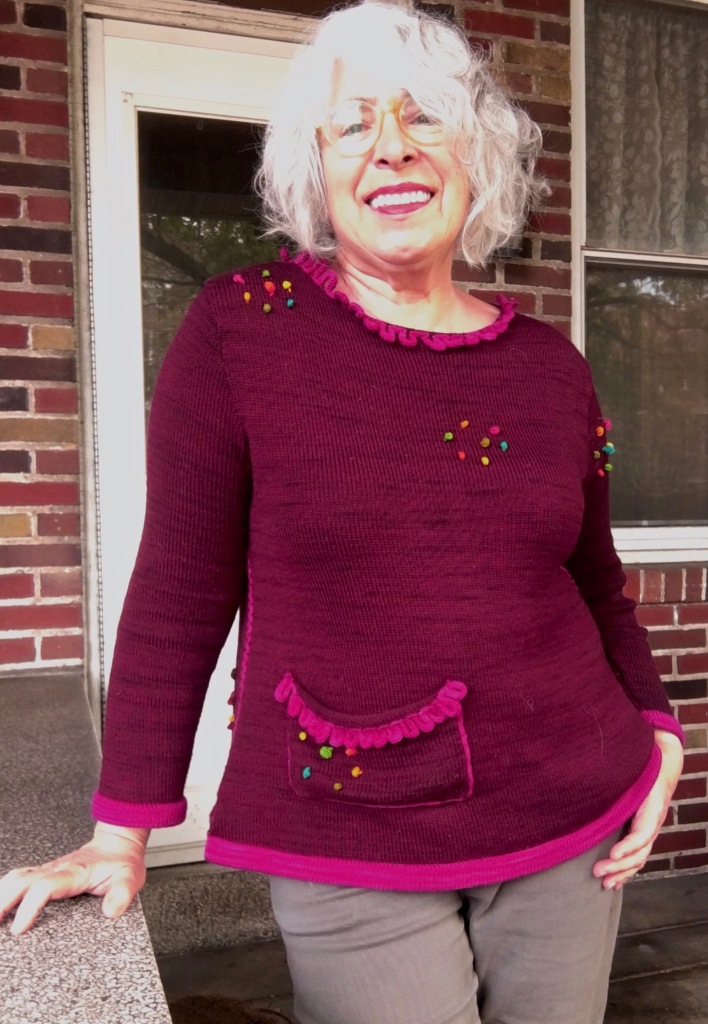
The finished garment suits my daughter very well, I think.


The thing I wish I had done differently would have been to make the sleeves narrower and the armhole smaller. The numbers I used were more suitable for me than for her. On the bright side, the numbers were suitable for me, and I used them for my next variation on these design themes.
The color scheme for the third variation was inspired by my sloppy housekeeping. A skein of maroon yarn in Wollmeise’s Merlot colorway had found its way under the coffee table, and I noticed it while I was doing my morning exercises on the living room floor. Instead of picking it up and putting it away, I looked at it every day for a while as I exercised and thought about the color. Eventually I fished it out from under the coffee table and put it up against Wollmeise’s Fuchsia colorway, and it was magic. Susan Guagliumi had a couple more methods for making rounder and larger popcorns than the ones I had made in the previous two versions, and I thought I’d give them a try. But this time there would be many, many fewer popcorns than the sweater I had made for my daughter, which ought to have proved my love for her, because making some 200 popcorns and cleaning up the ends nearly killed me. I started seeing random-on-purpose placements of brightly colored solar systems of smaller popcorns revolving around a larger popcorn, floating in a maroon-colored outer space. I liked that idea. I especially liked the idea of not making 200-plus popcorns, although the method I was using was even fiddlier than the method I used for making that massive popcorn overload.
I used the original version as the template to which I made some variations on the fit. I kept the chest measurement and the length of the garment, but I tried to make the distance between shoulder seams about an inch narrower and to make the shape a bit more A-line. The original had five decreases per side seam; the solar systems sweater had 14. The shoulder seams now hit a little closer to the points of my shoulders, but I didn’t compensate quite enough by making the sleeves longer, so they’re a bit short. Unfortunately my dumb luck ran out when it came to joining that second seam with the zigzag panel join. Over and over again, I kept making Moebius twists so often that I wondered in a state of panic whether the rules of geometry had been suspended along with the principles of democracy in my country, and I was now living in an Escher universe.

Finally I stumbled onto how to do it: turn the front and back inside out so that the reverse-stockinette side is facing. Place the already-made seam between one’s legs as one sits at the knitting machine, with the bottom edge next to the tummy, and fold the unseamed pieces over the halves of the seamed pieces. Pick up the piece on the right leg and hold up the wrong side to the needles so that the bottom edge is at the left edge of the three needles on which the i-cord will be knitted and attach the first three loops (not the knots) of the edge stitches onto the needles from left to right and do six passes of the carriage with the left part button pushed in. Then pick up the piece on the left leg so that the bottom edge faces the right edge of the three needles, count up three loops from the bottom edge and put the third loop onto the rightmost needle and the next two loops on the adjacent needles. Seam made. Whew, what a relief, we still live in a Newtonian universe.
This came out well. Next time I’m going to have to make the sleeves about an inch longer, and I might want to experiment with starting the decreases to shape the A-line of the body about 20 rows higher and spacing the decreases a bit closer together, ending up at the bust. There’s always something to try differently next time. Anyway, the combination of the maroon and the fuchsia makes me smile whenever I look at it.

As I have said before, my skills in machine knitting are hard-won and very basic. But every time I learn a skill or a technique, situations present themselves in which I can apply what I have learned in different ways from their original context. I want to learn more and more about machine knitting, but it does give me a lot of satisfaction to know that the little I have mastered can be used in original and pleasing ways with just a little resourcefulness.


“My brain has gears and my legs turn the gears” – well said.
Great results, and I like your process and the way you’ve documented it. Thanks for reminding me of Shirley Paden’s book, btw, as I own it and will want to return to it when I next embark on a sweater instead of the myriad little hand and foot coverings that have been entertaining me in lockdown.
Also: those 200 bobbles are indeed a work of maternal devotion. It took me two months to finish all the ends on a pair of stranded mitts for myself, and I’m still surprised that I managed to finish them at all.
LikeLike
Glad you enjoyed that turn of phrase! There are times when having a deadline to complete an onerous task is the only thing that can get you through the onerous task!
LikeLike
thank you so much for another insight in the way you make your knitting!
during my teacher training ages ago i was told about how moving and math are related and that some people had to relearn to walk to be able to do math.
your bobbles reminded me of the various techniques used in the book PopKnitting by Britt-Marie Cristoffersson to add structure, embellishment and colour to her work. however, she does not use a knitting machine. it’s an inspiring book, but i still have to be bold enough to use those splashes of colour!
LikeLike
I should take another look at Britt-Marie Christofferson’s book, which inspired several handknitting projects of mine some years ago. Walking really is my best problem-solving time. It helps me to visualize what numbers are trying to express. I would love to know the neurological reason why.
LikeLike
In the end, have you used these as layering pieces?
LikeLike
Well, no. And the tunic that prompted the whole exercise really is too big and will probably be given to someone it suits better. On the other hand, I’m wearing the first of the series right now and I wore the maroon one the other day!
LikeLike