
I’m kind of timid, or possibly lazy, or both, when it comes to expanding my machine-knitting skills. That’s probably because machine-knitting is only one of my interests, not an exclusive obsession. I can’t seem to make time to sit down and watch a video, then practice the skill until I master it. (But the January 2019 Swatch-a-long is upon us, and that’s when I force myself to sit down and learn something new!) The other reason for not expanding my skills is that I actually do know enough to make the garments I want and I haven’t exhausted all the ways to apply the little I know to designs that interest and please me.
Here’s the inventory of what I currently know how to do: e-wrap cast-on, changing colors for stripes, increasing and decreasing at the edges, short rows, the use of the hold button, joining two pieces of knitting on the machine to seam them together, controlling the tension of the stitches, using waste yarn, spotting and repairing badly knitted stitches, basic maintenance of the machine, replacing needles, and swapping out the sponge bar. As a hand-knitter with a lot of experience designing garments, I already knew how to calculate the numbers I need to get the shapes I want and how to plan ahead, so watching the row counter came naturally. Everyone who can do anything with a knitting machine has these skills. I was going to use these basic (but not simple!) skills to make something that not everyone was going to think of.
I was turning to my knitting machine to help me get numbers for a dress modeled on my most recent hand-knitted improvised stranding dress, And That Was Called Love, as a prototype for a new hand-knitted dress I’ve been mulling over. This new dress would be looser, with a higher waistline that would allow the skirt to move more freely. On the knitting machine, the 200-needle maximum capacity required me to make the skirt in pieces in order to get the swingy shape I was envisioning. Fortunately, seaming is one of my skills, and I was going to make a design feature of the need to make the skirt in panels and to connect them with seams.

Since preplanning is a requirement for creating a garment on a knitting machine, having an accurate stitch and row gauge is vital. I was going to use my go-to yarn, Wollmeise Lace-garn, for this garment, so I measured the stitches-per-inch and rows-per-inch of my Wollmeise lace sweaters that I haven’t given away. Then I measured And That Was Called Love for the length between the hem and the place on the torso where I wished the waist seam had landed, and multiplied that number by my row gauge to calculate the row count of my skirt panels. I decided I wanted the waist to be wider than it was for the dress, so I added a few inches to the measurement for that part of the dress, and multiplied by my stitch gauge, then divided by 4 for the front half of the dress, using the same numbers for the back of the dress, which would have eight panels. That gave me the number of stitches I would need for the top of each panel, and I decided to make the bottom measurement of each panel almost twice that number because I wanted a lot of swing and drape, and why not? I wasn’t hand-knitting a circumference of almost 700 stitches (although it wouldn’t have been the first time I have done that.) Subtracting the top width from the bottom width, I calculated the rate of decrease: specifically, 84 stitches at the bottom minus 44 at the top, decreasing 40 stitches over the 190 rows I had calculated for the length of the skirt. That was 20 rows with a decrease at each end starting at row 10, so that meant a decrease at either end of every 10th row.
Then I calculated the numbers for the distance between the waist seam and the armpit, using the dress as my reference for the space I wanted to cover, and used my gauge to calculate the number of rows that piece would require. I had some uncertainty about how I wanted to make the yoke, although I knew it would involve taking the front, back, and sleeves off the machine and finishing it by hand. I put off decisions about that until later.
I had a vague notion about making some kind of dress that looked like a pile of rags that miraculously came together into a floaty, deconstructed, but still coherent and flattering garment, but I never figured out how to achieve this miracle of coherent incoherence. Instead I settled for a patchwork effect of sometimes blended, sometimes contrasting Wollmeise colorways combined within the panels. I also figured out how to do a different kind of hem than any I had done before, although that used of “any” gives me too much credit since I stick to folded hems pretty much exclusively. This different kind of hem was something I’d been thinking about since my very first experiments with the knitting machine when I pushed in the hold button for the first time. I thought there might be a way to use the hold button to create rolled tendrils. If there is such as way, I haven’t figured it out, but these rolled tendrils can be achieved quite simply by knitting back and forth on a small number of stitches and ending the knitting on waste yarn in order to incorporate the tendrils into a larger piece of knitting later on. If I couldn’t achieve a deconstructed look, at least I would be able to get a jagged, ragged hem made of tendrils of different colors and lengths.

So I had my plan for getting this dress started. I had a pile of Wollmeise lace cakes in yarns I had used for previous projects, chosen because they had a certain murkiness to them, and then some that were brighter versions of some of the colors in the murky multis. I had a vision of the murky greens, grays, blacks, purples, and blues dominating the colors with occasional bursts of bright colors bubbling out of the murk. I was in a dark place as I chose and changed and blended my colors. I was watching the Brett Kavanaugh Supreme Court hearings, and I was aghast that someone as obviously courageous and truthful as Dr. Christine Blasey Ford could be systematically deprecated and disregarded while Kavanaugh blustered and frothed his way past Dr. Blasey Ford’s damning testimony against him to that position of privilege and power that his entire life of privilege and power had taught him to expect as entitlement.
I put a lot of anger into the design of the dress. I wanted the dress to look witchy and a little bit dramatic while being unrestrictive and easy to move in. And pockets, big strong pockets. This was what I wanted to wear to the revolution. This was what I wanted to wear to dismantle the patriarchy. I wanted to be able to move freely, I didn’t want to have to think about holding my stomach in, I wanted a place to put my hands and phone and keys and not to have to carry a purse, I didn’t want to look like someone else’s idea of a lady of a certain age. I’m not a Wiccan and have no particular interest in it as a belief system, but I was really loving the way that male power structures completely wig out over the idea of women coming together for nature-based rites that exclude them, and I wanted to create an effect that evoked that. But sometimes things happen between intention and execution.
It was the colors. For me it’s always the colors. I had about 30 different cakes of yarn, and about five of them were mostly somber colors, another dozen or so were multis that were mostly somber colors with flashes of brighter color while another dozen reversed the proportion of bright color and somber color, a few were multis in all bright colors, and about five were bright solids. I started off intending to use the five somber colors as the dominant color range and use the brighter colors as an unexpected pop, and in fact that’s what I thought I was doing when I blended in the multis that were based on somber colors but had blues, purples, dark reds, and greens in them. It turned out that the colors were much more intense than I had realized when the colors were in the cake, because the somber colors made them glow. Then I found ways to blend in the multis with the higher proportion of bright color, and before I knew it, I had an intensely colorful color composition. I really did work hard to use the dark, moody colors, but they just made the brights brighter.
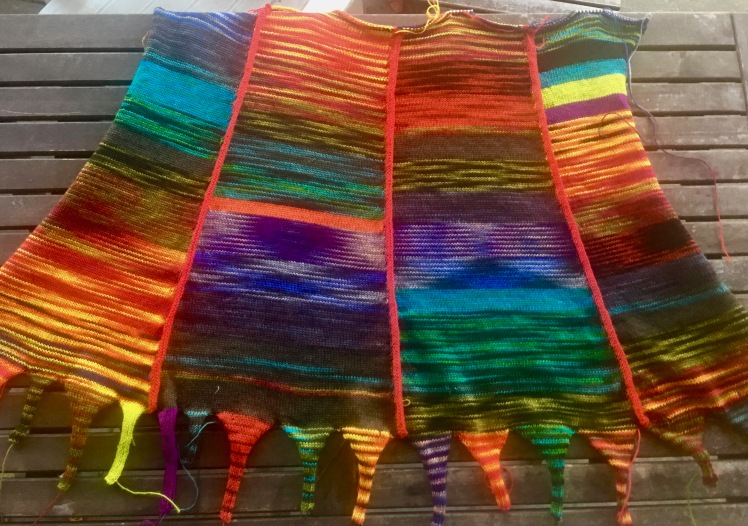
Here are my first couple of panels. I joined them as I made them. The seam is a design element, a solid bright red line outlining the panels with five rows knitted on top of the join on the facing side of the work.

At first I actually was pretty good about adhering to my plan to have the murky colors and multis predominate in my first couple of panels, but as I made more of them, I found different ways to combine the multis that managed to play up the brilliance of the colors. It seems that it might not be in me to make colors look murky, even when I try.

While I was knitting and joining the four panels for the front and the four panels for the back, I was mulling over the topography and numbers for the torso and yoke. My plan was to machine-knit the torso (front, back, sleeves) until I got to the point where I could recycle the numbers I used for the stranded triangles of the And That Was Called Love yoke. The math problem was to figure out how to make the back higher than the front for the neck shaping while bridging the difference with short rows at the shoulders on the sleeves, while also decreasing the number of stitches so that I could get as close as possible to the 336 that worked so well as a base number to achieve the diminishing triangles of the dress’s yoke.
I thought a lot about these numbers during my walks and during spates of wakefulness, but in the end it wasn’t all that complicated, as is usually the case after I’ve thought and thought about something. Using the already-knitted dress as a guide, I measured the amount of space I needed to cover between the waist and the start of the stranding, front and back, multiplied it against my row gauge, and settled on the row count for the front and the back, which meant figuring the front, then adding 12 additional rows to the back to raise the neck. I had 484 stitches. My goal was to get to the 444 of the yoke on And That Was Called Love, prior to a drastic decrease round to get down to 336, which meant decreasing five stitches at each of my eight edges: left front, right front, right front sleeve, right back sleeve, right back, left back, left back sleeve, left front sleeve. I found five places at either edge of front and back where I could do the decreases and noted where I did them so I could do the same decreases on the sleeves. The sleeves, where the short rows were going to be done, would require some thinking, so I took a break from thinking and joined the front lower torso to the front four panels of the skirt and then joined the back lower torso to the other four panels. I’ll admit that the seaming was a bit of a challenge. I made a bad assumption that the 184 stitches I had bound off at the top of the skirt panel and the 184 stitches I had cast on for the lower torso meant that I could hang the two pieces on 184 needles. That was way too tight, and I had to fumble with the hanging until I could keep most of the stitches on the needles when I passed the carriage over them. I still had holes that I had to fix by hand later.
Now it was time for the pockets, which needed to be strong and capacious and firmly affixed to the side seams of the dress, while not disrupting the flow of the skirt panels. The solution I came up with was to knit each pocket in the shape of a trapezoid that was more than twice the width of the distance between the panels on the sides and the neighboring panels on the front, in order to fold the two short edges together to form a bag that would be joined at one edge with the front side seam and the other edge with the back side seam. The folded edge would be hand-sewn into the seam of the neighboring front panel, and the top and bottom edges would be seamed on the machine. The trapezoid shape was formed by following the same slope as the panels, that is, a decrease on either side every 10 rows. The plan was to make the fabric of the pocket as strong as possible with a fairly tight gauge and machine-seaming at the top and bottom of the rectangles, attaching the pockets at the sides, so that hands and other objects could go into the pockets without distorting the hang of the dress.
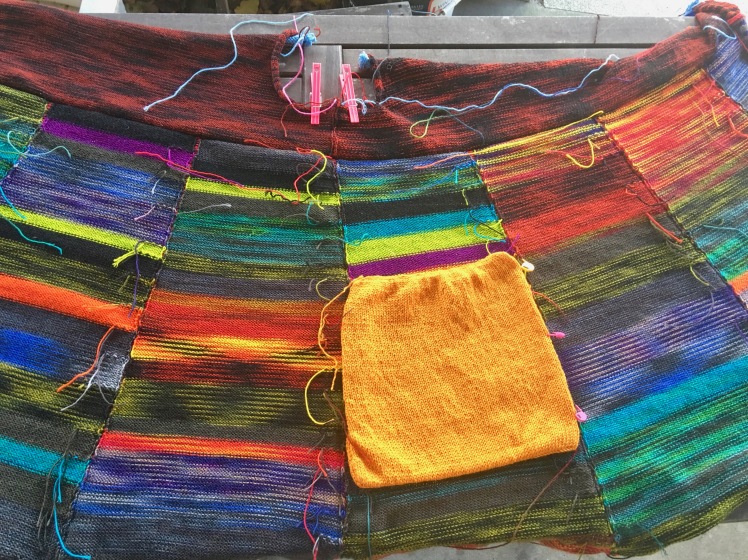
I used a sock yarn reinforced with acrylic to protect against wear and knitted at a tight gauge in order to get a strong fabric, but it was too tight, and it took me several tries before I got it right. The thickness of the sock yarn required adjustments in the way I seamed the pocket to the side seams, and I also made some spacial errors in what I was attaching to what. I unpicked a lot of things before I got my pocket the right size with the edges attached to what they were supposed to be attached to, with the proper side facing and everything closed up nicely. It was more complicated than one might think. I hastened to do the second pocket before I forgot everything I had done wrong with the first. Fortunately I still have a little short-term memory left and the second pocket went better than the first. I left the pockets dangling inside the dress, waiting to hand-sew them to the neighboring panel until I was done with all of the knitting and in the finishing phase.
Now it was time to confront my big spacial thinking challenge, the sleeves, where I was going to have to figure out how to do two shaping tasks at once, short rows and decreases at the raglan seam. I was anxious about the math I did for the two simultaneous operations, but oddly, the part of the first sleeve that bedeviled me was hanging the little dangly things on the machine so that I could knit the sleeve, which was a simple piece of unshaped knitting up to the armpit, at which point I would put stitches onto waste yarn and then shape the shoulder. But I was having an allergy attack that was blurring my vision and I couldn’t see my stitches, which happened to be in black yarn, and I was dropping and shredding my stitches all over the place every time I tried to deal with waste yarn. My sleeve was littered with stitch markers holding dropped and mangled stitches, and my math wasn’t working out in real life as I figured it on paper… but it turned out that the math really didn’t matter.
It really didn’t matter if the decrease on the long side of the shoulder aligned as planned with the decrease on the short side, as long as both decreases happened. I clustered the short rows on the front side of the shoulder, did the right number of decreases on both sides, and did the same thing on the other sleeve. As long as the two sleeves matched, and the short side of the shoulder was the same number of rows as the front and the long side of the shoulder was the same number of rows as the back, and the short rows of each sleeve pretty much mirrored each other, it was all good. The second sleeve went without a hitch. It even apologized to me for the trouble the first sleeve had caused me. I seamed both sleeves to the body, it looked great, and I was pretty much done with the machine knitting.

Now I had everything off the machine and 444 stitches on waste yarn waiting for me to put them on a long circular needle, unravel the waste yarn, and start the hand knitting. I couldn’t see my stitches and the waste yarn quickly turned into a tangled mess, but eventually I picked up my split and dropped stitches and got them turned the right way on the needle and got the waste yarn out of the way. Then I decreased down to 336 stitches, which was knit one, knit two together all the way around, except for four places that didn’t get a decrease because of the numbers. I used my hand-knitted dress as my guide for the diminishing triangles, although I eliminated one of the bottom triangle sequences because I started off with enough height in the torso that I didn’t need to knit it. I wanted the neck to be round and fairly high but not too tight, so I ended the triangles when I got to a 6-stitch repeat, 168 stitches, and did several sets of short rows from one front raglan line around the back to the other front raglan line and then decreased another 28 stitches, for a total of 140 stitches.

I left the neck stitches on a needle and set to work on the collar, which would consist of dangly things (technical term) in alternating black and neon green and a few rounds of garter stitch decreased to match the number of stitches remaining around the neck, to which the dangly things would be joined together with a three-needle binding maneuver. I did the numbers the easy way: fourteen 14-stitch dangly things, two stitches between each one for 196 stitches, two decrease rows to eliminate two stitches per dangly thing (-28, -28, down to 140). Then I juxtaposed the two needles (the one with the collar and the one with the dress hanging off it) and knitted a stitch from each needle together using a third needle. I knitted several rows of stockinette for a rolled edge and bound off.
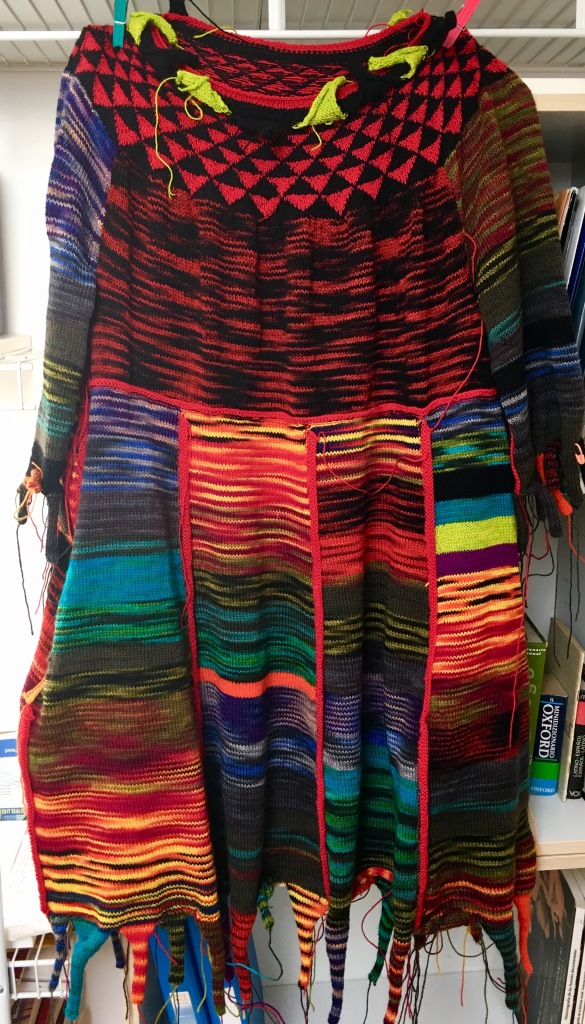
Whew. The knitting was done. But the finishing took yet another week, to clean up the millions of ends, repair the dropped and split stitches, and hand-sew the pockets to the neighboring panels. I did the pocket-sewing on a train in Germany after a long, wonderful, and tiring day with a Ravelry friend in Cologne. When I tried the dress on afterward, I discovered I had sewed one of them to the neighboring panel on the back instead on the front. Unpicking that was no fun. Tasks requiring spacial concepts shouldn’t be done tired.


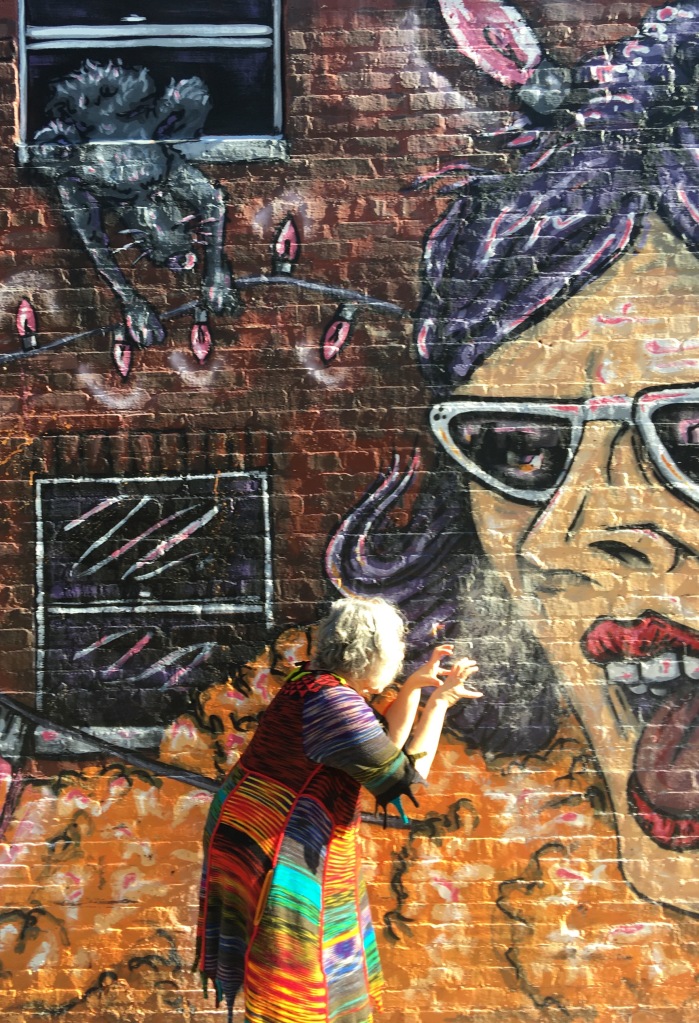
Eventually it was done, as I knew it eventually would be. But something had happened to my concept of a witchy, menacing, angry, subversive garment that reflected my witchy, menacing, angry, subversive state of mind while I was making it. People told me it looked like a jester’s garment, a harlequin, happy, joyful, fun, a day-brightener. Well, OK… I won’t turn that down! But how did that happen? There actually are a lot of dark colors and murky color combinations that perversely made the bright colors brighter. Is my attraction to brilliant color so strong that I can’t do dull even when I try? But here’s a theory that I like better. It’s that the process of making something with one’s hands, of planning it, calculating it, working out the problems, has the power to change the energy from negative to positive, from anger and tragedy to the other side of the theatrical mask– the jester’s grin.


You are the Rainbow Lady! lovely work Abby!
LikeLike
Thank you, Cynthia!
LikeLike
I love your dress! Your determination paired with your imagination always leaves me gobsmacked. Maybe you can be at the front of the line for the Revolution in which we redeem civility, empathy, graciousness, and inclusion back into our society. Yo go gal!
LikeLike
Wow, thank you so much! But revolutions aren’t something one politely waits in line for!
LikeLike
Love the dress, love the details about all the calculations, and love seeing photos that I recognize (porch table)!
LikeLike
Thank you, Laura! We had some nice times sitting at that table, didn’t we!
LikeLike
I love the detail you provide. Your colors inspire me. I bet you get a lot of looks and a lot of compliments! Well done!
LikeLike
Thanks so much!
LikeLike