
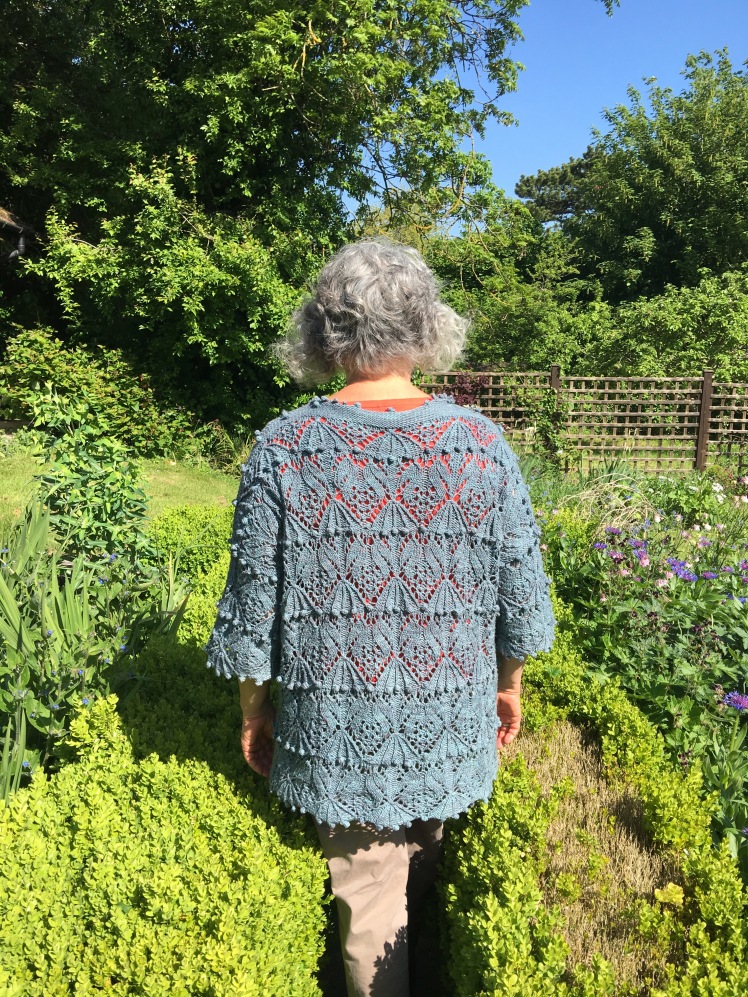
When I first started thinking about how I might blog about making the Slouching Towards Japan pullover, I thought this would be a very short post. After all, I had already blogged about making the swatch using pattern number 146 in The Japanese Knitting Stitch Bible, and I had already raved about the book as God’s gift to knitters, so what more is there to say, other than that the resulting pullover is a big, circularly-knit tube for the body that separates into back-and-forth knitting for the sleeve placement, and two smaller tubes for the arms, with a slight slope to shape the shoulders? But some of my friends seemed very interested in specific instructions to make this design, and I promised I would provide that.

I’ve been making a lot of boxy shapes lately, something I’ve avoided since the ’90’s, but I guess 20-30 years is the typical time span it takes for an old fashion to become trendy again. There’s an important difference between the oversized boxy clothing of the 1980’s and the updated version, and that’s shoulder shaping. The square shapes I used to make during my first knitting era (1983-1998) were a right angle from the side edge of the dropped shoulder to the neck, which caused a lot of excess fabric to bunch up unattractively under the armpit. The solution is a gentle slope from shoulder seam to neck made by doing a short row every inch or so, depending on the shape of the wearer’s shoulder, and the result is the relaxed shape one wants in a boxy, oversized garment without the unflattering frumpiness that characterized most of my knitting back in the day. Come to think of it, there’s another important difference between the boxes of yore and the current oversized shapes: ribbing, and its absence. I used to put ribbing on the bottom edge of almost every garment I made back in the 80’s and 90’s, because that’s what people did back then without even thinking about it, and then I’d wonder why my garments looked like boxes. Well, that’s what ribbing does, at least that’s what the ribbings of that time did. It makes clothing look like boxes rather than letting it follow the lines of the body. Now I generally stay away from ribbing in favor of hem treatments that are kinder to the wearer’s shape.

So the square shape of my pullover is essentially a piece of paper given to a kindergartner and the stitch pattern is a box of crayons, and I’m the kindergartner scribbling away with my crayons on my piece of paper. My job is to make the size of the piece of paper compatible with the numbers of the stitch pattern and compatible with the way I want the garment to fit my body, and then I’m just filling in the space with the stitch pattern.
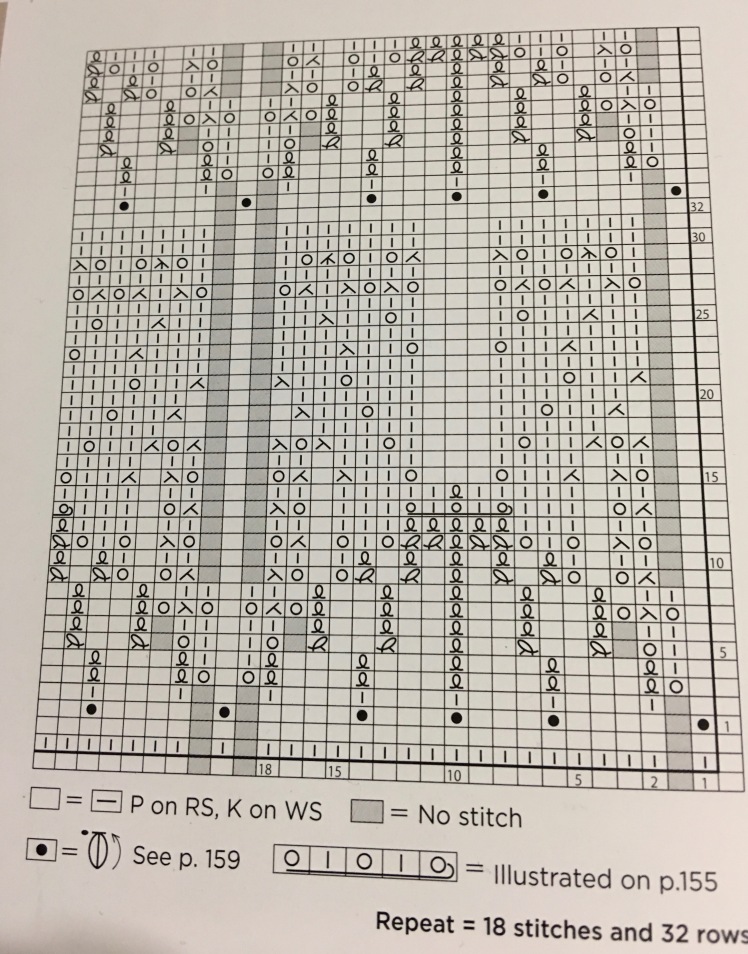
As a generalization, Japanese stitch patterns have a frilly, froufrou look. They often take elements of Bavarian knitting and add a bunch of yarnovers, or don’t, and turn the stitch combinations into designs with a very architectural vertical direction. Delicate is a good word for them. Forgive me for being stereotypical, but there are a lot of shapes in Japanese textural knitting that suggest pagodas to me. I’m on shaky ground when it comes to generalizing about Japanese designers and the cultural framework that influences their distinctive style, since Hitomi Shida is the only one I specifically know, being unable to read the Japanese text of the other Japanese knitting books that I own, and because I have not studied or visited Japan. The most accurate thing I can say is that Hitomi Shida’s designs combine elements from other knitting traditions, particularly Germany’s, to produce designs that are distinctly not European. The stitch pattern I used to fill the space of my boxy shape has a lot going on, which is typical of Shida’s patterns: a scalloped bottom edge, bobbles, textural lines converging in a sheaf of leaves, and a zigzag border of yarnovers and right- and left-leaning decreases. Knitting the parts of the design was confusing to me until I understood how the parts serve the whole (which is typical of my learning style), but once I understood the entire structure, knitting the pattern was fun and relaxing.

Since my goal was a relaxed, oversized pullover in which the complex stitch pattern did all the talking, all I needed was the numbers. That was easy. My swatch of 37 stitches (two 18-stitch motifs, one edge stitch) was 7 inches wide, and the 32 rows per pattern repeat came to 4 inches long. I needed at least 10 inches of ease for the relaxed fit I was seeking, so the garment would be 46 to 52 inches around, and I needed an even number of motifs because an odd number of motifs would unbalance the garment. I got the numbers I needed from 14 motifs, seven front, seven back, that is, 252 stitches. I wanted the garment to be tunic length, about 24 inches for my not-tall body. That meant five and a half motifs, which required me to end the final repeat at the halfway point of the stitch pattern chart where the partial motif wouldn’t look like an interrupted senten…
Every time I had to make a decision about the shaping and construction of this garment, I went for the absolute simplest option. Question: How to shape the sleeves? Answer: Don’t. Make simple tubes, four motifs around, two motifs long, for a three-quarters length sleeve. Question: How to fit the shoulder shaping into the stitch pattern: Answer: Don’t. Work short-rows at 9-stitch intervals in reverse stockinette and conceal the basic wrap-and-turns with bobbles. Question: How to work the neck shaping into the stitch pattern? Answer: Don’t. Do the neck shaping in the center of the reverse-stockinette wedge formed by the shoulder shaping. That is to say, all of the stitch patterning was done in simple unshaped tubes and rectangles.
As for the positioning of the sleeves into the side, I was pretty sure it would need to be done somewhere during the fourth pattern repeat of the body, at which point I would stop working in the round and start working back and forth for the front and back to create the edge onto which the sleeve tube would be grafted. So I stopped working on the body at the halfway point of the fourth pattern repeat and knitted the sleeves, which were four pattern repeats around for a circumference of 14 inches (72 stitches) and two pattern repeats long (64 rows), plus the first two rows of the pattern. The sleeve ends with the line of bobbles that starts the pattern repeat, then row 2, and then another round of plain reverse stockinette before binding off (total of 67 rows). I turned my completed sleeves sideways and put the edge of the sleeve up against the pattern repeats of the body to determine where exactly I would start the back-and-forth knitting that would give me the side edges where I would seam the sleeves and give me the garment length I wanted. The turning point was row 24.
After knitting row 23 on the pattern-facing side, I turned the work and knitted it on the wrong side, adding an edge stitch to complete the pattern repeat of the seventh motif repeat. Then I proceeded to knit the remaining eight rows of the 32-rows pattern, another 32 rows for the full pattern, and up to row 14, which is the row after the one in which the five twisted-stitch lines converge and are bound together in what the book calls a knot with three yarnovers. That operation is accomplished by slipping the middle stitch of the five converging lines over the first of the five stitches, then slipping the fourth stitch over the two stitches, then doing the same with the fifth, and yarnover, knit, yarnover, knit, yarnover. (The explanation, with photographs, is on page 155. If you’re interested enough to make my design, you really should have the book, which is easy to get on Amazon and is surprisingly inexpensive.)
Then the short-row shoulder shaping: Looking at the chart of the stitch pattern, the wraps-and-turns are positioned on the stitch adjacent to stitches 1 and 10, which are the edge and center stitches of the pattern, and bobbles are worked on stitches 1 and 10. (The bobbles are made with a crochet hook. Stick the hook into the stitch, pull up five loops, pull another loop through the five loops, and finish off the bobble by sticking the hook into the stitch below, pulling up another loop, and dragging it through the loop that’s already on the hook.) I did my W&T’s on the side of the bobble closer to the side seam of the shoulder I was working on, that is, if I was working on the right shoulder, the W&T’s were to the right of the bobble, on stitches 18 and 9, and if I was working on the left shoulder, the W&T’s were on stitches 2 and 11. The bobbles serve to disguise the wrapping of the short rows. Basic wrap-and-turn is not usually the most invisible of the short row methods, but it is the simplest, and putting a bobble right next to it makes it nearly undetectable.

So you’re working the back and you have finished row 13, where the five twisted stitch lines converge and are wrapped together for the knot with three yarnovers, and then you do row 14. Now you’re about to do your first short row on the left shoulder. With right side facing, purl across the work to the center stitch of the final pattern repeat of the row (stitch 10), make a bobble, and wrap and turn the stitch next to it (stitch 11). With wrong side facing, knit across the back to the center stitch of the final pattern repeat on the right shoulder (stitch 10), wrap and turn the next stitch (stitch 9), and make a bobble on stitch 10 now that you’re purling on the right side. Then you purl back to the left shoulder nine stitches away from your previous bobble and make a bobble on stitch 1, and W&T the neighboring stitch (stitch 2). With wrong side facing, knit back to nine stitches from the previous W&T, wrap and turn, make the bobble on the right side, and carry on in this manner until you have five sets of short rows, then knit across the wrong side to the shoulder seam, turn to the right side and purl to the neck stitches and make bobbles on stitches 1 and 10 of each pattern repeat, and purl across to the side edge of the left shoulder. Turn the work, knit to the neck stitches and bind them off until you get to the other shoulder and knit to the end of the row, covering all of the short rows with a row of reverse stockinette. Save the shoulder stitches on a spare needle until the front is done, when you’ll do a 3-needle bind-off.

To make the front, do what you did for the back, up to and including row 14 of the sixth pattern repeat of the body, then purl across the front to the first stitch of the center repeat (the fourth), knit a bobble, bind off the next nine stitches, make a bobble, and keep on binding off all of the stitches of that center motif. When the neck shaping is complete, the base will be the center motif and the shaping will use up half the stitches of the neighboring motifs, left and right. After you have bound off the base of the neck, make a bobble and continue purling until you get to the last nine stitches of the row. Wrap and turn, make a bobble in the next stitch, knit back to the edge of the neck, bind off two, turn and purl to the next set of eight stitches for the short row. Wrap and turn, make the bobble, knit back to the neck edge, and bind off two. This time when you turn the work for the knit row, make a bobble right next to the stitches you bound off on the neck edge, then repeat this procedure until you have five sets of short rows, a third bobble on the neck edge, and no more neck stitches to get rid of. That should put you on the right side when you turn the work for a final row of reverse stockinette, but if I’m wrong, or you’re not on the right side, don’t panic and don’t kill me for my lack of clarity, just do that final row of reverse stockinette until the end of the row, whether the direction of your work has you doing knit or purl. You can do the 3-needle bind-off now to join the completed shoulder with its counterpart on the back, or you can wait until you have finished the other side and do them both in quick succession. Your choice.
For the other front shoulder, you can replicate this procedure by turning the work to the wrong side and attaching the yarn at the neck edge. Then knit across to the final nine, wrap and turn, make the bobble, and carry on as described above. Just keep the big picture in mind: Wrap and turn at 9-stitch intervals, bobbles on the first and ninth stitches of the motif, 2-stitch bind-offs at the neck, bobbles at the edge of the neck every other short-row sequence, and reverse stockinette on the facing side. I’m reverse-engineering what I did since I didn’t take notes as I was doing it, and I don’t have test knitters, so there may be some inexactness in these verbal instructions. If you keep the big picture in mind, you can roll with whatever imprecision might exist in my instructions. These are words to live by when knitting any pattern written by anyone.
The final step is the decorative picot edging around the neck. First I picked up 84 stitches around the neck. My neckline is quite loose; I could have picked up a dozen fewer stitches and it would have been comfortable. I don’t recommend picking up more than 84 stitches. Anyway, there’s nothing sacred about the precise number of stitches one picks up as long as it gives you the fit you like. For the picot bind-off, knit the first two stitches and bind off one. Put the remaining stitch back onto the left needle and cast on three stitches by knitting into that stitch, then the newly created stitch, and the next newly created stitch. Bind off five stitches, that is, the three newly created stitches, the one that was returned to the left needle, and the next one after that.

So that was my procedure for making my Slouching Towards Japan pullover. I knitted mine in Wollmeise DK in the Mont Blanc colorway on U.S. size 4 needles, which is a relatively small needle size since I’m quite a loose knitter. The finished weight of my sweater is 628 grams, which equates to exactly three skeins of Wollmeise DK, but it would be prudent to have a fourth skein available. Its dimensions, after about a month of wear, are 50.5 inches around, 25.5 inches from the point where the neck meets the shoulder to the hem, 10 inches from one edge of the neck to the other, 16 inches from the underarm to the hem, 14 inches for the circumference of the sleeve, and 8.5 inches for the length of the sleeve. It’s a size that will fit a lot of people, but the design is easily adjustable by adding or subtracting even numbers of the stitch pattern to the circumference of the body and adding as many pattern repeats to the sleeves as you want, and making it longer or shorter by adding or subtracting full or partial lengthwise pattern repeats. Basically, this is a square that can be made as wide or narrow, long or short, as one wishes. Just retain the short-row shaping at the shoulders, done at intervals of half of the pattern repeat.
I had been thinking about writing these instructions as a conventional pattern with stitch and row numbers and symbols and abbreviations and charts, but these are things that I don’t like doing and don’t do well. If I someday find myself working with a tech editor, I will delegate these tasks. What I want to communicate is the big picture and the reasons for the numbers and abbreviations, because that’s what makes sense to me. As for the charts that decode the standard symbols that are used in Japanese knitting, they are beautifully translated and illustrated in the Japanese Knitting Stitch Bible, and are widely available in abbreviated form on the internet here and a whole lot of other places. Other people have already done this stuff a lot better than I can do it; hopefully my holistic approach to design has something to offer as well.


Fabulous. That book is going on my wishlist, that’s for sure.
LikeLike
It belongs in every serious knitter’s library!
LikeLike
What a fantastic tunic. Congratulations.
LikeLike
Thanks so much!
LikeLike
Your work amazes me every time I see it and your incredible posts with the – as you so aptly call it – exposure of the interior of your brain – I find mind boggling for my own brain! Thanks again and again!
LikeLike
Thank you so much, Margie!
LikeLike