
I’m just back from my annual long weekend at a holiday house in the UK with my friends from the Ravelry group The Sisters of the Glorious Wollmeise, and my jet-lagged synapses have recovered enough for me to start stringing words together to talk about what I did and learned there. These long weekends at holiday houses in the British countryside are very social occasions, and it’s possible that a bit of alcohol might be consumed there, but I will spare my readers the Bacchanalian details in favor of a report on the ideas I brought home from dedicated knitters from the UK, Norway, USA, and Germany.


To my joy, the person who inspired me to break out of everything comfortable for me and learn machine knitting joined us this year! That is Rachel Brooks, who is a personage in the machine knitting subculture. Rachel came to the 2016 get-together with one of her knitting machines and showed me how machine knitting could fit into a hand-knitter’s aesthetic, and she guided and comforted me during my rocky initial start and encouraged me when I started making things, and this year she again brought a machine in order to show me her current explorations and help me with things I’ve been having trouble with. Unlike most machine knitters (or hand knitters, for that matter), Rachel falls into the extreme end of the process knitter category, as opposed to being a product knitter. Making garments is less interesting to her than experimenting with techniques and producing beautiful and ingenious fabrics, and she had some stunners.


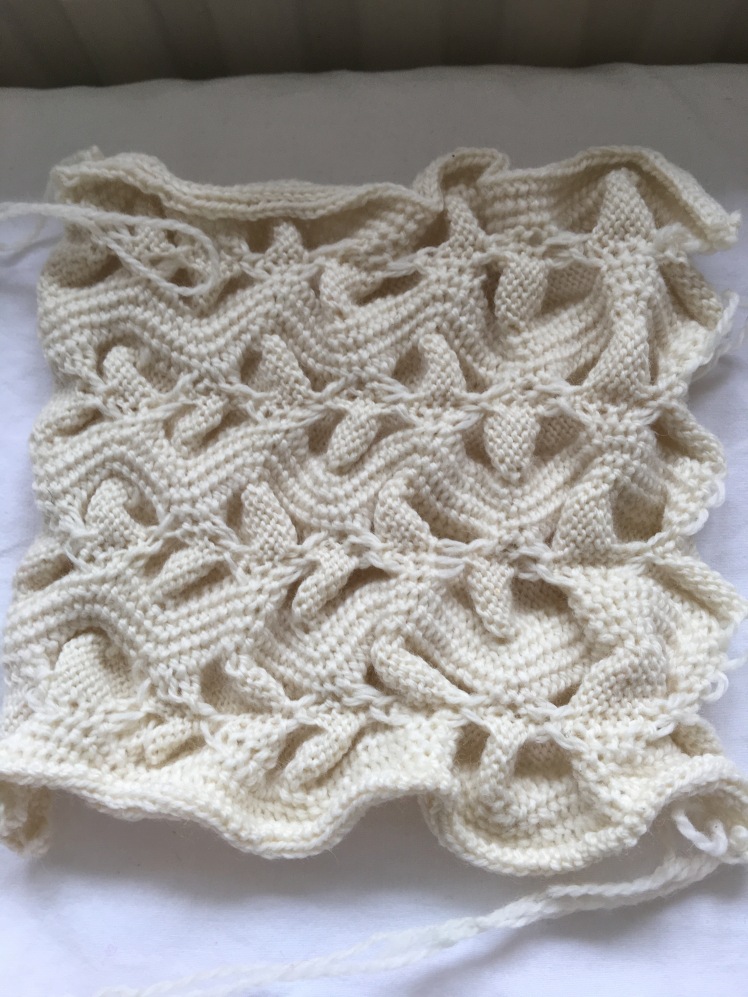

Rachel’s swatches were based on two things she wanted to expose me to, a book and a gadget. The book was Dimensional Tuck Knitting: An Innovative Technique for Creating Surface Design, by Tracy Purtscher, which is intended for hand-knitters but whose ideas Rachel has adapted for machine knitting. The book details a technique that has the knitter knitting purl stitches at specific places in the fabric that mark where he/she will pick up the stitch a few rows later in order to produce welts that resemble cables. I’ll do cabling when I feel very motivated, but it’s not a technique I usually enjoy. However, I am very intrigued by tucks and welts, especially if they don’t have to be made with a cable needle that always goes missing when I need it. Rachel demonstrated a couple of methods on the knitting machine to demarcate the stitches that would be picked up to make the welts, like placing a short length of a contrasting color into the designated needle in order to remove it from the work later, or putting the needle into hold position so that the yarn would pass over the latch of the needle and not be knitted. There’s a lot more to what Rachel did, but it required punch cards that she didn’t have with her, and it went over my head because I don’t have a punch card machine and haven’t yet gotten into the equivalent on my electronic machine… not to mention the fact that I was seriously jet lagged and didn’t have the mental wherewithal to understand much of anything about anything. The book is on its way to me now, and I’ll use it in hand knitting.
The gadget that Rachel demonstrated was a garter bar, an ingenious little device I didn’t know I needed until Rachel showed me what it could do. She uses it for inventive, virtuosic texture work that is way beyond my current capabilities, but I could use it at my current skill level for the rolled hems that I like so much. She showed me how to fit the garter bar stopper onto the needle bed and then how to put the piece with the holes for the needles into the needle latches, making sure that the piece is facing the right way, and then safely and smoothly she pushed the stitches onto the bar, flipped it around, and returned the stitches, stockinette side facing, back onto the machine. It looked so logical and natural that I was instantly smitten, and one of the first things I did when I got home from England was to order my own garter bar. Of course there’s a lot more to it whose details I’ll never sort out until I go through my usual mistake cycle. To facilitate the learning curve, Rachel is advising me to get Susan Guagliumi’s Craftsy class Special Techniques for Machine Knitting: Color and Texture, which she says was the only visual aid that gave her the detail she needed to master the procedure.

Rachel also helped me sort out a few basic things I was having trouble with, things that are so basic that the videos assume everyone knows them and won’t insult one’s intelligence by explaining them. So I’m a little embarrassed to admit publicly that I’ve been having trouble pulling out waste yarn from my knitting after getting the stitches onto the needles. In the last couple of rows, the yarn gets wound around and tangled up in the needles, and it takes a long time to detangle and to repair the stitches that inevitably get dropped in the process. Rachel had me show her what I’ve been doing, which is to lay the waste yarn over the needles when I stick the transfer tool into the stitches to put them into the latches. Aha! There’s the problem. I should have been folding the waste yarn under the loops of the live stitches I wanted to put onto the latches, with stockinette sides pinched together while I transfer the loops to the needles. Ta-da, it’s fast, I don’t split stitches, or drop them, or miss a needle. Rachel stopped me from pulling out the waste yarn as soon as I got the live stitches onto the needles, because she was going to address another of my problems.
That was the fact that occasionally stitches on the first layer of my seams have been jumping off their needle or failing to knit. I was wondering if that could be a signal that it’s time to replace my sponge bar, or if I was doing something to cause that to happen. She had me hang another piece of knitting on top of the stitches I had just hung from the waste yarn, and then walked me through a seaming method that threw several time-consuming steps of my usual method right out the window. The seaming method I had learned from videos on the internet had me hanging my first layer of stitches onto the needles, pushing them behind the latches, hanging the second layer of stitches inside the latches, then pushing the second layer of stitches through the stitches of the first layer, very, very carefully, because this is where I tend to lose my stitches. But Rachel had me push the needles all the way out and slap the second layer onto the needles and push those stitches behind the latches, weight the second layer, then loosen the tension and knit slowly across. Rachel told me to knit a few rows on top of my seam to create a rolled edging that I found very decorative, and then she showed me a refinement of the familiar transfer tool bind-off that had the bind-off thread going around the gate pegs for more elasticity. As for why my stitches occasionally jump off their needles, it might have to do with the complicated seaming method I’ve been using, but it may also be time to change the sponge bar, so the answer is C, all of the above. Then we pulled out the waste yarn, and when we got to the seam, we unraveled the waste yarn with a seam ripper. No lost stitches. It was a lot more efficient.

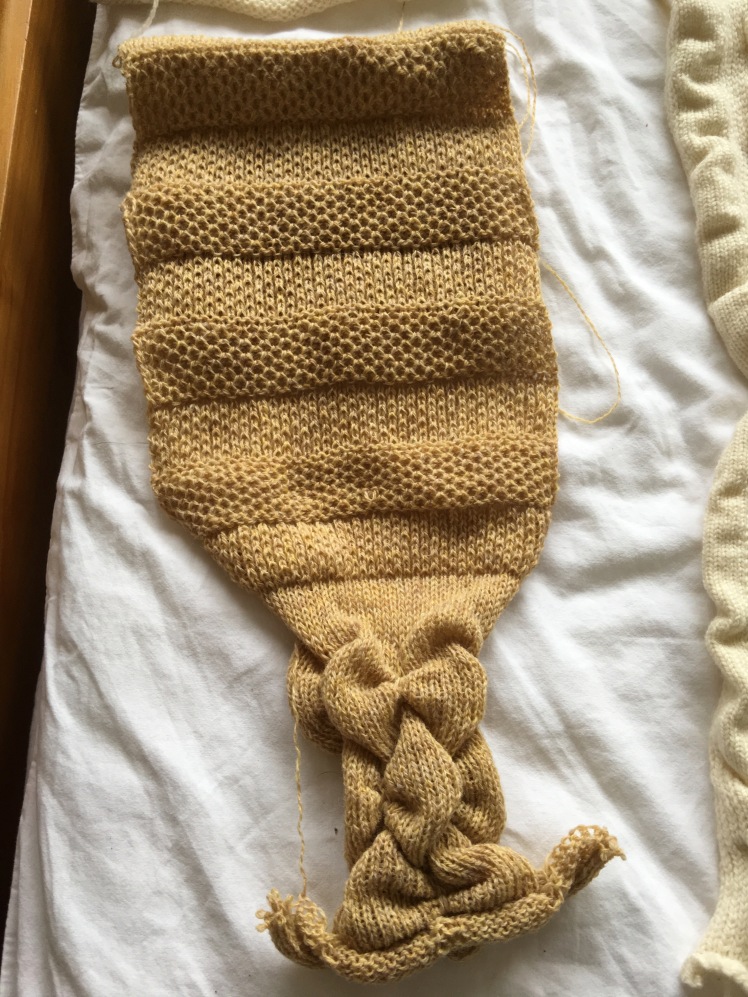
The last thing Rachel had me do was to knit sock blanks on the knitting machine. This was in preparation for the second half of our stay in the UK at the home of my Wollmeise Sister Gwen, near Oxford, and we had a big day of natural dyeing planned that was to include cochineal, which produces vivid pinks and reds, and is very quickly absorbed by the yarn, especially by Wollmeise. Gwen warned that tightly bound hanks could produce bright white resist marks at the places where the yarn was tied up, so Rachel’s solution was sock blanks. She had me pull out every other needle between 40 left and right, and e-wrap those needles for the cast-on. For the next five to ten rows, I pulled the needles back out after every pass of the carriage until the knitting was well established, attached weights, and merrily knitted away until I had 1- and 2-ounce sock blanks that would accept dye evenly, not tangle, and will unravel easily when it’s time to wind them into cakes. It’s also easier to make blanks than to try to wind hanks on my rickety umbrella swift. Many thanks to Rachel for sharing her knowledge with me! The skills she taught me are far better souvenirs of this trip than anything I can buy in a store.

Other notable details of the weekend get-together:
- Guro, from Norway, demonstrated how to stabilize a steek by crocheting the right leg of the center steek stitch together with the adjacent leg of the neighboring stitch to the right, and doing the same on the left side before cutting the steek in the horizontal bar that connects the right and left legs of that center stitch.
- Irene, from Michigan, advised me based on her experience as a quilter that I should use wool roving or batting rather than polyester fiber fill to stuff the eyes and noses of my wall hanging of 3-dimensional faces, because wool won’t bleed through the stitches as polyester fill will.
- I also spent a bit of time looking at a copy of The Joy of Color: Fair Isle Knitting Your Way by Janine Bajus. What attracted me wasn’t primarily the content, which at a glance seems very worthy of study, but the way the book is organized and how it presents the author’s thinking as a consumable product. I have a vague idea that there might be a book in me once I finally define what my consumable product is and how to present it, and this book looks as if it might serve as a model to help me define my niche and message. What I do know is that I’m not setting myself up as a color guru. This book and others do that quite nicely, and I’m too intuitive in my color use to be much help to those who are not intuitive.


After the weekend was over, Gwen took us to her home in the village of Blewbury, a verdant and watery place whose scenery is straight out of the illustrations of Kenneth Grahame’s Wind in the Willows, which is appropriate since it was Grahame’s home town. Gwen took Charles and me out to walk her excitable but sweet little dog Dixie and to collect hawthorn blossoms that then were at their peak. Hawthorn blossoms are white, but they dye a range of shades from yellow to orange to brown. Last year Gwen got a bright orange, but it stayed in the bath a bit long and turned an orange-brown, very much like avocado. Gwen gave me that yarn, to my delight. We made a bath of the blossoms, and my yarn started off an orangey-yellow and then became an ochre.


The weather was perfect that day and the next, when our Ravelry friend Liz Baltecz was coming from London to spend the day with Gwen and me dyeing with madder, indigo, and cochineal, while Charles spent the day sightseeing in Oxford. I am providing Liz’s last name because she is in the process of a career change to become a teacher of natural dyeing and knitting, and is exploring how to produce and market her own line of natural-dyed yarn. If anyone has a chance to take her workshops on any of her areas of great expertise– natural dyeing, the use of color, intarsia, stacked stitch patterns, etc.– do not miss the opportunity!

Dyeing with madder, indigo, and cochineal was a completely new experience for me, because I have some self-imposed restrictions on the kinds of materials I’ll dye with: basically, only plants I find on public land, or rescue from the trash bin, or am given by gardeners. Dyeing with invasive plants is my favorite thing. I love the idea of finding the inner secrets of local plants and turning unwanted or overlooked plants into colored yarn, and if the colors are pale and quiet, I enjoy the challenge of designing combinations that play up their nuances. But when I travel, I want to experience a new take on familiar things, or have an altogether unfamiliar experience. Liz is all about the colors: her mission is to show people that natural colors do not have to be dingy and subdued, and the colors she produces and the way she uses them are so thrilling that I’ve been seriously reconsidering my philosophy. So I gladly followed Liz wherever she wanted to take us.

I can’t report very much detail about how to mix up the preparations for the indigo, madder, and cochineal, since Liz and Gwen did those things while I was off winding yarn, and I was the passive beneficiary of their efforts. If I eventually decide that I want to make my own baths using purchased preparations of these dyestuffs, I’ll end up using the instructions on the Wild Colours website, which I think is the source of the procedures they used, as well as the source of the dyestuffs themselves. The indigo dye bath required a lot of tender treatment because there are many ways to make indigo go very wrong. Liz showed me how to mix the paste into the bath without introducing air bubbles into the vat, which will neutralize the indigo. The temperature needed to be kept around 50º C, so we kept adding cups of hot water from a boiling kettle in order to maintain the correct temperature, but the water had to be added very carefully by lowering the cup into the vat and upending it under the surface of the dye without splashing. The yarn couldn’t just be plopped into the bath– it had to be pushed slowly down the wall of the vat under the surface of the liquid, then gently swished along the floor of the vat for some timed number of minutes, two minutes, five minutes, 10 minutes. I got a gorgeous dark blue by putting my skein in for two separate immersions for five or 10 minutes each. We did a lot of dyeing with that bath, probably about a kilo of yarn. Maybe two.


As for my own personal results, I got some nuanced deep blues by overdyeing a couple of muddy pinkish/orange-ish hanks that I dyed last fall with amaranth that was past its prime, overdyed on something yellow like mushrooms or goldenrod in hopes of getting orange. The indigo rescued those colors. Liz brought some dried weld, which dyes brilliant yellow, and I quickly dyed several hanks in the weld and put a couple of those yellow hanks into the indigo bath for a few minutes, one for a few minutes more than the other, and got two nice shades of green. By then the indigo bath was starting to lose its potency after having served long and well. Then we turned to Gwen’s madder bath. I put in a large, undyed hank while the bath was at its maximum potency, and kept it in there until it was as saturated with color as it could get, a deep brick red. I got a couple of shades of orange from overdyeing yellow yarn, although one of those hanks might have been a dead-amaranth overdye. I can’t remember because I failed to make a note. Bad dyer! After I got home to Baltimore, I did what Liz instructed me to do with my yarn and swished the indigo hanks in water and vinegar, then washed it in pH-neutral detergent and a lot of water. The instructions for the madder hanks were to cook it in water for an hour in water between 60º and 70º C, definitely not hotter than 70º C because excessive heat will turn the colors brown. There are still bits of madder grit in my yarn. Maybe I’ll put it through another steamy (not bubbling) water bath.
Gwen, perfect hostess that she was, made me a little cochineal bath that got me some lovely deep salmon pinks. I used an undyed sock blank, a weld-dyed yellow sock blank, and a dead-amaranth overdyed hank, and the yarn sucked up the dye so thoroughly that there really wasn’t a lot of difference among the three. One of our friends had also given us a bag of eucalyptus leaves from a tree near her house in London (thanks, Monica!), and I kept one of my undyed hanks in the bath for about 24 hours until it turned a deep ochre. It’s not Monica’s favorite color, but I love it.

This was what knitting tourism is supposed to be: an exposure to materials, ideas, methods, experiences, and real-life, face-to-face friends. I’m back home and mostly over my jet lag, and I’m thinking about how much easier my next machine-knit sweater is going to be now that I have better methods for using waste yarn, hanging stitches, making seams, and binding off. I will have more design elements in my bag of tricks once I learn how to use my garter stitch, and Rachel has shown me that it probably won’t be that hard to learn it. My plant dyeing is going to be easier because I know how to make sock blanks in the same amount of time it took to wind the yarn on my swift. There might be some exceptions to the purism of my dyeing philosophy as well. I still have a fantasy that a reader in the United States will contact me to offer me invasive woad that they’ve been yanking out of the ground and throwing away, but if that never happens, commercially packaged indigo is just a click away should I wish to customize my greens and blues with deeper and more permanent shades than I can get with the freebie plants currently at my disposal. Same with madder. I could grow my own, but it takes three years before the roots are ready to be processed for dyeing, and I really don’t like gardening. I’m also trying to make up my mind about cochineal, because creatures had to die in order for me to dye. But cochineal is gorgeous stuff, and if I were a gardener, I’d be perfectly OK with bugs having to die in order for me to get pinks. So many things to think over. And that’s the good thing about coming home: time to sort out all the new ideas I got when I was away.

Great post Abby I am glad that the Eucalyptus leaves gave you a colour you liked but you are right I think it is eurgh!
LikeLike
It’s pretty clear what colors you like!
LikeLike
I’m following quietly from afar…this was a fascinating adventure!
LikeLike
Thanks, Nancy! I feel so fortunate to have the time, health, and resources to travel! And that I know such great people from meeting them online.
LikeLike
We did have fun😃
LikeLiked by 1 person
Great column – maybe I shouldn’t have given away my knitting machine ten years ago, but I would like a small one – you have inspired me!
LikeLike
I hope you find one that makes you happy!
LikeLike
Thanks for directing me to this post! Rachel’s swatches are amazing. One of these days I have to go to some conference and absorb all the machine knitting goodness.
LikeLike
Me too! There are a lot of creative people out there doing incredible things.
LikeLike
That’s an enviable vacation. Well done, all of you!
LikeLike
Thanks, it was pretty great!
LikeLike