
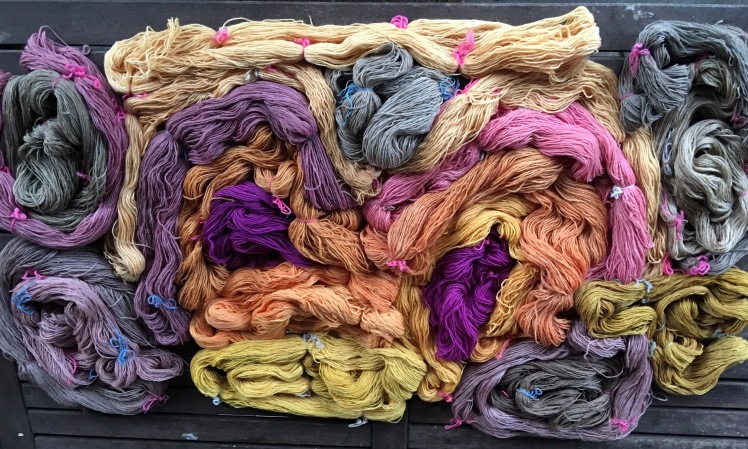
I have self-imposed rules for obtaining the plants I use for plant dyeing, which boil down to being a scavenger and using only plants that I find or am given or rescue from the garbage bin. I don’t pay for my dye materials or use materials that could be eaten. And then I broke my rule a few weeks ago because I was angry and bitter that a lovely load of amaranth I’d been given was ruined by drying it, which I had done carefully and purposely in hopes that drying it would would enable me to dye pretty pinks all winter long. I felt as if I was getting something back from the universe that had robbed me of my pinks, by going on Amazon and buying annatto seeds so that I could get the deep oranges that Johanna on my Ravelry group was getting. The annatto seeds started me off on the theme for my September dyeing: red, using red plant materials or trying to get dyed colors in the red range, oranges, pinks, purples, browns with overtones of red, orange, pink, or purple.
I read a blog post that the recommended ratio for annatto seed to wool was .5:1, but in that blogger’s opinion, that was excessive. So I weighed out the equivalent of .3:1, on the basis that I would want full strength for 2 ounces of yarn and would use the exhaust until it ran clear. I soaked the seeds overnight, then put my immersion blender in the soaking bowl and ground them up for a while until the mixture of seeds and water was a little like the consistency and color of a roasted red pepper soup puree. I put in an undyed 2-ounce hank of alum-mordanted superwash wool, and it almost instantly turned vivid orange, so I added two more 2-ounce hanks, one dyed yellow in goldenrod, as well as the hank that broke my heart by turning a dull light brown in dried amaranth. I left the hanks in the bath for 1-2 days, depending on how much color the hank was taking on, and then put the unrinsed hanks into a plastic bag to marinate for a couple of days before hanging them out to dry. I didn’t rinse them for about five days in hopes of “curing” the color in the hank. When I rinsed them, the orange bled like a stuck pig. I rinsed and rinsed and rinsed, and the bleeding lightened but the water never ran completely clear. What remained was not orange. I got some of the most beautiful yellows I’ve ever dyed, for which I thank the Fiber Goddess, but it wasn’t orange. The most orange hank I got was a previously undyed hank that stayed in the exhaust bath for four days, and it’s a beautiful sunny light orange.
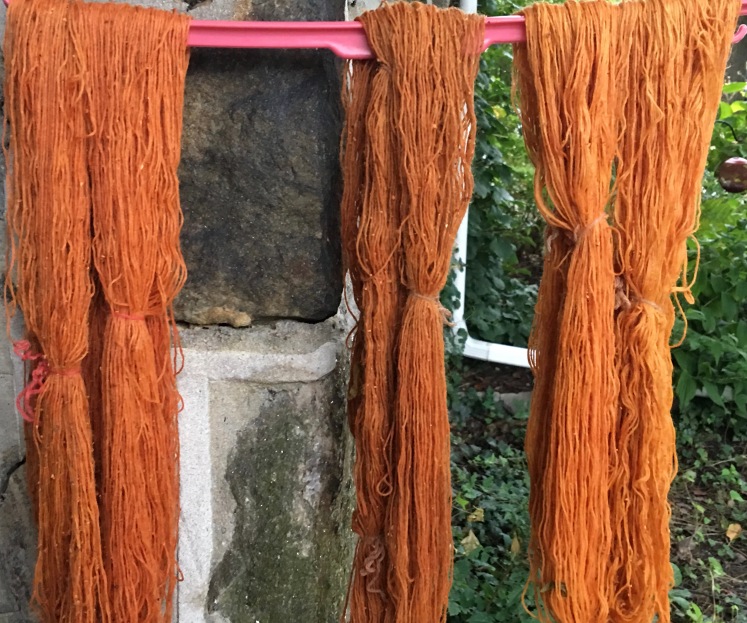

My conclusion is that the .3:1 ratio is insufficient for producing strong, true oranges, and Johanna confirms this. Also, the cooked annatto dye bath hemorrhages color, so the color of the yarn in the bath is not a good indication of the rinsed color. The color of the yarn in the dye bath needs to be very, very dark, and the yarn needs days and days in the bath. Of course I’m going to experiment more with this dye material. What would happen if I fermented my annatto dye baths instead of cooking them?
I learned about the fermented dye extraction method from a European textile artisan of my internet acquaintance, named Marylene Lynx, who has been using this method for some time and wrote a blog post detailing it. Fermented dyes have the advantage of not consuming cooking fuel in the preparation or requiring the wool to be mordanted. I’m pretty sure I’ve read that fermented dyes are often less prone to fading than cooked dyes and, when used with fruits and berries, the color is less fugitive, but now I can’t find where I read that. Back in the spring when the black mulberries were coating the sidewalks of Baltimore, I tried out the method but my baths molded, even though I thought I was following the instructions closely. Recently I joined the “Fermentation in Natural Dyeing” group on Facebook and learned what I’d been doing wrong, which was using tap water instead of distilled water, using dye vessels that weren’t airtight, putting the vessels outside on my porch in the warmth of a Baltimore May, and failing to cover the dye vessels with black plastic bags to keep out the light. That is to say, I did everything wrong.
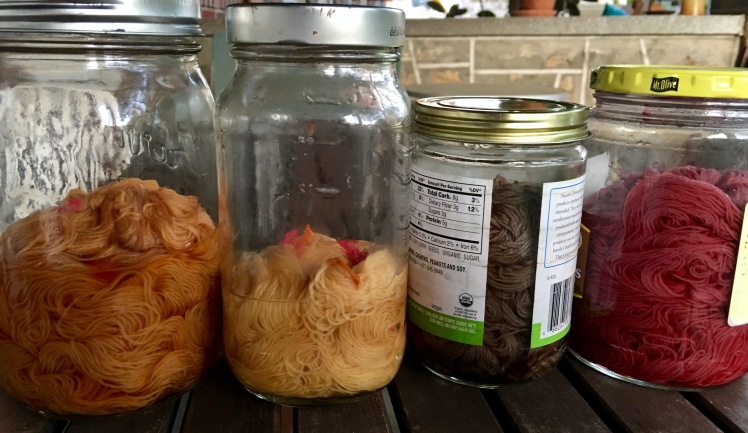
The method is pretty straightforward, in reality. I tried it out on red hibiscus blossoms, which I was foraging from the sidewalk during my walks. I stuffed the blossoms into a mason jar and poured distilled water into the jar without filling it so that there would be room for fermentation gases to be released without exploding the jar, and I sealed the jar and covered it with a black plastic bag. I shook the jar a few times a day and opened it in the morning and evening to let the gases out. The release of the gases made a “pfft” sound when I broke the airtight seal of the closed jar. We were having some warm weather, and it only took a couple of days for the hibiscus bath to ferment. When the jar was opened without emitting the “pfft” sound, the fermentation was complete. I sieved the plant material from the dye bath, which was gooey and gelatinous. Marylene’s instructions say to divide the bath into two and to make one half acidic, to pH 3 or thereabouts, and the other half alkaline, to about pH 9. I used lemon juice for my acidic bath, and the dye turned a pink-red. For the alkaline bath, I diluted baking soda in distilled water, which I added by the teaspoon, until it turned the dye a dark green. Then I added a hank of yarn to each bath and left them to soak up the color for a couple of days.

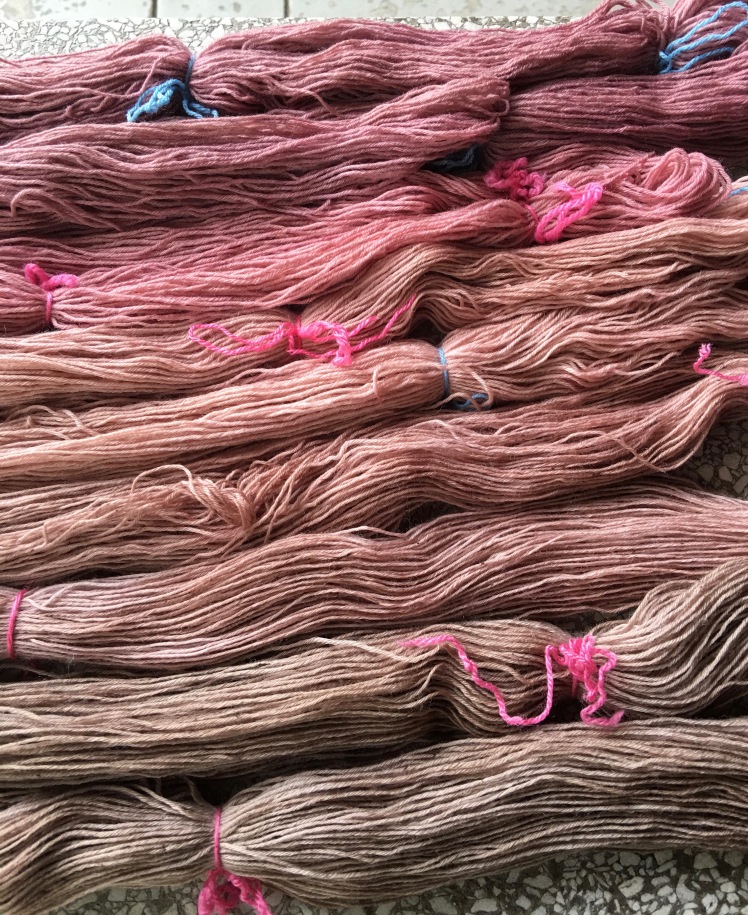
At the same time, I was continuing to pick up hibiscus blossoms from the sidewalk and filling my jars and plastic juice bottles with one fermentation bath after another. I didn’t attempt to replicate my results because I wanted as wide a range of hues and shades as I could get, but I did hope to get another color that was similar to my first acidic hank, which was a pretty soft purplish pink. I almost got it once, in fact it looked as if it was going to be a little brighter, a bit more reddish-pink. And then I got greedy, waiting for the color to get even better, and when I got up the next morning, the hank had turned brown. The dye had disintegrated overnight and dulled my pretty pink hank to pinkish brown. Temperature is an important factor in fermentation, and if there is bacteria in the bath, warmth and humidity will make it grow into mold, which will make the dye brown. Our weather was quite warm, and I kept an eagle eye on my baths to pluck out the first speck of mold on my fermenting hibiscus blossoms. I didn’t catch everything in time. Some of my baths gave me browns rather than the pinks and purples I wanted, although that may have been less because of molding and more because I experimented with not pH-modifying some of my baths in hopes that the resulting color would be the dark grape purple of the unmodified dye bath. Sadly, no. My favorite hanks were the ones to which I had added lemon juice and/or white vinegar to the bath as soon as I sieved out the remains of the blossoms.
As for the alkaline baths, the resulting greens initially appeared to be a green-tinged silvery gray, but they have turned out not to be stable. They faded to brown after they were rinsed and dried, so I put them into a dilution of ammonia to revive the green. It didn’t really work. They’re pretty much brown. They’re greenish in some lights.

Meanwhile, on my walks, I had found a little garden patch where the yellow cosmos were shedding orange petals on the sidewalk, so I scavenged as many of them as I could pick up and made a fermentation bath of them. The bath from this plant source was easier to handle than the hibiscus baths. The petals took longer to ferment, but the bath wasn’t slimy and viscous like the hibiscus and wasn’t prone to molding. When I stopped getting the “pfft” from my dye vessel (a plastic V-8 juice bottle, which I recommend because it is airtight while also being easy to open), I divided the bath into two jars, as Marylene instructs, one acidic and one alkaline. The pH modification for the hibiscus dye produced a 180 degree color wheel variation between the acidic and alkaline baths, from purple to greenish; but for the cosmos, adding diluted baking soda to the orange-colored dye deepened the color of the bath to amber, while adding lemon juice lightened it to yellow.
I got a simplified explanation of the chemistry at work from my usual source, Candy, on my Ravelry group. Alkaline modifiers pull a hydrogen atom from the dye it is reacting with, resulting in a negative charge, whereas acidic modifiers push a hydrogen atom onto the dye it is reacting with, for a positive charge. This changes the charge of the atom, which will move the color to one direction, depending on the charge affinity of that compound’s color components. Affinity means the degree to which a dyestuff accepts or rejects the charges. If a dyestuff is an acid reactor, it likes to have positive charges in the solution it is working in. That makes the dyestuff itself more positive because the acid will move negative charge from the dye to make the solution more neutral. A base will make the dye stuff more negative because it will move positive charge from the dyestuff to make the solution more neutral. Modifications to a dye solution’s pH will alter dye color by changing the way its molecules line up and affect the way light bounces in and out of the molecule. The degree of affinity will result in either a color shift, which moves the color to a nearby color on the color wheel, or a color change, which is a 180-degree change to the opposite color on the color wheel.
In the specific cases of my dyestuffs, hibiscus, without modifiers, is a dark purple bath. Because this particular dyestuff has relatively weaker charge on the acidic side, the color shifts to pink-purple when lemon juice is added. But there’s a great deal of charge on the alkaline side, and when baking soda or washing soda solution is added, even just a little bit of it, the color does a 180 and changes to green. As for the yellow cosmos, the bath is a strong yellow-orange. It’s somewhere in the middle, with respect to charge caused by either end of the pH range, so an acidic modification shifts to yellow and alkaline shifts the color to orange.
Marylene has used her fermentation method over and over, and every word of her instructions is the result of repeated experimentation, but there is one part of her method I haven’t been able to apply successfully, and I’m hoping she will get back to me with further guidance. After drying the dyed yarn, she advises deepening the color by putting the yarn from the alkaline bath into the acidic bath and vice versa and drying it again, and repeating the process if desired. I didn’t dare do that with my hibiscus dyes, because I couldn’t see how dipping an acidic pink/purple hank in dark green alkaline dye could result in anything but brown and I didn’t want to risk a color I liked, especially after I dipped my greenish alkaline hank in the acidic bath and it turned the dye greenish-brown. I thought I was on safer ground by alternating between the color-shifted baths of my yellow cosmos baths. I wasn’t. The alkaline exhaust bath dulled the bright yellow of my acidic hank, and the acidic exhaust bath instantaneously stripped the color from my gorgeous orange alkaline hank. I snatched it out of the bath before it could take every bit of color from the hank, but it was badly affected.
Why??? Marylene has used this method for years and years, and it works for her. There must be something in my materials and methods that produces such a disastrously different result for me, but I don’t know what it is. Maybe it’s my alkaline modifier. Marylene gives detailed instructions for making wood ash lye, but that requires a wood burner or fireplace that will produce ashes, and I don’t have that. According to Marylene, washing soda is an acceptable substitute, but I’ve had consistently bad experiences with washing soda, which in my hands produces a dark green Color of Death in the dye and washes everything out of my wool, leaving me with a heartbreaking weak yellowish tint. Maybe wood ash lye is the only alkaline modifier that works as Marylene intends? While I await clarification from Marylene, I will skip that part of her method. But wait! I just got back from a walk, which tends to raise my IQ by about 10 points, and during my walk I thought of a simple solution to my wood ash deficiency. There are at least three restaurants with wood-burning pizza ovens within a mile radius of my house. Wouldn’t you think at least one of them would have wood ashes to give me so that I can follow Marylene’s instructions for making wood ash lye and using it to replicate her tried-and-true methods?
As for my yellow cosmos hanks, I salvaged them by retrieving more yellow cosmos petals and making another dye bath. While I was picking the petals up off the sidewalk, a young woman came up to me and asked me if I was harvesting the seeds. I explained what I was doing, and found out that she was the gardener who had rescued that unloved bit of land to do something beautiful with it. She gave me permission to pick as many of the flowers as I wanted. I had already picked as many petals as I need for the task at hand, but I came back later and took her up on her offer. The baths that were made from only flower petals were more orange than the bath I made with the whole flower. The green parts added more yellow and a bit of green to the dye and gave me a slightly brownish orange.

In September, the pokeberries start to ripen in the places where I walk. Actually, the pokeberries ripen everywhere whether I walk there or not because they are an invasive weed that grows anywhere that’s not paved over in the eastern United States. They are tantalizing to plant dyers because the berries release a gorgeous magenta juice under the slightest pressure, but the rep on pokeberry as a dye material is that it’s a cruel hoax. It’s water soluble and will rinse right out when extracted through the simmer method. There are articles online that say that vinegar is a semi-effective mordant, but even still, don’t get too attached to that gorgeous fuchsia/magenta. I asked Candy whether fermentation could give pokeberry a bit more permanence. She speculated that alcohol might function as a carrier molecule for the dyestuff’s color molecules to attach the color to the wool, and noted that water is more polarized than alcohol, which could interfere in some way with the color bonding to the wool. She wasn’t definitive about whether fermentation would give me a colorfast dye from pokeberry, but I felt encouraged to try.
I used the same method for the pokeberry as I used for the hibiscus and the yellow cosmos: I stuffed my pokeberries into a spring-top jar (my favorite, because of the tight seal and ease of opening and closing), added distilled water a couple of inches short of the top, covered the jar with a black plastic bag, and shook the jar and opened it a couple of times a day until the “pfft” of gas release ceased and signaled that the fermentation was complete. That took about four days, because the weather was warm. I didn’t add sugar or anything else to the solution, it wasn’t needed. After the fermentation was complete, I divided the dye into two jars, adding lemon juice to one jar and dissolved baking soda into the other, but the pH of the dye was 1 and my modifiers didn’t change it. I liked the color as it was, so I didn’t keep adding modifier, since the big lesson I was learning from this exercise was to recognize when things were good and take them as they were. I put a 1-ounce hank of yarn in each jar, and the hanks quickly took on color, lots of color, the same color in each hank, an intense magenta, the most intense color I have ever dyed from plants. I kept the yarn in the dye for only one day, and the baths looked depleted when I removed the yarn.
Then I prepared for heartbreak: I cut a test strand from the hanks and rinsed them well under the faucet. And heartbreak didn’t come! The color stayed put! I let the hanks dry without rinsing them for a day, then rinsed them, and the water ran clear pretty much immediately. The colors haven’t faded as of now, six days on, which was plenty of time for my unstabilized cherry dye hanks to turn brown and gray. As for my fermented pokeberry-dyed hanks, so far so good, the color seems stable over the short term. And I’m hearing encouraging experiences from people on the fermentation dyeing group on Facebook who have used the same method I used to ferment pokeberry for dye. I will report back on its colorfastness with the passage of time.

So I’m very enthusiastic about the fermentation dye extraction method and am using it right now for some new vats I have going right now, marigold petals, dahlia petals, and more pokeberry. I will keep making the pokeberry dye until the last berry is gone for the year. For winter dyeing, after the fresh plants are gone, I’m wondering how it will work with annatto seeds and black beans, whose color tends to gray when extracted by soaking and cooking. Will fermenting black beans keep the color bluer for longer? I also went over to the pizza restaurant nearest me yesterday evening and came away a few minutes later with a big bag of wood ashes. Marylene specifies using rainwater to make the lye, and we haven’t had rain for 2 1/2 weeks, and I don’t have a rain barrel. Hopefully distilled water will suffice. When the season comes, I will try the fermentation method on mulberries that drop onto the sidewalk. I might even violate my rules next summer to see how perfectly edible cherries behave when their color is extracted through fermentation rather than cooking. I have plenty of dyeing questions to direct my future efforts. And plenty of pretty colors to knit and crochet!
There’s another, more profound reason for my interest in plant dyeing beyond producing the colors that I use to create artisanal objects. Plants are seasonal and come and go because of their time and place, and one must be aware of time and place in order to get their benefit, literally “gathering rosebuds while ye may.” The fact that this metaphor means living life to its fullest is no accident.

Thanks for this extensive write up on fermented dying, I haven’t tried this style of dying yet, but am keen to have a go with native flowers here on the East Coast of Australias
LikeLike
I like this method a lot, now that I have learned how to keep my baths from molding. Please let me know what your results are, now that spring is coming to your side of the planet.
LikeLike
I really enjoyed this entry. I don’t knit and I haven’t tried dying. But I think I might try dying porcupine quills for making beadwork jewelry, so I really appreciate your detailed and clear account of your experience. I love the pokeberry dyed wool. And I love the idea of “fugitive color.” What a great phrase!
LikeLike
Thanks, Nancy! I can’t claim credit for the term “fugitive color” in the context of plant dyeing. It’s a technical term.
LikeLike
I know this is an older post, but I wondered how the pokeberry dye has held up. I’m super eager to find a lasting poke recipe!
LikeLike
Well, I’m glad you asked. It faded. Not into nothingness, but that vivid purple is now a dusky rose. I used it in a couple of places in my recent Johanna’s Jacket. I’m told that more lasting colors can be gotten by fermenting the pokeberries in a 50/50 white vinegar and water dilution. I’m planning to play with some instructions I got from someone on my Ravelry group when the berries are ripe again.
LikeLike