
I had an idea for a dyed, machine-knit, and felted scarf with lots of lacy holes and ladders, but when I tried to make it real, the Fiber Goddess said no to every detail of my plan and instead gave me something entirely different and better. I might have taken that as a sign that persisting with the original idea might seriously offend the Fiber Goddess after she gave me the gift of a better result, but the idea wouldn’t go away. My rationalization was that the Fiber Goddess’s gift wasn’t just the tangible result but the opportunity to figure out a different approach that would bring me closer to what I had in mind. And I like to think that the Fiber Goddess and I are buddies… as long as I don’t push my luck too far.
In the interests of not pushing my luck, I went to the people who have knowledge as opposed to dumb luck, the members of my Ravelry group The Interior of My Brain. What I wanted to do was to machine-knit a scarf in white feltable single-ply yarn and intentionally put holes and ladders into the fabric, really destroy it, and drip dark blue acid dye on it, then felt it, with the intention of the final result occupying some interesting territory between the accidental and the intentional. The members of my group helped me to identify where my previous experiment had gone off the rails due to my failure to control how much it felted during the dyeing, and also in my failure to set the dye sufficiently. The trick was to figure out how to set the dye without felting the fabric in an unintended way.
The first task was to machine-knit the fabric, which was huge fun because I was liberated to do things to my fabric that would be disasters in any other project. I didn’t even get too upset when some bent teeth of my claw weights snagged my knitting, because the felting would turn the snags into holes, which I wanted. (But I still need to fix the claws so that they don’t keep eating my knitting.) I made holes and ladders wherever I wanted, and as I played with my transfer tools and pushed my needles out of working position and then in again to create holes of different widths, I started finding ways to create spines in my ladders and move them to the right and then to the left and zigzag them hither and yon. I widened the holes and narrowed them again, and eventually some of the holes and ladders stopped looking quite so accidental-on-purpose and started looking on-purpose. Knowing that the goal was to destroy my fabric gave me a stress-free way to experiment with a few of the tools and basic functions of my machine and use them to create shapes and designs in my fabric.

Previously I had felted my fabric before dyeing it, and then it felted more than I wanted it to during the dyeing, so my corrective plan was to dye my fabric without felting it, and then felt the dyed fabric exactly as much as I wanted to as the final step. My group members advised me to soak the fabric in citric acid as a mordant so that the dye would affix, apply the dye, wrap the dyed fabric in plastic wrap, and microwave the wrapped fabric repeatedly for short intervals until the dye stopped bleeding from the fabric. Then I could felt the scarf until it was the way I wanted it to be.
My scarf weighed 66 ounces, or 2.3 grams, so I dissolved about an eighth of a teaspoon of citric acid in some hot water and added that to a bowl of water at room temperature. I put the scarf into a colander and lowered it into the bowl to soak. After it was thoroughly saturated, I lifted the colander out of the bowl and let it drain. Very gingerly, I pressed down on the fabric so that some of the liquid could squeeze out of the colander, taking extreme care to minimize the amount the wool fibers were in close contact with each other, when they would be apt to grab hold of one another and felt without my permission. I spread a couple of plastic-coated disposable table cloths over the parapet of my front porch and laid my sopping wet wool scarf on top of the table cloths along the length of the parapet.
Then I put some water into a well washed French’s mustard squeeze bottle and mixed up some dye in a combination that I hoped would approximate navy blue. My group members told me to “dirty” some turquoise dye with a bit of black and smaller amounts of red and yellow. I did that, and shook the mixture in my squeeze bottle until I thought it was dissolved, then dripped the dye around and along the holes and ladders. It came out an inky blue-black and spread out onto the wet fabric in large bleeding trails and pools. It wasn’t quite what I had in mind, although I didn’t really have a very clear idea what I did have in mind. The effect was more diffuse and runny than I had intended, but since I didn’t know what to expect, I accepted it as information. A bit more yellow and turquoise went into the remaining dye because I thought it might be nice to have more color variation. I dripped bits of this second mixture around the first set of pools and splotches and trails so that it reminded me a little of astronomical bodies with lots of moons, or perhaps the footprints of some creature with a great many toes. I wanted to leave a lot of the fabric white, so I tried to restrain myself. I must not have been quite as diligent about shaking my dye mixture in the squeeze bottle until it dissolved, because the dye of the second mixture began separating into blues, purples, and greens as soon as it touched the fabric.
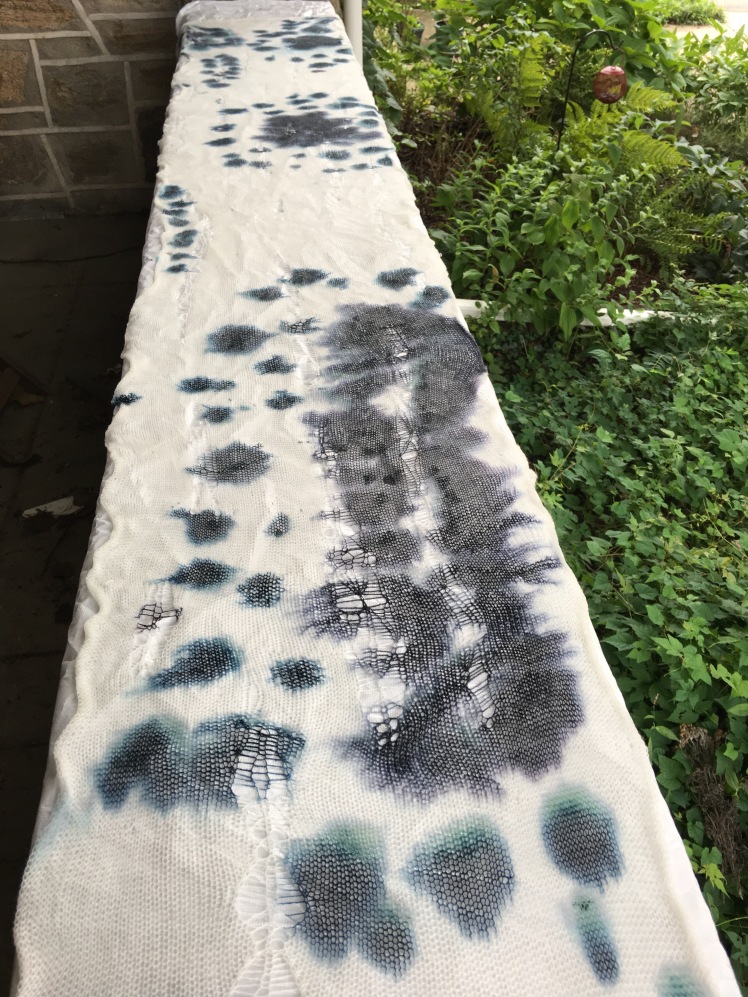
Originally I had planned to put plastic wrap all the way around each section of the scarf, but it was awkward to do that, and I discovered that I didn’t have enough plastic wrap even if I could have gotten it around front and back without folding the scarf in on itself. Besides, that would have been unnecessary, because all I needed was a layer of plastic separating the layers so that they didn’t bleed onto of each other. I laid out lengths of the wrap over horizontal sections of the scarf, then folded the scarf over, repeating until I had a package of alternating layers of fabric and plastic, and finally wrapped the entire package in what remained of my roll of plastic. Then it went into the microwave for multiple one-minute sessions, after which I pressed a bit of paper towel into the fabric, hoping it would come out without dye having bled onto it. It took many more sessions than I was expecting. Eventually I had the inspiration of letting the hot dye take a minute to be absorbed into the fabric between microwave sessions, and then my paper towel did come back un-bled-upon.

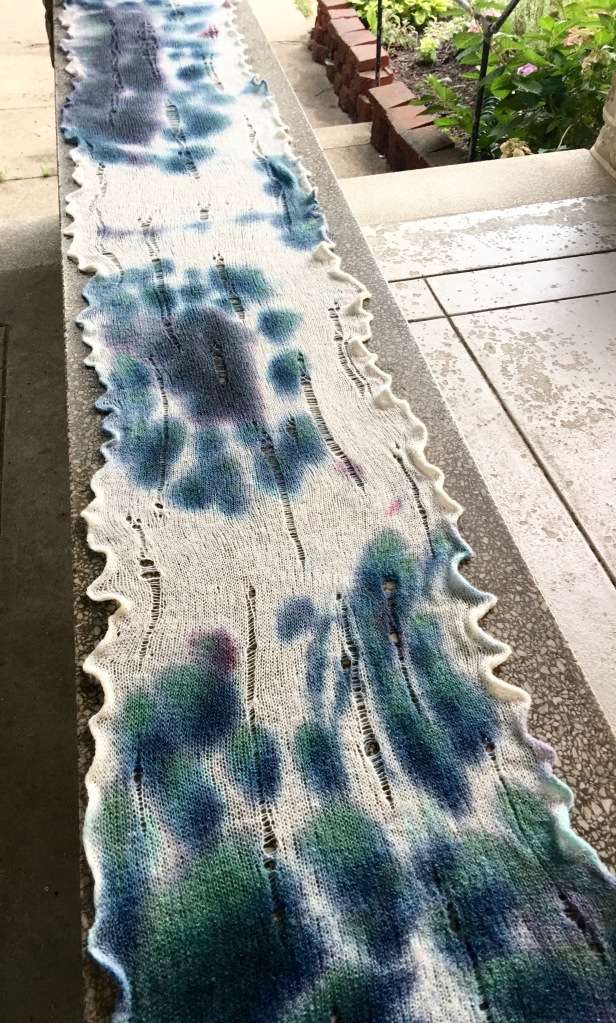
After leaving the scarf in its wrapping to cool to room temperature, I unwrapped it and was pleased to see that I had achieved my technical goals: the dye had set completely and was fully absorbed in the fabric, and the fabric remained unfelted, its loose, gossamer consistency unaffected by the wetness of the dye and the heat of the microwave. Regardless of the look of the final product, the piece had met my main goal. I ran warm water over the entire length of the scarf, squirted dish washing liquid over it, and began rubbing the detergent into the fabric, and rinsed it in cool water. I pulled on the edges to make the edges a bit ruffly while preventing them from rolling in so much that they turned the scarf into a felted tube. I stopped felting when the scarf was about two-thirds of its original length. The fibers had joined together but the fabric was still light and airy and the holes and ladders were open enough to be visible. At that point I laid the dyed and felted fabric out onto the parapet of my front porch to dry.
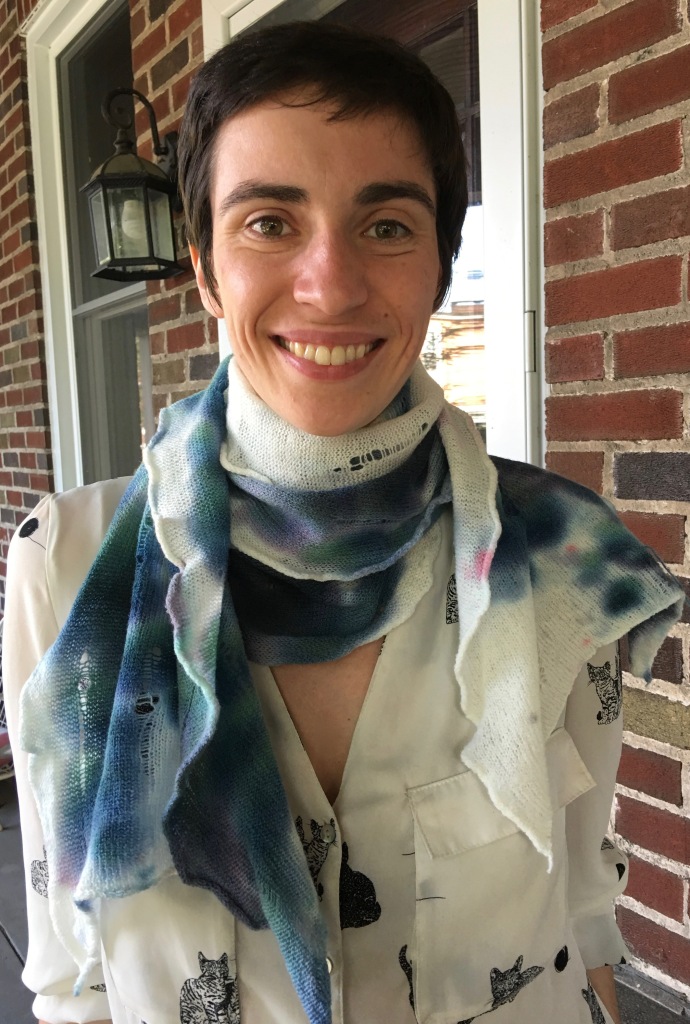
When the fabric dried, it draped in flattering ways around female necks with a weightless coziness. This particular yarn, Yeoman Yarn’s 1-ply merino felting yarn, is perfect for the purpose I have assigned to it. The yarn is probably the reason why the scarf works as a wearable object. I just bought another two cones of it.
The colors required me to adjust my attitude a bit, because generally I don’t like white with colors, as I’ve discussed in detail here. However, the colors, including the white, are easy to wear and are compatible with a lot of colors in my daughter’s wardrobe. I’m giving the scarf to her.


I have the transcript of my follow-up conversation with the Fiber Goddess.
Fiber Goddess: I let you have what you wanted. Are you grateful?
Me: Um… of course, Fiber Goddess. I am your devoted worshipper.
Fiber Goddess: You sound ambivalent.
Me: The colors separated and got blurry and watery. It has kind of a Monet lily pad painting look. Not bad, but it’s… tame. I did everything I could think of to destroy my fabric and then Jackson-Pollack’ed my dye all over it, and ended up with.. tame! How did that happen?
Fiber Goddess: Figure it out for yourself, sweetie. I can’t do everything for you.
I went back to the wise ones on my Ravelry group and asked for a post mortem. They affirmed that the scarf had a delicate, watery effect that was pleasing, but it was indeed tame. My own criticism is that the holes and laddering don’t have much of a relationship to the dyeing: they exist as separate aesthetic entities and don’t enhance or inform each other. I want my design elements to communicate with each other, and I don’t see that happening in this piece, which is a design flaw, although the scarf is effective as a wearable accessory. The consensus from my advisors was that I had gotten the soft-focus effect from my dyeing because the fabric was so wet when I dripped the dye onto it from the squeeze bottle. They gave me suggestions about how to get dye to set in my fabric when the wool isn’t wet so that the dye doesn’t run and bleed and stays more localized. After I soak my feltable fabric in citric acid prior to dyeing, I could squeeze out more of the liquid, although I would worry that the squeezing would felt the wool. Or– and I’ll probably do this– don’t wet the scarf before dyeing and mix the citric acid in with the dye mixture and apply it to the dry fabric. Because this isn’t going to be the last time I machine-knit a scarf with holes and ladders, dye it, and felt it. There’s a lot I can do with this idea, and I’m going to run with it.

If you want the knitting to relate to the dyeing have you considered dying some of the yarn you are knitting? It would be incorporated into the piece here and there and could relate to the dye applied after knitting.
LikeLike
I’m not sure how I would have done that on the knitting machine.
LikeLike
Such a wonderful and talented person you are Abby. Thank you for such a lovely colorful blog.
LikeLike
Thank you, dear Mariam!
LikeLike
I really enjoyed reading of your adventure. I’m wondering if fiber reactive dyes (Dharma Trading Co.) would work for your purposes … simplify the dye-ing process and eliminate felting concerns during that step.
LikeLike
Thank you for the suggestion! I don’t know anything about fiber reactive dyes, but that’s why we have the internet! I happen to have a starter kit of Jacquard dyes, so that’s what I’m using.
LikeLike