
Last summer, my sister and her husband kindly invited my husband and me to their cottage rental in Cape May for a few days. There were so many things to love about sharing the space with my extended family and about the space itself, and I encapsulated the experience in a long series of photographs of Cape May’s famous multicolored Victorian houses, the “painted ladies”. I knew that someday I would turn those colors into something knitted.


As I’ve mentioned before, my enormous stash of Wollmeise lace yarn locks me into an exclusive relationship with that brand and makes me feel that I can’t purchase other kinds of yarn because I already have so much Wollmeise. That logic falls apart somewhere along the way because it doesn’t stop me from purchasing more Wollmeise. Much as I’d like to claim Spock-like logical behavior, that claim wouldn’t hold much water. So for whatever illogical reason, I’m committed to Wollmeise. Although the palette is famously extensive, it has significant gaps in the pastel and muted color range. That was my motivation for getting into natural dyeing.
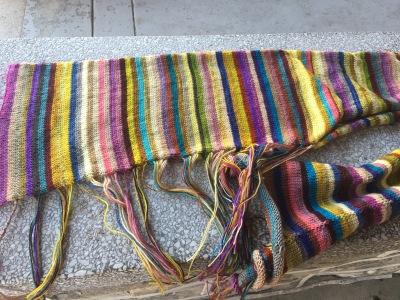
When I finished my first machine-knit project, a multicolored striped scarf for my husband, I liked it so much I wanted to appropriate it for myself, but seeing my husband wear it and look so good in it was even more satisfying than stealing it for my own use. Now I had the skills to make another mega-multi-striped scarf without all the drama of the first one, and I had a range of natural colors to combine with the vibrant Wollmeise colors.
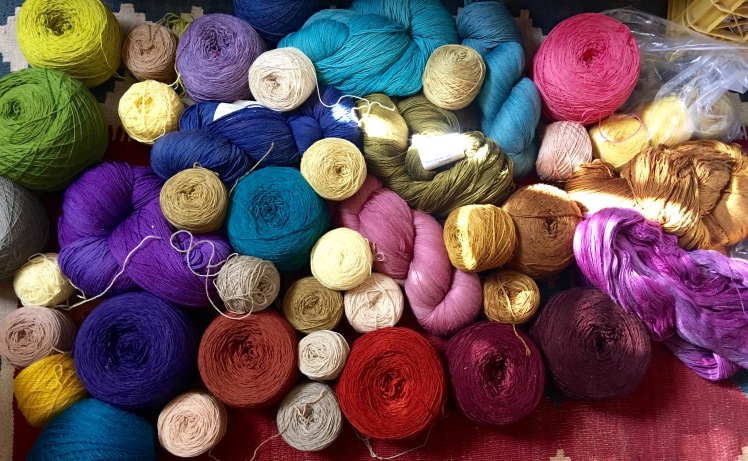
When I knit from real-life inspiration, I make a point of avoiding photographs of the inspiration and attempting to match it while the project is in progress, because I feel that closely emulating something in real life shuts down my ability to make something original. Also I still didn’t have some of the pastel colors of the painted ladies, and I didn’t want to feel constrained by what I didn’t have when I had something like 40-50 different colors between the natural colors and the commercially produced colors. When I first started knitting the scarf, I wasn’t quite satisfied with the direction I was going in. I was clustering a lot of Wollmeise colors together, and they were looking dark and harsh to me. I corrected that by using the dark intensities and bright hues much more sparingly and lightening the effect by surrounding them with clusters of natural colors that were close in hue and intensity, and generally restricting the width of the stripes to about three rows each. I also like to avoid predictability in the arrangement of my stripes, and I was assisted in that design decision by the fact that I couldn’t see the very much of the most recent 8 or so inches of my work while I was knitting it on the machine because the wrong side was facing me, and the work was hanging between the main bed and the ribbing attachment. I could have removed the ribber. I admit that the reason I didn’t was because I was afraid I wouldn’t be able to get the machines back in place properly afterward. I’m sure eventually I would have, but I chose not to mess around with it at that point and to turn working blind into a design feature.
After working so hard on my first scarf to master color changes and to learn to control my tension, the 202 color changes in this scarf were mostly disaster-free. I did slip up a couple of times, resulting in the work falling off the machine, but that gave me an opportunity to see how my colors were working. I know there are more efficient ways to rehang fallen work than the way I was doing it, but they were beyond my current skill level, so I just put the work onto a hand knitting needle, repaired the dropped stitches from the hand knitting needle, and used the three-headed transfer tool to replace the stitches back onto the machine. Over the course of two weeks, I was able to do about 100 rows per machine knitting session out of a total of 660 rows, which was a huge increase in productivity over my first project.

Another reason for the narrow stripes was that I wanted to have a lot of ends that I could turn into a fringe at the seam side of the scarf. I pulled the ends to the outside as I blanket-stitched the seams, and when the seaming was complete, I enjoyed the brainless pleasure of braiding three pairs of ends together, one after the other, 68 times, to be exact. It was like a little girl’s slumber party!
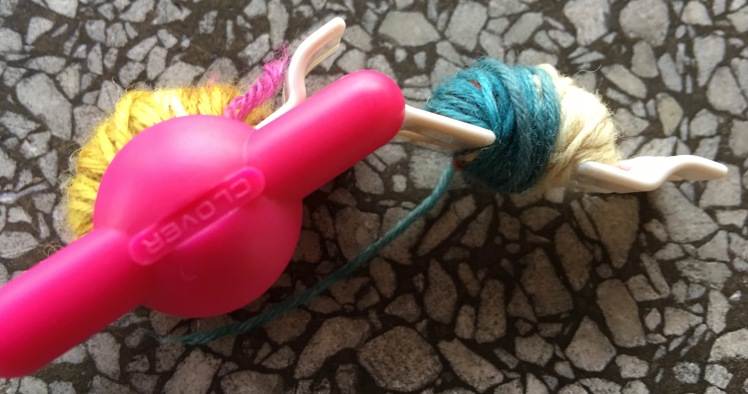
I saved the best for last: the pompoms. I’ve been fascinated by the amazing things that Japanese crafters have done to elevate the humble pompom to an art form, stuffing abstract and representational forms into a little ball of wool using two doughnut-shaped pieces of cardboard, a couple of clamps, some yarn, and a lot of skill and ingenuity. That was a bit ambitious for me at this point. What I wanted was very small, tightly-trimmed, multi-colored balls to adorn the short edges of my scarf as a way to tie the colors together. I got a package of Clover pompom makers in the smallest size and experimented with wrapping various colors of yarn in different ways that might produce dots, stripes, and wavy lines. It was fun to cut them open and see two-dimensional wraps blossom into three-dimensional balls. At this stage, I don’t aspire to the precision and complexity that the Japanese pompom makers attain and am satisfied with the random dots and dashes of color I got in my pompoms. The most important thing I did to make pompoms that met my low expectations was to use dental floss to tie the halves of my pompoms together tight enough to avoid a visible equatorial seam and to hold the pieces of yarn together securely. Here are some progress photos showing the construction of one of my pompoms:


The finished scarf is a reminder in wintertime of a beautiful place in summer.


Excellent – I love your colors – and the pompoms – I never saw such pompoms. What a wonderful piece of work! Thank you so much for taking the time to show us.
LikeLike
Thanks for the kind comment, Jean!
LikeLike
Wonderful! Love the pompoms!
LikeLike
Thank you!
LikeLike
Abby – I am so impressed by the way you discover the inspiration and then take it and translate it into a work of art and then on top of all that translate that into words documenting the whole experience and sharing it with others. Thank you so much!
LikeLike
Thank you for the kind words!
LikeLike